Why Does My Violin E String Whistle? And How Do I Stop It?

Violin E strings are notorious for whistling occasionally. This whistling is common and can be extremely frustrating. But why do E strings whistle like that?

Normally, the bow causes the strings to vibrate side to side, but when the string vibrates abnormally in a torsional or twisting motion, you get an E string whistle. This whistle only occurs on the E string because E strings on the violin are normally unwound. Wound strings, like your G, D, and A strings are not as susceptible to this abnormal twisting motion of the string.

How can I stop my E string from whistling?

Anything that detracts from a clean start can cause the violin E string to whistle. Dirty bow hair or too much or too little rosin can contribute to the whistle.

However, I’ve noticed that the most common culprit is slurring and bow speed. You might notice the E string whistles more when slurring from the A string. This is often because the bow speed is too fast for the E string, resulting in a sloppy start to the vibrations, causing the twisting motion of the string.

Here are my recommendations for stopping your E string from whistling.

  • Wipe off excess rosin off of the E string

  • Slow the bow speed as you change over to the E string.

  • Add more weight in the bow as you change to the E string (I imagine something pulling my right elbow down to help me add more weight).

  • Play closer to the bridge with more weight to get a cleaner start.

  • Change the bowing so you avoid slurs over to the open E string.

  • Change the fingering so you avoid playing the open E string.

  • Some strings tend to whistle more than others. You may also try changing your E string.

Happy Practicing!

How Tight Do You Tighten A Violin Bow?: The Ultimate Guide to Tightening and Loosening Your Violin Bow

When you first receive your violin bow, the hair will probably be touching the stick. You have to tighten the violin bow which forces the hair to stretch and move away from the stick in order to play. But a common question when it comes to learning how to tighten the violin bow is “how MUCH do I tighten the violin bow?”

Well, it depends.

When you are just beginning, you can learn to tighten the violin bow by sight. But as you become more comfortable playing, you will learn to tighten the violin bow based on feel.

When you are finished playing, you will want to loosen the hair on your violin bow to release the tension.

But first let’s talk about the mechanics of tightening and loosening a violin bow.

How to Tighten a Violin Bow

Hold the violin bow horizontally in front of you with the frog to the right. You’ll notice a silver screw at the very end of the frog. Turn the screw away from you and watch the middle of the bow. You’ll begin to see the bow hair moving away from the stick.

Also notice the frog. Do you see how the frog moves as well when tightening the violin bow? The more you tighten, the more space is created between the tip of the frog and the leather grip. This is the place where your thumb goes so if you find there’s not enough space for your thumb, tighten the bow a little more.

Notice how Tightening the bow changes the space between the frog and the leather grip

the looser the bow, the less space between the frog and the leather grip

The Rule for Tightening the Violin Bow

Eventually, you will tighten the bow based on sight and feel, but if you are a beginner here is a rule for tightening your violin bow by sight.

Notice the stick of the violin bow is curved with the stick dipping down towards the middle slightly.

To tell how much to tighten your bow, turn the screw until you can fit your pinky in between the violin stick and the hair at the middle of the bow.

Watch the middle of the bow as you tighten and continue turning the screw until you could fit your pinky in between the stick and the hair in the middle of the bow. You have to look at the middle of the bow because if you look at the ends, you will see the hair is further away from the stick. Use the middle as your gauge.

Now, the “pinky” rule is a good place to start. However, I notice that most people don’t tighten the bow enough when using this rule. So tighten the violin bow so that your pinky with a little bit of space on either side can fit in between the stick and the hair.

Tighten the bow until you can fit your pinky in between the hair and the stick in the middle of the bow

What Happens if You Tighten a Violin Bow Too Much?

Can you over tighten a violin bow? Yes! Over tightening a bow can damage the bow. When you over tighten the bow, the stick will be very straight without any of that natural curve. All that extra tension can warp or break the stick. You’ll also over stretch your hair which means you will have to continue over tightening your bow just to get to a “normal” tightness because the hair is too loose. You’ll have to get the bow rehaired sooner rather than later.

Over tightening the bow also makes it harder to play. The bow is too stiff when the hair is too tight resulting in unwanted bounces and scratches. The bow will be harder to control when the hair is too tight.

Can You Play if Your Violin Bow Hair is Too Loose?

When people learn that over tightening the violin bow can damage that expensive wooden stick, they tend to under tighten the bow.

While under tightening the bow will not damage it, it will make it harder to play. When the violin bow is too loose there is no resistance. You need a little give in the hair to be able to apply and release weight to get a good tone.

Just like Goldilocks, it’s all about getting it just right and that comes down to learning to tighten the violin bow based on feel.

How to Tighten the Violin Bow by Feel

Eventually, you will be able to feel if your violin bow is too tight or too loose as you play violin. The best way to learn to do this is to experiment. Try barely tightening your violin bow and then play something. You’ll notice there is no resistance or “give” in the violin bow. You can’t apply any weight into the string.

Now try slightly over tightening the violin bow (don’t worry, this will just be for a second). Play something now. Notice how the violin bow is too stiff and also looses some of its resistance and give. The bow is probably so stiff when it is overtightened that it is much easier to bounce the bow and get unwanted bounces.

Loosen the bow until you feel the correct amount of resistance.

How Much Do I Loosen the Violin Bow

When you are finished playing, you will want to loosen the hair on the violin bow. This will your hair to last longer and reduce the tension on the stick. But how much do you loosen the violin bow?

Most people tend to loosen the bow too much when they are finished playing. Simply loosen the screw until the hair is just touching the stick. That’s it! You can put your violin bow to bed now!

The correct amount to tighten the violin bow

The Correct amount to loosen the Violin Bow

Do I have to loosen the bow every time I finish playing?

If you’re just taking a short break, it’s fine to leave the violin bow hair tight. If you’re taking a longer break or if you are done for the day, it’s best to go ahead and loosen the bow hair.

What happens if you loosen the bow too much?

The hair will get very loose and floppy and eventually you will unscrew the screw completely. Don’t worry! You didn’t break your violin bow. Simply reinsert the screw and tighten it again. You may notice when you loosen your violin bow too much, the screw detaches and the frog detaches as well. Again, you didn’t break your bow. Reinsert the frog into the hole where it was attached, reinsert the screw and tighten.

if you loosen the bow too much, the screw may come out

and the frog may detach! don’t worry, reinsert the frog and the screw, retighten, and you’re good to go!

I forgot to loosen my bow hair! Is it okay?

That moment when you realize you forgot to loosen your bow hair last night

You close up your violin case and completely forget to loosen the bow hair. When you open up your case the next day, to your horror you see the violin bow is already tight! EEK! Is the bow damaged? Did you ruin that expensive stick?

Don’t worry, this happens to all of us at some time (sometimes multiple times…) Repeatedly forgetting to loosen the bow hair will not necessarily damage the bow, but you will have to rehair the bow sooner as the hair is getting stretched out more and more.

Can I replace the hair on my violin bow?

Yes, you can and you should! The bow hair wears out eventually and looses its “grippiness.” No matter how much rosin you apply, the bow will feel like it’s slipping across the strings. Simply take your bow to a local string shop or luthier and have them rehair the bow. This will cost anywhere from around $70 and up depending on your location.

You should rehair your bow at least once a year. Rehair your bow every 3-4 months if you play more regularly (2 hours a day and up).

Does weather and humidity affect violin bow hair?

Absolutely. Humid weather will make the violin bow hair stretch and lengthen, making it harder to get the correct amount of tension. You will tighten and tighten and tighten the screw and eventually the hair will have the correct amount of tension. The danger occurs if the humidity changes and turns drier, then the hair will constrict and your violin bow will be too tight.

This is particularly a problem when playing outside or going in between playing outside and inside. Keep an eye on the humidity and try to keep the humidity around 40%-60%.

Why won’t my violin bow tighten?

Hight humidity can make it harder to tighten the bow. If the bow hair is old, or if the bow hair has been overstretched, it will be hard to tighten the bow. Getting a bow rehair will fix this problem.

Sometimes there may be an issue with the screw. Cheap violins that come with cheap bows can often be difficult if not impossible to tighten due to the inferiority of the parts. If you’re playing a a very cheap bow (Under $50) and you’re violin bow won’t tighten, you may need to upgrade to a better bow.

I hope this helps you with all your questions when it comes to tightening and loosening the violin bow. If I didn’t cover something, let me know in the comments below.

Happy Practicing!

Down Bow, Up Bow, Slurs, or Separate? Choosing Good Violin Bowings

How do you know when to use a down bow or an up bow? What’s the difference between down bows and up bows? How do you add in bowings when none are written? How do you change bowings when they are written? Are there any rules for choosing good violin bowings?

These are all very common questions about violin bowing that don't get enough attention. Let’s dive into the world of violin bowings!

Down Bows or Up Bows: How to Choose the Correct Bowing Direction

First let’s talk about up bows and down bows. Down bows are when the bow moves from the frog towards the tip. Up bows are when they bow moves from the tip towards the frog. Down bows and up bows are notated by two different symbols.


In general (and this is very general), use down bows for strong beats or down beats and up bows for off beats or weak beats. If you have a single pickup note, it’s usually an up bow. Some passages might feel awkward starting on a down bow, or they might feel awkward starting on an up bow, sometimes it doesn't really matter.

To understand if you should use a down bow or an up bow, try experimenting with both and see what makes sense. You can also try starting in different parts of the bow. This can greatly affect how comfortable and natural the bowing feels.


Down Bows vs. Up Bows: General Rules for Violin Bowings

Most “rules” in music can be broken! But here are some general rules for choosing between down bows and up bows on the violin.

Use down bows for:

  • Strong beats or down beats

  • Forte or loud sections

  • Accents

  • When you need to travel to the upper half of the bow

  • Decrescendos

  • Long, slow bows (especially when they have a decrescendo at the end)

  • The last note of a phrase or song (especially when the last note ends with a decrescendo)

Use up bows for

  • Weak beats or pick up notes

  • Piano or softer sections

  • When you need to travel to the frog

  • When approaching a note that needs to be played “off” the string

  • Crescendos

  • The last note of a song when you want to end with a flourish, a crescendo, or come off the string.


Slurs and Separate Notes

A slur is when we connect multiple notes into one bow. This bowing is notated by a curved line connecting all of the notes in the slur.

Separate notes, or notes that are not connected by slurs are notated different ways. Most often, notes that are separate don’t have any indication other than the absence of a slur. Sometimes separate notes have individual down bows and up bows over each note. Other times you will notice dots or dashes over the notes to indicate articulation and to show that each note is distinct or separate and not slurred together. Playing each note on a different bow is sometimes often referred to as a detaché bow stroke.


How to Choose Good Violin Bowings

Choosing good violin bowings depends on several factors. I would break down my bowing strategy into five groups: ability/ease of playing, sound, tempo, style, and necessity. Let’s talk about each violin bowing strategy!

Ability: How the Level of Your Playing Affects What Bowings You Choose

Sometimes I’ll see a printed bowing and think, “there's no way I can play that bowing!” Or at least, I’m not ready to do it yet!

So I change the bowing to make it easier for my playing ability. For instance, if I’m learning a piece and the printed bowing wants me to slur eight notes in one bow, I might split that up until the tempo is faster and I’m ready to tackle all of those notes in one bow. If I’m dealing with big string crossings, I usually avoid a slur because it’s harder to make it sound good. It’s fine to change bowings to make it easier on yourself. Although you also want to challenge yourself to be able to play more difficult bowing combinations sometimes as well!

Slurring two notes will be easier than slurring four notes at slower tempos.

Easier

Harder


Sounds: Choosing Violin Bowings Based on the Sound You Want to Portray

This is where slurred bows or separate bows come in to play. If I want a smoother sound, I’ll slur the notes together. How much do I slur? Do I slur two notes, three notes, four notes? It depends on the tempo and how much bow I want to use, and what I can comfortably fit into one bow. Separate bowings have their place too and often add to a variety in sound. If EVERYTHING is slurred together in various combinations of slurs, playing detaché or using separate bows can make something stand out (in a good way or a bad way!) It depends on the sound you’re aiming for.


Tempo: Speed Affects What Violin Bowings You Should Use

This is a big one that I don’t think we think about enough. Tempo plays a big factor when determine what bowing you should choose.

The slower something is, the harder the slurs and long bows will be to play on the violin. It’s much easier to slur eight sixteenth notes in a fast tempo than eight quarter notes in a slow tempo. This is also one reason why the bowings might change from your initial “learning” tempo, to your actual performance-ready tempo.

Style and Musicality: Choosing Violin Bowings for Different Musical Styles

When it comes to musicality, more advanced bow strokes come in to play like hooked bowings, louré bowings, “off” the string strokes like spiccato and staccato, or even bow lifts. As you get a feel for different styles of playing (Baroque, Classical, Romantic, Fiddle) you’ll get an idea for what bow strokes would work best in certain areas. When it comes to musicality, if you have an important, long, accented note you would probably want to start it on a down bow at the frog. If you want to start something very softly, you would start at the tip on an up bow.


Necessity: Choosing Violin Bowings Often Depends on What Needs to Happen

A lot of decisions fall into this category. You might change a bowing somewhere just to make a bowing further down the line work out. Sometimes certain bow strokes or bowings are used for musicality, but sometimes they’re more for bow planning. For instance, if there was a certain note you really wanted to start at the frog, you might slur the previous notes into one long up bow to get you where you need to be. Use the bow as a tool to help you!


When You Can’t Change the Bowings

As a violin teacher, I always encourage my students to make their own decisions when it comes to choosing bowings. If there is a bowing you don’t like, as long as you are consciously changing it and have a good reason, that’s fine with me!

However, there are certain times when changing a bowing to fit your own needs is a no-no. And that’s orchestra time! Everyone needs to bow in the same direction in orchestra. So if you’re part of an orchestra, coming up with your own violin bowings probably isn’t the best idea unless you are the concertmaster or principal second! However, if you do have suggestions for bowings, ask your section leader or conductor.

The Takeaway When it Comes to Choosing Violin Bowings

So as you can see, when it comes to deciding on violin bowings the main thing to remember is…it depends. Choosing good violin bowings depends on your ability, the tempo, style characteristics, and your own personal decisions of musicality and phrasing. Most of all, deciding what bowing to choose comes down to trial and error. And this is where experimenting comes in handy. And you know what I think about experimenting!

Happy Practicing!

P.S. The bow is your most useful tool for creating musicality, expression, and phrasing. Do you want to learn more about how to control the bow, relax while playing, and develop a better sound? The Secret to Better Bow Control is just one of the courses you get access to when you become a Meadowlarker and sign up for my online studio! Learn more here.

Master the Basics: Easy Violin Scales and Arpeggios for Beginners

Hello, fellow violin enthusiasts! I'm Lora from Meadowlark Violin, and today I'm excited to share with you the secrets of mastering three super easy scales and arpeggios tailored for beginners. Scales are the backbone of every violinist's practice routine, serving as the essential building blocks for honing your technique. Whether you've just started playing or have a few weeks or months of playing under your belt, these scales and arpeggios will set you on the right track.

I’ll be teaching you all of these scales by ear, no sheet music required! Learning scales and songs by ear is great for intonation, even if you already read music.

The Magic of Finger Patterns

What makes these scales super easy, you ask? Well, they all share the same finger pattern. That means learning one pattern opens the door to playing three different scales. Understanding finger patterns can simplify the learning process, and repetitive finger patterns don’t just stop with easy scales. As you progress on the violin, you’ll notice advanced scales spanning several octaves can share the exact same finger pattern as another scale in a completely different key. (Learn more about universal scales and violin finger patterns here.)

Dive into D Major

Let's kick off our exploration with the D major scale. With two sharps (F# and C#), we delve into the world of half step pairs. Half steps occur where two fingers are touching on the violin.(Learn more about half step pairs and how scales work here.) F# and G, and C# and D, form our two half step pairs for D major. As we start on the open D string, I'll guide you through the notes, creating a musical journey akin to the first two notes of "Happy Birthday."

On the D string, play the open D string followed by the first finger, second, and third finger. All of the notes will be a whole step apart except for the second and third fingers. These notes are F# and G and that’s one of our half step pairs, so those fingers will be touching. Repeat that exact pattern on the A string for a complete D major scale.

Transition to A Major

Next on our musical adventure is the A major scale. With three sharps (F#, C#, and G#), we adjust our half step pairs. Our new half step pairs are between G# and A, and C# and D. The finger pattern remains consistent, allowing a smooth transition from D major. Simply play the exact same finger pattern, but on the A and E strings. Tada! An A major scale.

Venture into G Major

Our final destination is the G major scale. Utilizing the same finger pattern, we seamlessly navigate between the G and D strings. The magic lies in the continuity of patterns – one pattern, three scales. The consistent approach makes G major as accessible as the previous ones, empowering you to expand your repertoire. Can you determine what the half step pairs are for G major based on the finger patterns? The half step pairs are B and C and F# and G.

Arpeggios Unveiled

Now that we've mastered the scales, it's time to delve into arpeggios – a sequence of individual notes forming a chord. Let’s start with the D major arpeggio, which consists of the notes D F# and A. On the D string, play the open D followed by the second finger. Then move over to the A string. Play the open A followed by the third finger. That’s a basic arpeggio pattern! The same pattern is applied to A major and G major arpeggios, simply start on the A string for an A arpeggio and start on the G string for a G arpeggio.

Conclusion: Embrace the Patterns

In conclusion, mastering the basics of violin scales and arpeggios is akin to unlocking a musical treasure chest. By discerning and embracing these patterns, you pave the way for easier and more enjoyable learning experiences. Remember, the violin might seem intricate, but patterns are your allies.

10 Tips for Better Violin Intonation

How do you play in tune on an instrument with no frets or markings? If you feel like you are never in tune on the violin, here’s 10 reasons why you might be struggling with bad violin intonation and how to play more in tune!

There’s a lot that goes into playing in tune on the violin. If you feel a little bit overwhelmed at all the reasons that might be affecting your violin intonation, make sure you stay to the end because I’ll give you one practice technique that will help you solve all of these problems.

#1 Using finger tapes or finger decals

Wait, what? Aren’t these supposed to help you play in tune? Not really, in fact it will contribute to bad intonation in the long run. Think about it, playing in tune on the violin is an auditory skill. Finger tapes are visual cues. How can a visual cue help you with an auditory skill? Finger tapes might help when you’re just starting off, but they will also force you to rely on your eyes and you’ll never build those ear training skills that you need to play really in tune on the violin.

(Watch the Pros and Cons of Using Finger Stickers on Your Violin)

So work on developing your aural skills instead of your visual skills and your intonation will improve.

#2 Incorrect left hand technique

If you’ve got a crooked wrist or maybe your thumb is pulled far back, it’s going to make it harder if not impossible for you to consistently play in tune. Crooked wrists and other left hand problems can introduce tension, which make playing in tune very difficult. Incorrect left hand technique can also force you to play with flat fingers. And flat fingers is the next reason you may struggle to play in tune.

#3 Flat fingers

Your left hand fingers need to be curved like little arches or boxes. This allows you to hit the string with accuracy. If your fingers are flat or sloping you won’t be able to be as accurate with your pitch, resulting in inconsistent or bad intonation.

#4 Not leaving fingers down

My rule is that if you put a finger down you should leave it down until you absolutely have to move it. Let’s say you play first finger and then you play 3rd finger. Are you leaving the first finger down? Or is it flying off the fingerboard when you aren’t using it?

Leaving fingers down gives you anchor points and helps you compare other notes.Those anchor points will help you build muscle memory in your left hand which is essential to playing in tune.

#5 Using tuners

If you’re relying on a flashing green screen to tell you if you’re in tune on the violin, once again you’re relying on a visual indication for an auditory skill. It might help in the short term, but it’s going to hurt your progress in the long-run because you’re not developing those vital auditory skills that you need to help you play in tune.

Instead of using tuners, use music play back programs or music writing software like MuseScore, or or get a piano or piano app, play the notes you’re having trouble with on the piano. That way you know what the note should sound like and you can match that pitch on your violin.

#6 Not practicing ear training

You need to train your ear to hear intonation problems the same way you train your eyes to read music or train your right hand to hold the bow. Unfortunately ear training is a topic we don’t talk about enough in the violin teaching world. EarMaster is a great ear training tool. I also have a complete course on ear training for violinists in my online studio. Ear training is a topic I cover a lot in my studio and show you lots of ways you can develop your ear for better violin intonation.

#7 Thinking of intonation as a one note problem

Intonation is not a one note problem. It’s a two note problem. With the exception of the first note of a song, every note follows another note. No note exists in a vacuum. You have to think about what note comes before the out of tune note. Practice those 2 notes, think about how you get to the out of tune note, how you stretch for it, or how you prepare for it.

For instance if you have a big stretch to a 4th finger and then a low 2 after the 4th finger, that big stretch to the 4th finger is going to affect the low 2nd finger. You’re going to have to stretch back for the low 2 to get it in tune. Thinking of any violin intonation problem in terms of two notes will help you play more in tune.

#8 Tension

Tension is a big reason for bad intonation on the violin.

First of all I want you to remember this rule: there is no such thing as perfect intonation. There is the illusion of perfect intonation.

As you progress on the violin, ideally your ear is progressing as well. Your ear begins to identify when a note is out of tune and your ear will tell you how how that note is out of tune: too sharp or too flat. Your left hand finger quickly adjusts to match what your ear is telling you the note should sound like. Ideally this whole process happens quick enough that your listeners have no idea that you originally played the note out of tune.

The point here is that your fingers need to be able to adjust and move with lightening quick speed and if you are tense or have a death grip on the violin, your fingers will never be able to move quick enough to play in tune.

(Watch How to Get Rid of the Death Grip)

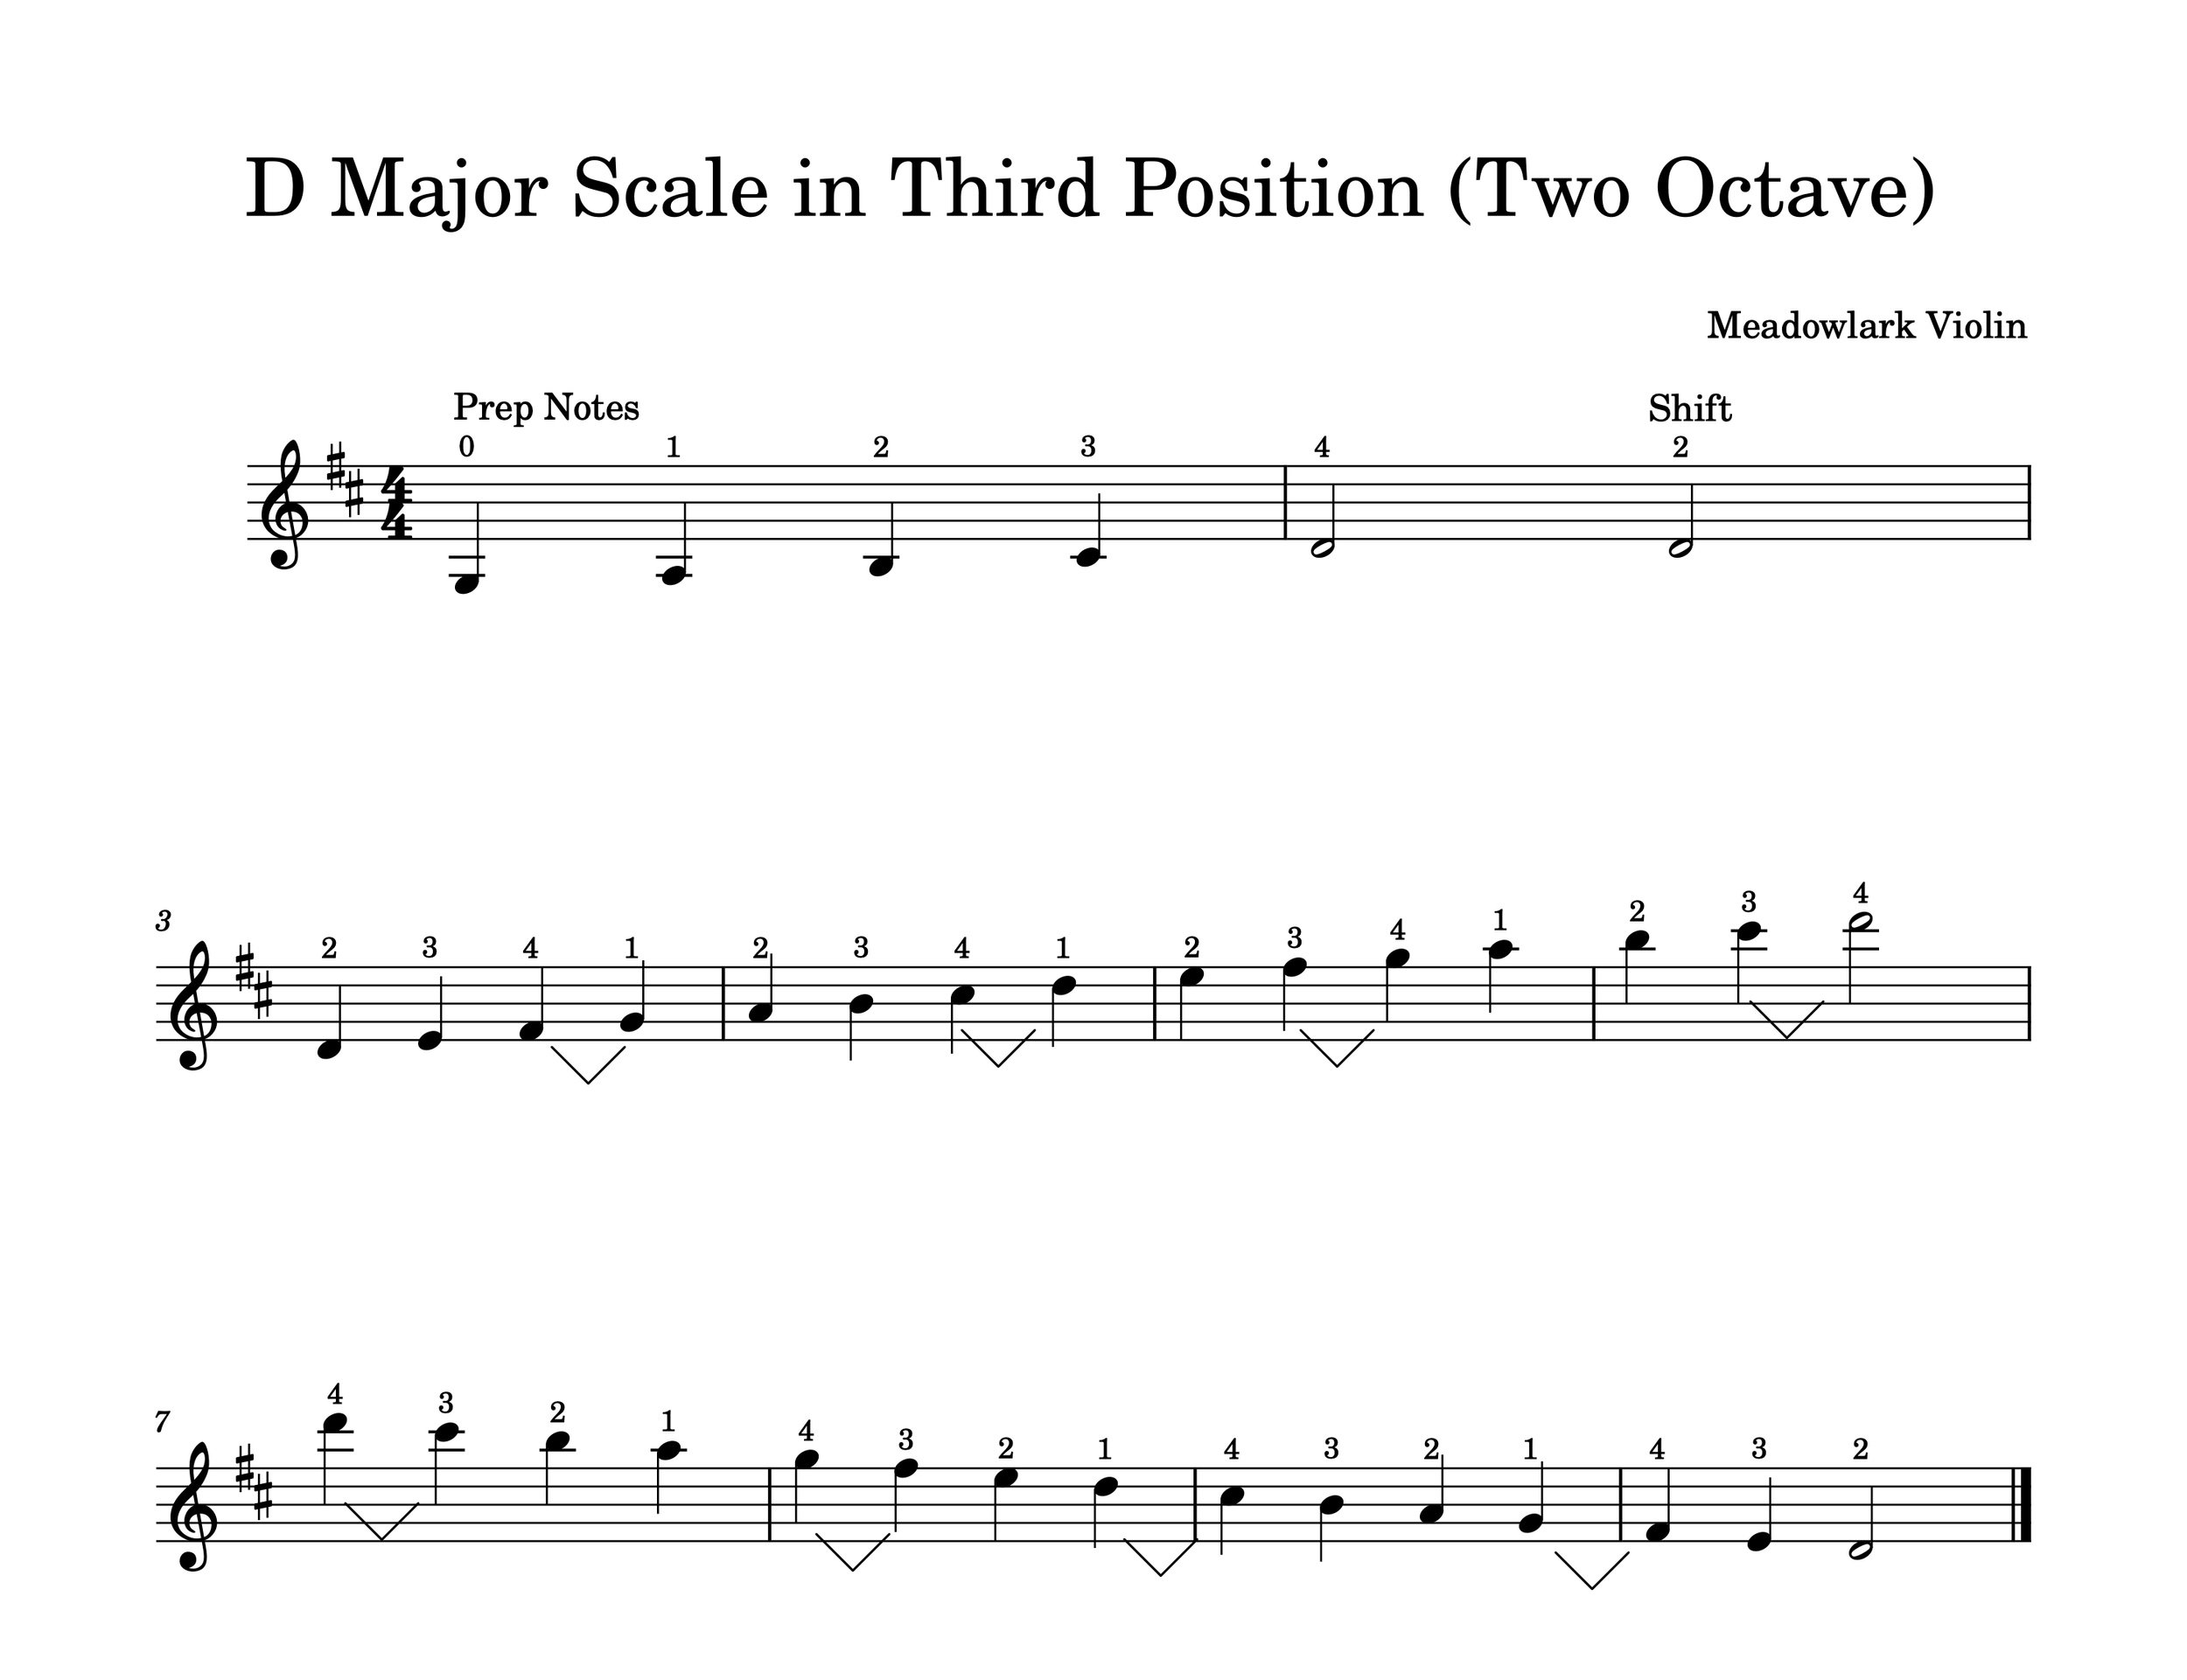
#9 Not preparing the fingers

When you’re playing one note, you need to be thinking about the next note and your finger needs to be preparing for that next note. For instance, if I’m playing 1st finger and my next note is a 4th finger, while I”m playing the 1st finger, I need to be stretching up with my pinky, maybe moving my thumb up, and hearing in my head what that next note needs to sound like. If you’re not thinking ahead, every note will catch you off guard and you’ll always be playing catch-up.

If you’re thinking, that’s a lot to think about, you’re right. If you’re also thinking there’s no way I could ever think about all of those things while I’m playing violin, you’re wrong. That brings me to my last reason you may be struggling with intonation.

#10 You’re not practicing slow enough

You need to dedicate time for every scale, song, and passage and play it unbelievably slow. Like, unbelievably slow.

When I play that slowly, I actually have the time to think about all of the those things I talked about. I have time to prepare the note, I have time to force my hand to relax, I have time to think about intonation in terms of two notes, I have time to curve my fingers, I have time to think about leaving fingers down, and I have time to understand what my left hand is actually doing.

Playing unbelievably slow is one of the best tools we have as violinists, but unfortunately it’s one of the tools we use the least.

So take some time to play unbelievably slow every day and I think you will hear a major improvement in your violin intonation!

Easy Violin Harmonics Explained!

Harmonics on the violin often seem over-complicated and confusing, but harmonics on the violin are actually some of the easiest notes to play on the violin! Not only are they easy to play, they’re easy to recognize in music. After you go through this easy guide to violin harmonics I think you will find these special notes on the violin not only easy, but fun to play!

Here’s some common questions about violin harmonics that we’ll cover in this easy guide to harmonics. (Skip ahead if you like).

What are violin harmonics?

How to play violin harmonics?

What are the different types of harmonics?

What’s the difference between natural and artificial harmonics on the violin?

How are harmonics notated?

What are the most common harmonics on the violin?

How are artificial harmonics notated?

What’s the most confusing way to notate harmonics that I’ll probably never see in violin music? (I’m glad you asked. I’ve got an answer for you)

What Are Violin Harmonics?

The definition of a harmonic is: a wave whose frequency is multiple of the frequency of the same reference wave.

Got it? Okay, good. Moving on.

Just kidding. You don’t need to know anything about waves, overtones, nodes, frequencies, etc to understand violin harmonics.

What is my definition of a harmonic? A note that is played by lightly touching the finger to a particular place on the violin string, which produces a whistling sound.

When you are playing a harmonic, you are touching the string so lightly that you are actually allowing both parts of the string to vibrate (the parts of the string to the left and right of your finger). Think about it. When you put a finger down on the violin fingerboard normally, you’re allowing the string in between the finger and the bridge to vibrate, but the part of the string in between your finger and the nut of the violin doesn’t vibrate.

Allowing both sides of the string to vibrate is one of the things that gives a harmonic its characteristic whistling sound.

How to Play Harmonics on the Violin

Look at your string from the nut (the grooved part at the bottom of the peg box where the strings are touching) to the bridge. Do you see that distance between the nut and the bridge? On a full size violin that’s about 13 inches. You can either measure or just eyeball it, but lightly touch your finger to the string at the mid-point of the string. I do this with my fourth finger but you can do it with any finger. Move your finger around until the harmonic speaks.

Tada! You’ve found the most common harmonic on the violin. The harmonic will occur on the same place on every single string.

What you are playing is a natural harmonic on the violin. It occurs when you divide the string in half. That ration of 2:1 is the simplest ratio you can get, so the harmonic produced there is going to be really easy to play.

There are other natural harmonics on the violin. For instance, if you divide your string length into thirds, you’ll find there’s a natural harmonic right where your 3rd finger would go in first position. (Ever wonder why that finger is a “ring tone” on your violin that really rings when it’s in tune? Now you know).

There’s also a natural harmonic where the fourth finger goes in first position. Just try lightly touching the string and scoot your finger all the way up the fingerboard. You’ll hear lots of natural harmonics. The ones that sound clearly are more simpler ratios. The harmonics that don’t speak so easily are more complicated ratios like 7:1.

What Are the Different Types of Harmonics on the Violin

There’s only two types of harmonics on the violin: natural harmonics (what you just played) and artificial harmonics.

What's the Difference Between Natural and Artificial Harmonics?

Natural harmonics occur when you lightly place your finger on the string. On a full size violin the length of the string from the nut to the bridge is about 13 inches. So you’ll find natural harmonics at certain places, like 6.5 inches up from the nut (the exact middle of the string) Or 4.3 inches up from the nut (the string divided into thirds).

Well those same ratios exist even when playing on a different length of string.

Let’s say we put our first finger down firmly on the first finger in first position. Guess what?! You’ve changed the string length! You’re no longer dealing with a 13 inch string. You’re dealing with something more like a 12 inch string. That means those harmonics that occur when you divide the string in 2 or divide by 3 are going to occur at different places.

So if you keep your first finger down and lightly touch the 4th finger with your pinky, you’re essentially dividing that string into thirds. That’s an artificial harmonic!

An artificial harmonic occurs on the violin when you create an artificial “nut” by placing the first finger firmly down on the string and then placing another finger lightly on the same string to divide the string into thirds and play a harmonic.

How Are Harmonics Notated on the Violin?

There are four ways to notate natural harmonics on the violin. The first two are the most common, but you’ll occasionally see the second two.

The most common natural harmonics are usually notated with a 4 and a 0 or circle. You’ll find this notation for that common natural harmonic that occurs right in the middle of the string.

For the other natural harmonics, it’s common to see the note head in an open diamond shape. Sometimes you will also get a number like 3 and a 0 to indicate that note is a harmonic.

Sometimes you will see an open string below a diamond shaped note. The lower string is telling you what string to play this harmonic on. In the example below, you would lightly place your 3rd finger on the “G” note on the D string.

What Are the Most Common Harmonics on the Violin?

These are the most common natural harmonics on the violin. You can play them with third finger in first position, 4th finger in 1st position, or 4th finger in 4th position.


How Are Artificial Harmonics Notated?

Artificial harmonics often look like a double stop (two notes at once). But the bottom note will look like a normal note and the note on top will be diamond shaped. This is telling you to firmly place the bottom note wherever you would normally place it if it were just by itself. Now lightly place your pinky on whatever note the diamond shaped note is indicating (always on the same string).

Sometimes artificial harmonics look like this.

That’s really all you need to know to be able to identify harmonics in music. Sometimes you’ll see the word harm. to indicate the notes are harmonics. Sometimes you’ll see the word flag. which is short for flageolet, another word for harmonics. But that is somewhat rare.

What's the Most Confusing Way to Write Harmonics?

Wait, you mean you’re not confused? You’re disappointed because you thought harmonics would be sooo much more complicated? Alright, alright. Let me try and confuse you with this form of harmonic notation that you’ll rarely see in most violin music.

So what in the world is this trying to tell us? Are these artificial harmonics or natural harmonics? They’re natural harmonics trying to masquerade as some unnatural aberration.

Sorry natural harmonics, you’re just not that confusing.

Okay, stay with me here. The bottom note tells you what open string to play the harmonic on. The diamond shaped note tells you where to lightly place your finger. And the note in parentheses tells you what pitch is actually sounding.

The diamond note is the only important note in my opinion. The other two notes are completely unnecessary. The bottom note is not needed because where else would you play those diamond shaped notes? How about that first one? Do you want to try and play that G on the E string? Hmmm….probably not a good idea. Why don’t you just play it where you would always play that note! On the D string!

What about the second example? Where else are you going to play that low B? Well there’s only one string you can play that harmonic on, the G string, so your options are kind of limited.

How about those top notes in parentheses? Those are the pitches you are actually producing when you play that natural harmonic. The good news about natural harmonics is that if your finger is in the right place, the harmonic is in tune! No need to get out your tuner to see if that natural harmonic on the D string with 3rd finger is actually indicating that high D.

Composers have already done all the hard work to figure out what pitch they want to sound at that particular place in music. So the parenthetical notes are way more information than you need and often left out of most violin music.

I hope you enjoyed this easy guide to violin harmonics! If you would like more music theory, check out my course on Music Theory that covers pretty much every topic imaginable!

Happy Practicing!

~Lora


What is Third Position on the Violin (And Why is it Hard!?)

What is third position on the violin

What is third position on the violin? What do we gain by learning a new position? Why do we learn third position after first position? What are the notes in third position? And most importantly, why is learning third position so hard?

These may be some of your questions as you’re getting ready to learn third position on the violin. I remember learning third position turned my world upside down and I’ve heard similar stories from other professional violinists. For a longtime I watched my own private students struggle with learning third position. Then I finally realized the problem wasn’t with third position, but with the way we teach it!

Traditionally, we teachers plop a third position book up on the music stand and watch our students slog joylessly through reading music in third position. The reason third position is so hard is because students have never been taught to understand and speak the language of the violin.

Let me explain. I took a couple Spanish courses in college. I learned to parrot back a couple phrases. To this day, I sing a little ditty I learned titled, “Me gusta la leche, me gusta cafe.” Now I can say a couple things in Spanish. At one point I might have even convinced a few non-Spanish speakers that I could speak the language. But did I actually known and understand Spanish? NO! All I could do was repeat phrases I had learned. That’s not knowing a language in my opinion. But unfortunately, we violin teachers teach violin in the same way.

We teach you to memorize little things. “Play a high 2nd finger on this string, but not on that string. Just remember when you see this key signature you have to do it that way. Don’t ask why. There’s not enough time to explain.”

So when you get to third position, no wonder it’s so confusing! You’ve never learned the basic rules of the language and when you throw in an advanced concept, your world falls apart.

My method of teaching third position is completely different. I teach you the language of the violin through ear training and music theory so third position makes sense. If you want the real third position experience, check out my course on Mastering Third Position Basics (you’ll get the entire course as part of my Online Membership).

For now, let’s talk through these questions about third position.

What is Third Position on the Violin?

Simply put, if you put your first finger where your second finger normally goes in first position, you’re in Second Position. Now go back to first position. If you put your first finger where your third finger goes, now you’re in third position. The first finger in third position on the G string is on the C note, on the D string first finger is G, A string first finger is D, E string first finger is A.

Every time you change to a higher position, you gain one new note that you didn’t have in the lower position. You also lose a note on the lower end as well.

When Should I Learn Third Position?

You should wait to learn third position until you are pretty comfortable in first position. Once you can play all of the notes in first position with pretty good intonation and muscle memory, you’re probably ready to start learning third position. However, I think it’s very important to experiment during your practicing. Experimenting means not knowing what the outcome will be, so you can’t beat yourself up if the outcome wasn’t what you expected. It’s very important to experiment with the violin during your playing. You’ll discover so much about your violin by just “playing around.” So if you want to experiment playing in third position even if you are fairly new to the violin, I say go for it.

How Do I Get Ready for Third Position?

Well, I’ve got 7 tips for making sure your set-up and violin hold is ready for third position. You can watch the video here.

What are the Notes in Third Position on the Violin?

Here are the notes in third position for each string. You’ll notice you gain a high C and D on the E string. These are notes you didn’t have in first position. But you also lost the low A and the low B on the G string.

Why Do We Learn Third Position Before Second Position?

Certain key signatures fit well with certain position. In first position, you probably learned D, A, or G major first. Trickier keys in first position are B Flat, F Major, E Major, etc. These are tricky because they involve “low 1s” or “high 3s,” notes that don’t fit in that normal finger pattern.

Every position has keys that fit will in that position. Third position tends to favor the same key signatures in first position, and therefore, favors keys that are very popular on the violin. Second position however, favors B flat, F major, etc. So when you’re learning your first higher position on the violin, it’s best to learn one that favors keys you are already very comfortable with.

Another reason we teach third position before second position is because third position can feel more comfortable and stabilizing since your palm will be touching the actual body of the violin (with most hand shapes). In second position, your hand just feels like it’s floating out there in outer space. There’s not a lot of physical cues to help you know where you are.

How Do I Play In Third Position?

To get up to third position on the violin, you need to start in first position. It’s very important to prep third position. Play 0-1-2-3 in first position on any string. Make sure your third finger is very in tune (hint: ring tones!)

Now replace your third finger with your first finger. Or move your hand so your first finger is playing the exact same note you were playing in first position. Ta-da! You’re in third position. Yep, it’s that easy. However, it does take a LOT of practicing and muscle memory and ear training to get that transition really smooth and seamless. Don’t worry, I cover these topics in depth in my Third Position Course.

Scales in Third Position

Before you learn scales in third position, it’s very important to learn the universal scale pattern for the violin. Once you learn this pattern, playing scales in third position will be so much easier. Watch the video below to learn about the universal scale pattern. I think you’ll be surprised how easy it can be to play in higher positions when you aren’t worrying about READING music.

If you are ready for more easy scales in third position, learn more here.

Ready to Master Third Position Basics?

Learning third position shouldn’t be a struggle. Let me show you how easy it can be! Click below to learn more.


Easy Scales in Third Position for the Violin

If you are starting to learn third position then it’s time to start practicing third position scales on the violin. You’ll notice certain key signatures make more sense in certain positions. For instance, with first position scales on the violin, the keys of G, D, and A major make a lot of sense. In second position, the keys of B and F major seem to fit well. With third position scales on the violin, C major, G major, and D major feel very comfortable.

This is one reason why we generally teach third position on the violin after first position. Since first position favors most of the same key signatures, it makes sense to learn third position next.

Now if you’re not familiar with scale theory, learning third position scales might be pretty tricky. Don’t worry, if you need to brush up on how scales work, watch the following video for a quick overview. By the way, every violinist should know the half step patterns in scales. It will make the violin instantly make more sense! I talk about this in depth in my Creative Scales Course for the Experimental Violinist (part of my online studio).

Many people find third position difficult to learn, and I think that’s because they don’t truly understand the language of the violin. And if you don’t understand how to “speak the language” then learning advanced concepts like third position will always be a challenge. My Online Violin Studio has several courses that will help you “speak the language” like a native speaker!

Courses That Will Help You Learn Third Position

Let’s start off with the easiest one octave scales in third position.

Easy One Octave Third Position Violin Scales

C Major Scale in Third Position on the Violin

First off, let’s learn the C major scale in third position. Now if you know the universal scale finger pattern that I talk about in my violin third position course, this makes so much more sense! Basically, the universal finger pattern involves two strings with the same finger pattern on both strings. There will be a whole step between the first and second fingers, a whole step between the second and third fingers, and a half step between the third and fourth fingers. You can play this universal finger pattern pretty much anywhere on the violin (just don’t start on the E string) and you’ll get a scale.

Okay, on your violin fingerboard, start on the G string and let’s build our way up to third position. Play open string, then 1st, 2nd, and 3rd fingers. You should be on a C. Now replace that 3rd finger and put a 1st finger where the 3rd finger was. Tada! You’re in third position!

(P.S. It’s VERY important when you are starting to learn third position to always prep your notes. Start in first position and build up, then replace the notes. I go over this a lot in my course to make it easy to hear and understand.)

Now that you are up in third position, play that universal scale pattern up to 4th finger and the next string, then come back down and you’ve got an easy C major scale in third position!

By the way, those little arrows mean half steps!

Easy G Major Violin Scale in Third Position

Next is a one octave G major scale in third position and the good news is that it’s just like the C major scale you just played, only it starts on the D string instead. So remember, prep your notes in first position, replace the third finger with the first finger and you’re ready to play the G major scale in third position.

Easy D Major Violin Scale in Third Position

Next up is the D major scale in third position and yep, you guessed it. It has the exact same finger pattern as the C and G scales. See what I mean about knowing that universal scale finger pattern? It really shows up all over the violin fingerboard. The fun thing with the D major scale in third position is that you will gain two notes that you didn’t have down in first position. Those two high notes are C sharp and D.

Ready to Master Third Position?

I’ll teach you how! Click below to learn more.

Two Octave Violin Scales in Third Position

Two Octave C Major Scale in Third Position

Now that you’ve learned the first octave of the C major scale in third position, let’s learn the second octave! If you remember that your half step pairs in the key of C major are between B and C and in between E and F, then you’ll realize why you change finger patterns for the A and E strings. On the A and E strings, your 2nd and 3rd fingers will touch. Just go up to the third finger on the E string (the C) then go back down.

Two Octave D Major Scale in Third Position

You’ve already learned the higher octave of the D major third position scale, so now let’s learn the lower octave. The bottom octave is a little bit trickier. It starts on 2nd finger on the G string, so build up to 4th finger D in first position, then replace the 4th finger with the 2nd finger (test it against your open D to make sure it’s in tune). Now you’re ready to play the scale, but remember, D major has two sharps, C sharp and F sharp. That means those 4th finger on the G and D strings in third position are going to be sharp which means you are going to have to stretch for them!

Those scales are the easiest violin scales in third position. If you’re ready to learn more about third position, my Third Position course will show you all the tips and tricks to master third position that you NEVER learn in private lessons. Click here to learn more!

Happy Practicing!