How Tight Do You Tighten A Violin Bow?: The Ultimate Guide to Tightening and Loosening Your Violin Bow

When you first receive your violin bow, the hair will probably be touching the stick. You have to tighten the violin bow which forces the hair to stretch and move away from the stick in order to play. But a common question when it comes to learning how to tighten the violin bow is “how MUCH do I tighten the violin bow?”

Well, it depends.

When you are just beginning, you can learn to tighten the violin bow by sight. But as you become more comfortable playing, you will learn to tighten the violin bow based on feel.

When you are finished playing, you will want to loosen the hair on your violin bow to release the tension.

But first let’s talk about the mechanics of tightening and loosening a violin bow.

How to Tighten a Violin Bow

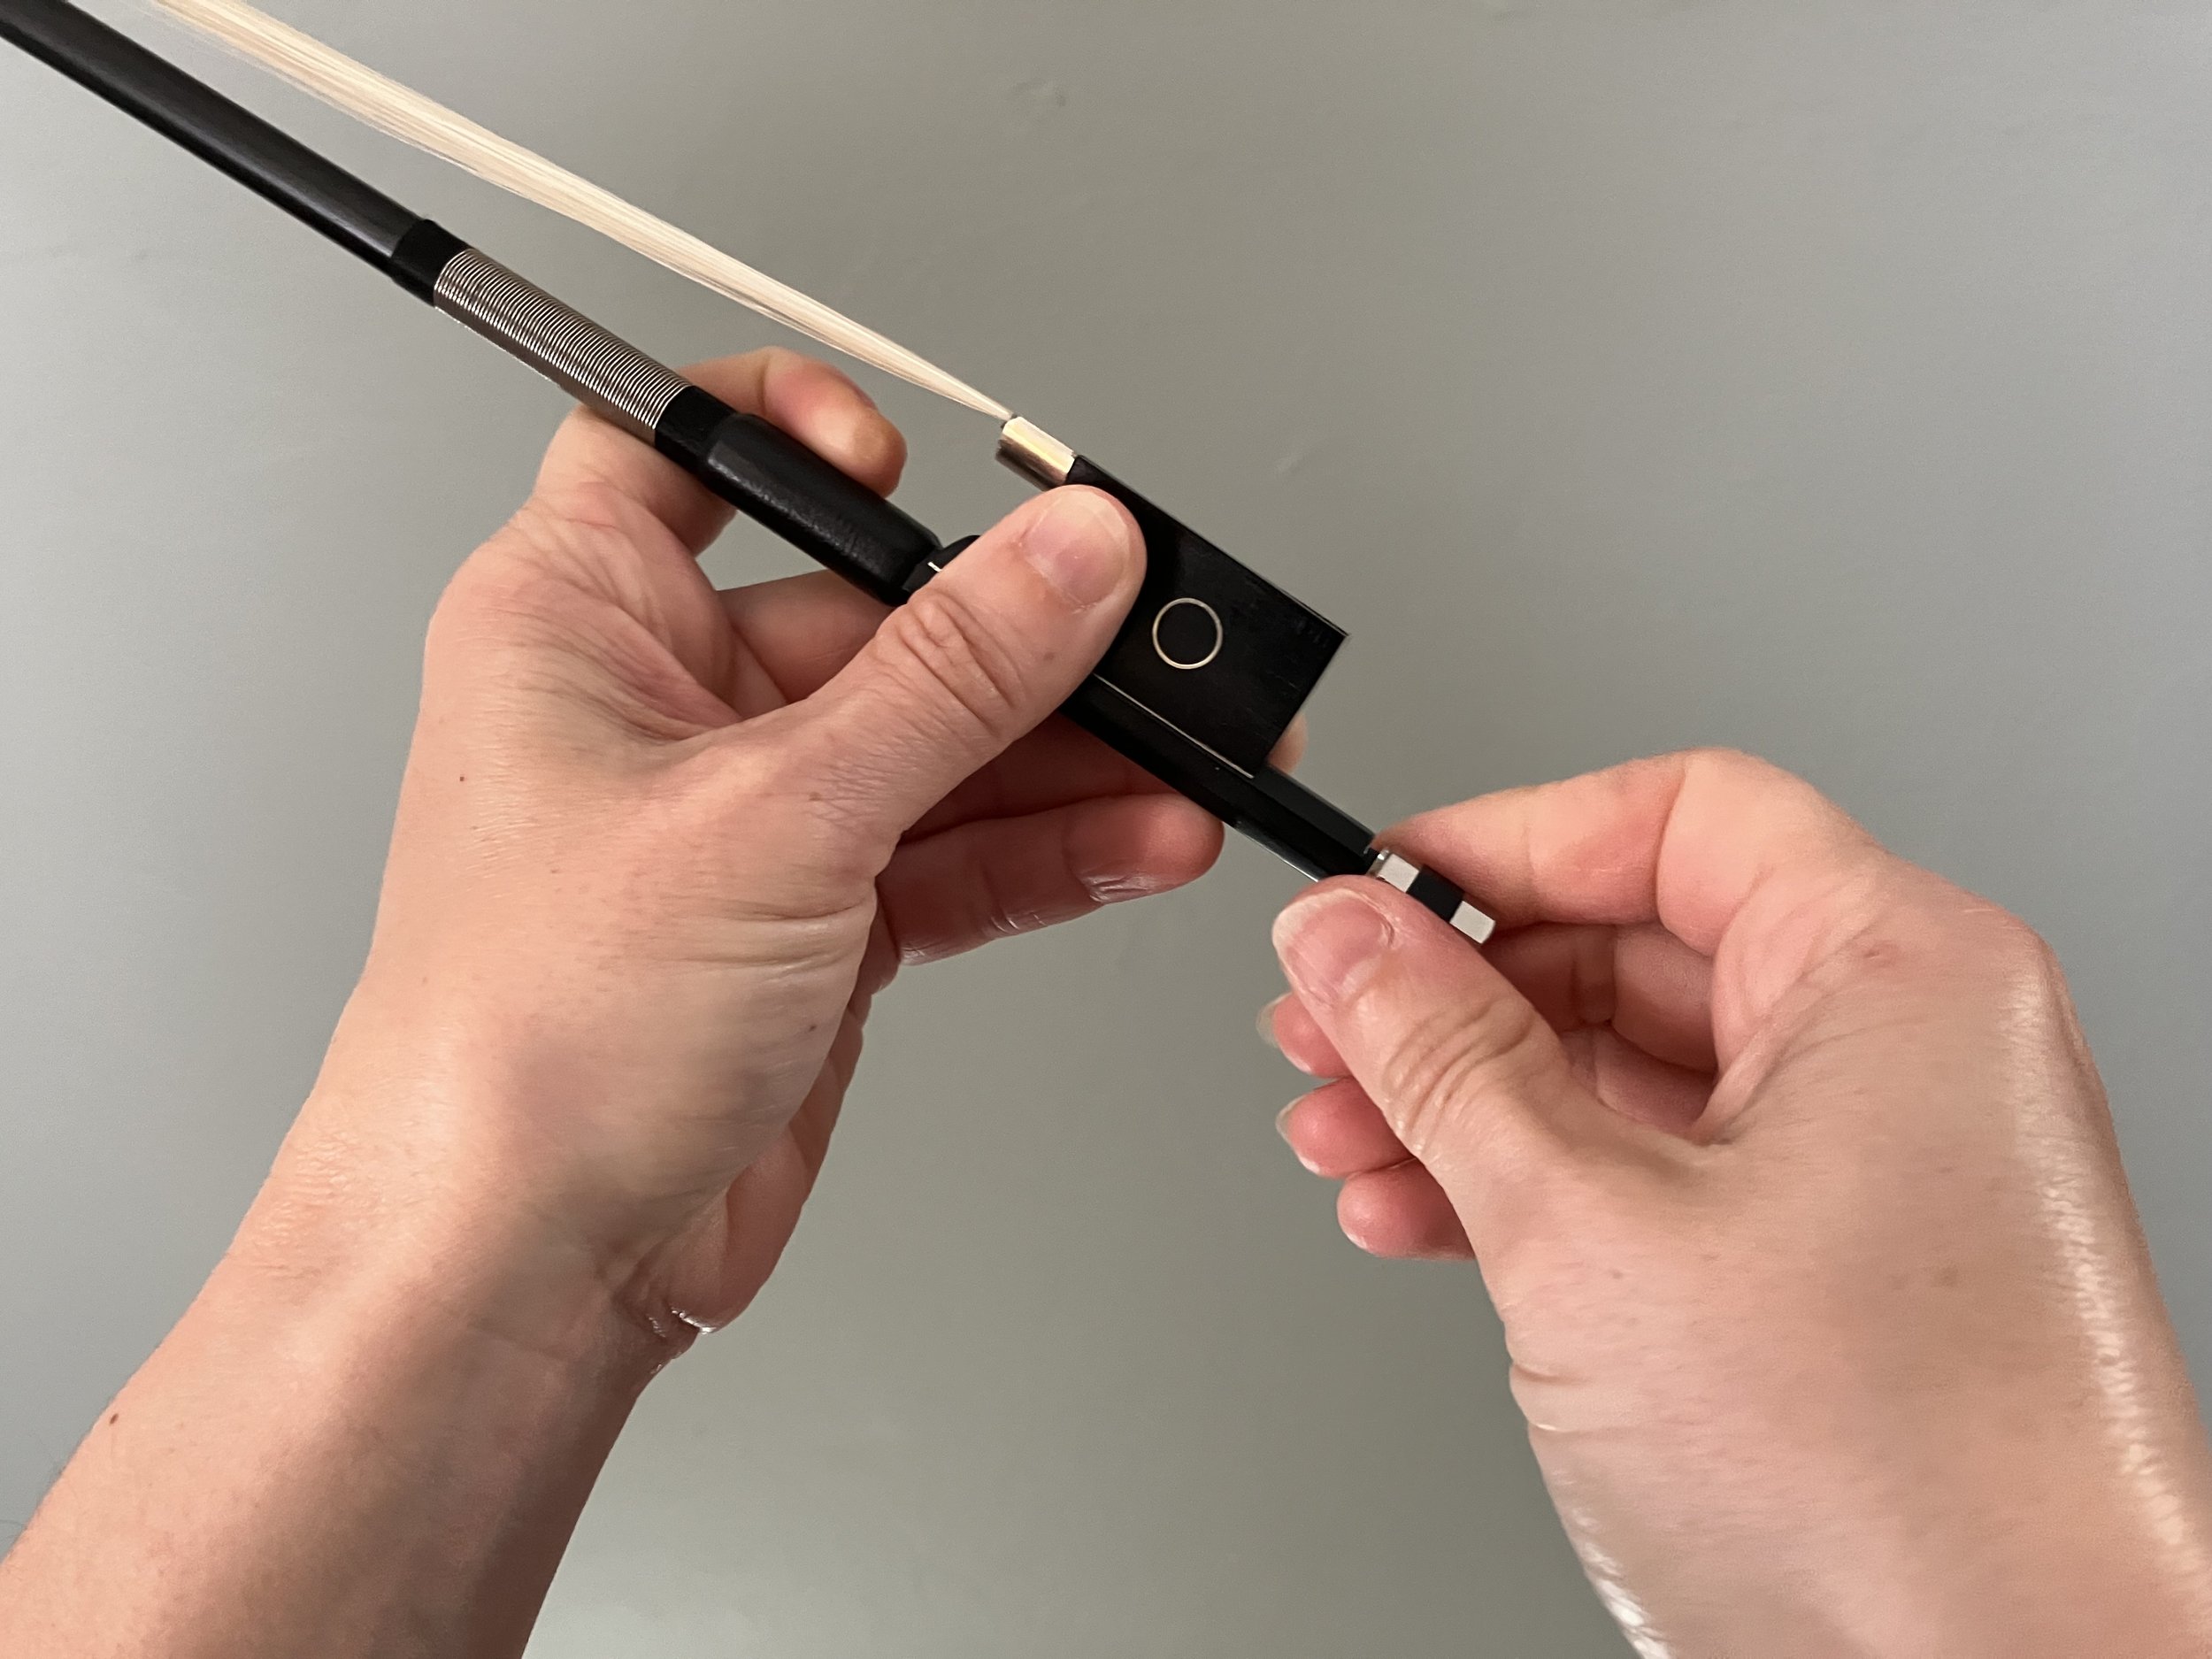
Hold the violin bow horizontally in front of you with the frog to the right. You’ll notice a silver screw at the very end of the frog. Turn the screw away from you and watch the middle of the bow. You’ll begin to see the bow hair moving away from the stick.

Also notice the frog. Do you see how the frog moves as well when tightening the violin bow? The more you tighten, the more space is created between the tip of the frog and the leather grip. This is the place where your thumb goes so if you find there’s not enough space for your thumb, tighten the bow a little more.

Notice how Tightening the bow changes the space between the frog and the leather grip

the looser the bow, the less space between the frog and the leather grip

The Rule for Tightening the Violin Bow

Eventually, you will tighten the bow based on sight and feel, but if you are a beginner here is a rule for tightening your violin bow by sight.

Notice the stick of the violin bow is curved with the stick dipping down towards the middle slightly.

To tell how much to tighten your bow, turn the screw until you can fit your pinky in between the violin stick and the hair at the middle of the bow.

Watch the middle of the bow as you tighten and continue turning the screw until you could fit your pinky in between the stick and the hair in the middle of the bow. You have to look at the middle of the bow because if you look at the ends, you will see the hair is further away from the stick. Use the middle as your gauge.

Now, the “pinky” rule is a good place to start. However, I notice that most people don’t tighten the bow enough when using this rule. So tighten the violin bow so that your pinky with a little bit of space on either side can fit in between the stick and the hair.

Tighten the bow until you can fit your pinky in between the hair and the stick in the middle of the bow

What Happens if You Tighten a Violin Bow Too Much?

Can you over tighten a violin bow? Yes! Over tightening a bow can damage the bow. When you over tighten the bow, the stick will be very straight without any of that natural curve. All that extra tension can warp or break the stick. You’ll also over stretch your hair which means you will have to continue over tightening your bow just to get to a “normal” tightness because the hair is too loose. You’ll have to get the bow rehaired sooner rather than later.

Over tightening the bow also makes it harder to play. The bow is too stiff when the hair is too tight resulting in unwanted bounces and scratches. The bow will be harder to control when the hair is too tight.

Can You Play if Your Violin Bow Hair is Too Loose?

When people learn that over tightening the violin bow can damage that expensive wooden stick, they tend to under tighten the bow.

While under tightening the bow will not damage it, it will make it harder to play. When the violin bow is too loose there is no resistance. You need a little give in the hair to be able to apply and release weight to get a good tone.

Just like Goldilocks, it’s all about getting it just right and that comes down to learning to tighten the violin bow based on feel.

How to Tighten the Violin Bow by Feel

Eventually, you will be able to feel if your violin bow is too tight or too loose as you play violin. The best way to learn to do this is to experiment. Try barely tightening your violin bow and then play something. You’ll notice there is no resistance or “give” in the violin bow. You can’t apply any weight into the string.

Now try slightly over tightening the violin bow (don’t worry, this will just be for a second). Play something now. Notice how the violin bow is too stiff and also looses some of its resistance and give. The bow is probably so stiff when it is overtightened that it is much easier to bounce the bow and get unwanted bounces.

Loosen the bow until you feel the correct amount of resistance.

How Much Do I Loosen the Violin Bow

When you are finished playing, you will want to loosen the hair on the violin bow. This will your hair to last longer and reduce the tension on the stick. But how much do you loosen the violin bow?

Most people tend to loosen the bow too much when they are finished playing. Simply loosen the screw until the hair is just touching the stick. That’s it! You can put your violin bow to bed now!

The correct amount to tighten the violin bow

The Correct amount to loosen the Violin Bow

Do I have to loosen the bow every time I finish playing?

If you’re just taking a short break, it’s fine to leave the violin bow hair tight. If you’re taking a longer break or if you are done for the day, it’s best to go ahead and loosen the bow hair.

What happens if you loosen the bow too much?

The hair will get very loose and floppy and eventually you will unscrew the screw completely. Don’t worry! You didn’t break your violin bow. Simply reinsert the screw and tighten it again. You may notice when you loosen your violin bow too much, the screw detaches and the frog detaches as well. Again, you didn’t break your bow. Reinsert the frog into the hole where it was attached, reinsert the screw and tighten.

if you loosen the bow too much, the screw may come out

and the frog may detach! don’t worry, reinsert the frog and the screw, retighten, and you’re good to go!

I forgot to loosen my bow hair! Is it okay?

That moment when you realize you forgot to loosen your bow hair last night

You close up your violin case and completely forget to loosen the bow hair. When you open up your case the next day, to your horror you see the violin bow is already tight! EEK! Is the bow damaged? Did you ruin that expensive stick?

Don’t worry, this happens to all of us at some time (sometimes multiple times…) Repeatedly forgetting to loosen the bow hair will not necessarily damage the bow, but you will have to rehair the bow sooner as the hair is getting stretched out more and more.

Can I replace the hair on my violin bow?

Yes, you can and you should! The bow hair wears out eventually and looses its “grippiness.” No matter how much rosin you apply, the bow will feel like it’s slipping across the strings. Simply take your bow to a local string shop or luthier and have them rehair the bow. This will cost anywhere from around $70 and up depending on your location.

You should rehair your bow at least once a year. Rehair your bow every 3-4 months if you play more regularly (2 hours a day and up).

Does weather and humidity affect violin bow hair?

Absolutely. Humid weather will make the violin bow hair stretch and lengthen, making it harder to get the correct amount of tension. You will tighten and tighten and tighten the screw and eventually the hair will have the correct amount of tension. The danger occurs if the humidity changes and turns drier, then the hair will constrict and your violin bow will be too tight.

This is particularly a problem when playing outside or going in between playing outside and inside. Keep an eye on the humidity and try to keep the humidity around 40%-60%.

Why won’t my violin bow tighten?

Hight humidity can make it harder to tighten the bow. If the bow hair is old, or if the bow hair has been overstretched, it will be hard to tighten the bow. Getting a bow rehair will fix this problem.

Sometimes there may be an issue with the screw. Cheap violins that come with cheap bows can often be difficult if not impossible to tighten due to the inferiority of the parts. If you’re playing a a very cheap bow (Under $50) and you’re violin bow won’t tighten, you may need to upgrade to a better bow.

I hope this helps you with all your questions when it comes to tightening and loosening the violin bow. If I didn’t cover something, let me know in the comments below.

Happy Practicing!

Should I Rent or Buy My First Violin?

With so many options on the internet these days, choosing a beginner violin can be a difficult task. Use this guide to make choosing your first beginner violin hassle-free! You can also check out my top picks for beginner violins here.

bow-598118_1920.jpg

Violin Size

Violins come in many different sizes. The size is notated by a fraction ranging from 4/4 for a full size, adult violin to 1/32 size for young children. Choosing the right size for a beginner is essential to success. Having a violin that is not the right size can make it nearly impossible to learn the basics. The best way to find the right fit is to visit a shop and hold many different sizes. One way to determine the correct size is to have the student hold the violin in the shoulder position and extend the left arm and cup the palm around the scroll. The elbow should be slightly bent. If the student cannot reach the scroll or if the arm is straight, the violin is probably too big. Remember, it is always best to go with a smaller size if you are unsure. If you are ordering a violin online, you can measure from the neck to the left wrist for an approximate size. Here is a link with violin size charts and measurements.
 How To Determine the Proper Instrument Size

Buying vs. Renting

Since young students change violin sizes as they grow, many parents prefer renting a violin. Support your local violin shop if you can. The great thing about rentals is that you can exchange the violin fairly easily if the size is not right.

Buying a violin costs more up front, but then you always have the option of reselling it if you take care of it. It is a great idea if your student has younger siblings that will one day want to learn to play the violin as well. I once taught a family of 8 children who all played the violin. Over the years, they had accumulated every size of violin and simply passed them on to the next child when the older child outgrew them.

Is a more expensive violin better?

If you go into a violin shop, the most expensive violin might not always be the best sounding violin. Sometimes, you pay more for the violin's pedigree even if a cheaper violin sounds better. But, with beginner violins at companies like Shar and Southwest Strings, you generally get what you pay for. The more expensive violin will generally be better quality. However, when you start to get into a higher price range, don't just buy the more expensive violin, try several violins out. The sound and tone of the cheaper violin might appeal to you more. It's all about tastes and preferences!

Will a more expensive violin make me sound better?

Better quality violins will give you a better sound. You also have more room to grow musically with the violin. If you have a young child playing on a fractional size violin, you might not be ready to spend more money since you know the child will have to get a bigger violin eventually. However, if you are buying a full size violin, I recommend spending a little more money to get a better quality fiddle. As you progress on violin, you will need a violin that delivers all you're asking of it. Buying a better violin from the start gives you more room to explore and push your own limits. 

What about used violins?

If you buy a used violin let a professional look it over first to insure there are no problems with it. The first thing I would do with a used violin is put a new set of strings on it, since you don't know how long the old set has been on there. A decent set of strings will run you $30-$40. If you don't know how to put the strings on, you'll have to pay someone to do it. If there are other things damaged with the violin, you'll have to pay to get those fixed. Unless it is an unbeatable deal, a cheap, used violin might be more hassle than it's worth.

Never buy a violin from sites like Ebay and be wary of violins for under $100. These instruments are cheaply made and often unplayable. I once had a student with an Ebay violin. The pegs were plastic and therefore, would not keep the string in tune. Playing violin in tune is hard when the strings are in tune! Imagine if the strings are constantly changing. It's impossible!

What else do I buy?

Most beginner violins come as outfits with a case, violin bow, and sometimes rosin. Make sure your purchase comes with all of these. If not, buy them separately. You will also need a shoulder rest that matches the size of your violin. Buying a music stand is also essential to promoting good posture. Here's a list of things you may need.

Don’t let the process of choosing a violin be intimidating! Feel free to contact me any time with any questions you may have.

Step by Step Guide to Starting Violin Lessons

Step by step.jpg

Starting a new instrument can sometimes be a challenging endeavor. There’s the struggle of finding an affordable, good quality instrument. Then purchasing the accessories you might not have known you needed. Finding a teacher that suits you and then finding a time that works for both of you. And we haven’t even played a note yet! I’m here to help you streamline this process for violin lessons into step by step guide to getting started so you can focus on making beautiful music!

1. Find a Violin Teacher

This might not seem like the logical first step, but finding a good teacher from the start can help the rest of the process go smoothly. I don’t know any violin teacher who wouldn’t be eager to help a student get started. Feel free to reach out an ask questions.

2. Purchase or Rent a Violin

sebastian.jpg

This is the fun part! First you want to know what size violin you will need. I’ve got a handy sizing chart to make measuring easy. Next, decide if you want to purchase or rent. If you decide on purchasing a violin, learn how much to budget for a violin and the pros and cons of used versus new violins. Then check out my top picks for beginner violins. Most beginner violins come as an outfit including a violin, bow, and case, so you will need to purchase just a few other accessories.

3. Accessories

Once you have the violin on the way, the next step will be to purchase the goodies you will need to go with it. There are a lot of gadgets out there that supposedly make learning violin easier. Don’t bother with the majority of them. Only two accessories are necessary. A shoulder rest and rosin. Here are my top picks for shoulder rests. For rosin, I recommend Hidersine.

If you don’t have a music stand, it will make your life so much easier when it comes to posture. And lastly, it’s not necessary, but if you want a little extra help to show you where to place your left hand fingers, purchase a First Frets Decal, just make sure it matches the size of your violin.

You’ll want to purchase the music books your violin teacher recommends. Here are a list of books I use.

4. Tune Your Violin

When your violin arrives, you will find it’s pretty bad out of tune. No worries! Your teacher will be happy to help. I’ve also made a video to make tuning a breeze. Make sure you’re keeping your new violin safe and clean as well!

5. Learn to Play!

Now that your violin is in tune, you are almost ready to make music! Learn how to adjust your shoulder rest to play comfortably. Get your bow hold ready to go, and start playing! I’ve got lots of free sheet music for beginners and make sure to check out my lessons on music theory and technique tips!

Happy Practicing!


Tuning Your Violin

Learn the ins and outs of tuning your violin

At first, it might take you a while to learn to tune your violin. As you get better, tuning your violin will get quicker. Keep in mind, violins of inferior quality may make it difficult, or impossible to tune. If you are getting frustrated tuning, it may be time to look for a better violin.

Tuning the violin isn’t difficult, but with a few tips and tricks, you can learn to tune quickly and easily.

Read the rest of the article at Lessonface.com

How to Take Care of Your Violin

luthiers.jpg

Even beginner violins aren’t cheap by any means. So it’s important to learn how to take care of your violin from day one. Taking care of your violin ensures that you are getting the best possible sound your violin can offer. With a little bit of upkeep and preventative maintenance, you can catch issues before they develop into bigger problems. Follow these guidelines so your violin always sounds its best!

Read the rest of the article at Lessonface.com

New to the Violin? Here's Some Tips for Parents

TIPS FOR PRACTICING

pexels-photo-165973.jpeg

WHEN TO PRACTICE

Try to practice right after the lesson while everything is still fresh. The longer you wait, the more your child will forget. If you aren’t able to practice right after, have your child talk through the new things they learned.

The amount of time each student needs to practice will vary with age and level. For all students, it is much better to have short daily practice sessions than to have one or two long weekly sessions. For beginners, at least 10-15 minutes a day 5 days a week is a good start. 

HOW TO PRACTICE

Students often fall into the trap of just running through pieces for their practice time. Running through a song might make it sound better after multiple attempts, but there are better, quicker ways to make something sound good. Set daily and weekly goals for yourself. I try to give students one or two big concepts to work on for the week. Think of these things while you play. Stop and ask yourself if you are doing them. Identify any problem spots. You don’t always have to start at the beginning of a song, start at the hard parts and try to understand what makes them difficult. Simplify the music if needed: pizz. the song without the bow or shadow bow it without the left hand. Make up words to songs or listen to others playing them. Finally, reward yourself for playing something well! As musicians, we are always thinking about what we did wrong and forgetting about everything we did right!

PARENT INVOLVEMENT

Parent involvement will differ with age level. For very young children, parents should be present during the lesson. Take notes and ask questions since you will be your child’s teacher during the week. Practice time for young children should be adult supervised as well. I can always tell an incredible difference with young students who have parents assisting them during lessons, versus parents who are not present during the lesson. When parents (or older siblings) help out a child during lessons, we can cover much more material, and the parent knows exactly what to work on during the week. If you can’t be present for your child’s lesson, ask for your teacher’s notes on the lesson. I leave lesson notes for every lesson so parents always know what we worked on. Use these notes as a guide throughout the week.

MOTIVATION 

Staying motivated is hard no matter how well you play. Once the honeymoon phase has worn off, parents should make sure their children still practice regularly. The less they practice, the more discouraged and frustrated they will become and the more they will want to quit. Hearing other musicians play is always encouraging. Take advantage of the internet and YouTube to find some great performances. Encourage students to also improvise on their violins. This is a fun and important part of developing the necessary aural and tactile skills.

Consider Learning the Violin Yourself

When a parent learns violin along side their child, something magical always happens. The child almost always progresses much, much faster than other students. The child will hear the parent playing their songs, reinforcing what the songs sound like. The parent serves as a role model throughout the week. The greatest benefit is the joy of sharing music together, which is priceless!

Stop Wasting Your Practice Time! How to Set Up a Great Practice Routine

Making your practice time "golden."

Making your practice time "golden."

A good practice routine is the key to staying motivated to play the violin. But if you don’t have a good practice routine, chances are you will just dabble with the violin and never make any lasting progress. Does the following story sound familiar?

You get out your violin to practice. You know you’re supposed to start out with scales so you whiz through them so you can get to the good stuff. You play through the piece you’re working on. If it’s a good day, you make it all the way through. If not, you stop when it gets hard and go back to play the parts you sound good on. Let’s say it’s a good day. You make it all the way through. What do you do next? Start at the beginning and play it all the way through again. It might sound a little better, chances are, not much has changed. You decide to buckle down on the two or three hard lines. You play through the measures once. Ugh. It sounds awful. You try again. Even worse this time! Stupid fingers. Maybe if you try it faster…nope. Slower? That’s agony, too. You’re frustrated but you’re determined to get it right. You play it again but nothing is sounding right today and your practice time is up. You put the violin up for another day.

Sound familiar? What progress did you make? Not much of any. In fact, you probably reinforced some bad habits. You may not be doing all of these practicing no-nos but everyone is guilty of some of them from time to time (including me)!

What’s the key to being a better player? What’s the key to staying motivated? Practicing smarter. Not practicing more or practicing harder but having quality practice that yields tangible results. Practicing smarter is a skill you must learn. It might be slower going at first but as you get better at practicing, you’ll advance quicker.

Here are some tips to get more out of your practice time and keep your motivation up.

1. Get a warm-up routine—Doing the same warm-ups every day makes it easier to measure progress. Don’t rush it. You’re not only warming up your muscles, you’re getting your mind primed to focus. Start off with some stretches focusing on your upper body. Next I do “windshield wipers” with my bow. Then I move on to open strings. This is yoga for the violin. It’s a time to focus on relaxing, breathing, and making a good tone (one of the hardest things to do!). Draw your bow as fast or as slow as you need to make a good sound. Experiment with different parts of the bow. Try adding more weight or less weight. Think about the angle of the bow.
Next I play scales and arpeggios. You might think scales are easy and therefore don’t require much attention. Teachers prescribe scales because they are easier than your piece and are a great way to perfect difficult skills. Start by focusing on intonation then move on to varying the speeds and using different bowings. There are a million things you can focus on while doing scales. If you can’t think up any, I’m sure your teacher has tons of ideas. For now, only focus on one problem for each scale.
Depending on your level, you’ll want to transition to etudes or other method books and then you’re ready for the main song you’re learning. What’s the number one rule?

2. Keep your expectations low—Then you won’t be disappointed! That’s my life motto. Dream big for long-term goals, but for day to day practice, keep your goals short and manageable. Don’t try to conquer an entire song in one 30 minute practice session. Focus on one ore two measures. Even then, don’t repeat them aimlessly. Focus on one thing at a time to work on like getting your F sharps in tune of smoothing out your string crossings.

3. Keep a practice log—Before you start practicing, write down what your overall goal for the day is. Keep it manageable and tangible. Nothing like “I want to make my song sound better.” Pick something specific and simple like keeping your bow straight and relaxing your grip. If other things fall by the wayside, don’t beat yourself up. If you’ve progressed a little on that overall goal, you’re doing better than if you had no goal at all. As you practice certain measures, again write down what you want to achieve. This keeps you safe from aimless repetition. But, to determine what you need to work on, you need to stop and do some thinking first. Which brings me to my next point.

4. Be a detective—When something doesn’t sound right, don’t play it over and over again the same way hoping that one day it will sound better. Stop. Think. Is it a left hand or a right hand problem? Is it a difficult fingering or a difficult bowing? Are you correctly reading the notes or the rhythm? Once you’ve determined the problem, you or your teacher can come up with a way to fix it. You must do this for every measure and every note that doesn’t sound right! This is what your teacher is doing during your lesson. Learning to practice this way means learning to be your own teacher! That means you can use your lesson time to talk about other exciting things.

5. Stay focused—These tips won’t get you very far unless you can devote your utmost focus to the task at hand. For me, 5-10 minutes is the max I can focus on any one measure or problem, and that’s assuming I’m rested and removed from distractions. When you are past the peak of your focusing ability, simply move on to something else or take a break altogether. It’s better to practice shorter amounts and be focused. Otherwise you could be developing bad habits or reinforcing incorrect bowings, rhythms, etc. Like wise, if you start to get frustrated, put the violin down immediately and come back when you are refreshed.

6. Stop practicing on a high note— When you are nearing the end of your practice time and you play something well, STOP! Put the violin down and walk away while you are still happy! Sure, you could plow through a few more measures and risk getting frustrated but it’s much better to end feeling good about something. It will make you want to practice the next day.

Happy Practicing!

8 Ways To Make Practicing Fun!

Making Practice Fun

Before I share a few ways to make practicing fun for your child, let me start with a caveat. Practicing isn’t always fun. That doesn’t mean that it’s tortuous, but it’s not always smiles and giggles. Sometimes your child just has to buckle down and do it. At the same time, you don’t want music to be yet another homework assignment. Having fun during practice time can be a great way to cultivate creativity and encourage focus if you choose the right “games.”
Some of these games are ways to get students to practice for longer. Keep in mind that as students progress, we want them to stop focusing on quantity practice with mindless repetition and start aiming for quality, goal-oriented practice.


As much as we wish our 7 year-olds would wake up and say, “Today I’m going to focus on getting my F sharps in tune,” that’s probably not going to happen. So until they do start thinking like that, here are 8 ideas to make practicing fun.

*Some of these games can get crazy. Use your discretion to ensure violins and bows aren’t harmed. Otherwise, you might be making an educational visit to the violin shop for repairs!

1. Hopscotch—Perfect for when your child is having problems with a specific section or measure. It requires them to focus to “win.” Using a a tiled floor or a carpet with squares, place a piece of candy on a square. Then position your child 7 squares behind the prize. If they play the measure correctly, they can move forward. If they make a mistake, backwards. When they get to the candy, they’ve played their problem spot correctly for at least 7 times.


2. Crazy Cup—Ideal for when students have already learned a measure or song but still need more repetitions before they’ve mastered it. On several slips of paper, write down actions your child can do while playing their piece (they can help you think up ideas). Keep in mind, they’ll be holding a violin so nothing too crazy like somersaults. In the crazy cup I use for my students, I have actions like “play with one eye closed” or “walk around in circles,” “sway like a tree.” Having them move around while playing can also help them relax and keep them from developing tension problems.


3. Recess—Take advantage of your portable instrument and go outside for practice time! When your backyard gets boring, go to a park or playground. Better yet, surprise a neighbor or friend with a song at their doorstep.


4. Every room in the house—Challenge your child to play a song in every room in your house. They’ll have fun playing in the dark in the closet. Ask them what room they sounded the best in. This will get them actually listening to themselves (which doesn’t always happen). A tiled bathroom will be a lot different than a carpeted bedroom!


5. Teacher time—Have your child be the teacher and let them give you or another family member a lesson. Make sure you ask them if your bow hand and posture are correct. You can deliberately mess something up so the child has to fix it. Act confused and ask them to demonstrate how to do it right. This helps remind them about all those curved pinkies and thumbs!


6. Free time—You might call this noise, but I call it improvisation. Being able to experiment and come up with their own songs is vital to a child’s creative development and aural skills. I never did this as a child and as a result, I was terrified of “jamming” with a band or playing anything without music in front of me. It was a fear that took me a long time to get over. It’s important to start this exercise early. The older the child gets, the more terrified the student becomes of playing something “wrong.” Imposing a few rules gives this time some structure. You must insist they continue to hold the instrument and the bow correctly. To reduce the chaos, give them a certain string to improvise on or a rule of “only open string and 2nd fingers” or “only use the Mississippi Hot Dog rhythm.” You can even make another cup with slips of paper with “rules” for guided improvisation.


7. Play along—Listening to better violinists is the best thing to keep students motivated. Students in orchestra programs have the benefit of always being surrounded by better players to mimic but students that only take private lessons don’t always have that. Youtube a professional violinist and let your child “play along” with them. They won’t be able to play all the notes, but simply pretending to play all the notes can do wonders for motivation. They’re listening to what they could achieve. Of course, use caution. If they’re pretending to be Lindsay Sterling, things could get out of control pretty quickly so be ready to take the violin away and transition to “air violin” before anybody, or anything gets hurt.

8. My Candy—This is my all time favorite trick for getting students to focus while they practice. Identify a problem measure, section, or song. Put five pieces of candy on the music stand. When the child plays the selected measures correctly, they get a piece of candy. But if they play it incorrectly, I take one of their pieces of candy, quickly pop it in my mouth, and comment on how delicious it is. Just seeing me eat their candy is enough to motivate them to focus on the task at hand. Before you start, give some parameters on what is considered “correct.” No stopping and starting, no wrong notes, no flat left hand wrists, good posture, etc.

What else do you do to make practicing fun? Share your ideas!

Happy Practicing!


Recital Time! How to Master Your Recital

It’s that time of year again! Flowers are bursting into life, birds are singing, music students across the country are furiously practicing (hopefully) to get their recital music in shape. First timers are often surprised to learn that they don’t sound as well as they did in the comfort of their own home. That’s because performing is a skill that gets better with time. Just like you practice playing in tune, you have to practice performing! Here are 5 tips to help you dropkick your recital.

1. Perform, Perform, PERFORM!

There are people who are naturally wonderful at everything. And then there are the rest of us who actually have to work for it. But people who perform well have practiced performing. I guarantee you, when a 10 year-old prodigy performs at Carnegie Hall, it’s not the first time they’ve ever played in front of an audience! You must practice performing to be good at it! Start with your most adoring fans: your goldfish, your stuffed animals, your music-loving houseplant. Then move on to more demanding listeners: your dog, your mom, your little brother. Then go for the really tough critics: your grandparents.
Go through the whole rigmarole when you practice performing. Dress up, walk to the stand, play, bow, smile. It’s also a good time to school your family on recital clapping etiquette!


2. Think about the little things.

It’s those pesky things we never though of that trip us up. Like the fact that the pretty necklace we bought just for the recital buzzes when it touches the violin. To avoid wardrobe malfunctions, have a dress rehearsal. Get used to playing in those 6 inch heels. Make sure your dangling earrings aren’t too dangling. Does your collar or tie interfere with your violin? Figure it out before you go deer-in-headlights in front of 50 people.

Think about the other little things. Imagine yourself in the space you’ll be playing. Memorize how high you like your stand. If you are playing from memory, where will you look? Figure out page turns, erase confusing markings in you music. People develop weird quirks when they get nervous. I’m a nose-runner so I keep a hanky handy. Know thyself and be prepared!

3. Don’t Rush!

When adrenaline is pumping through your veins, the natural instinct is to play everything super fast. You’ll get done quicker that way, right? Well, yes, but you’ll hit a bunch of pot holes along the way. At home, practice at a faster tempo than you plan to play at the recital. Just in case your nerves take control, you’ll be prepared. But always plan to play at a tempo slower than your max speed. It’s better to go a little slower and get all the notes than go faster and get every other one.


4.Whatever happens, don’t do this!

Everyone makes mistakes. What separates the professionals and the amateurs is what they do after the mistake. If you grimace like you just swallowed spoiled milk, everyone will know you goofed. If you go on and pretend like nothing happened, there’s a good chance no one in the audience will ever know! But if you stop, grunt, roll your eyes, and publicly flagellate yourself for messing up, it’s like taking a highlighter to your boo boo. Keep a straight face and keep on chugging along.
Performing is like being an actor. You have to pretend you know what you are doing even if you want to crawl in a hole and die. Recital audiences can be oblivious, only slightly better listeners than your houseplant. Even if you make a mistake, and an audience member thinks he heard it, if you keep on going without a scowl, that audience member will shrug and think you meant to do it that way.

5. Eat a Banana!

Seriously. This is a hint handed down from my teacher. Anytime I perform I eat a banana about 30 minutes before I go on stage, even if I have to force it down. It’s hard to eat when you are nervous, but you don’t want to perform on an empty stomach. Bananas reduce anxiety. It’s scientifically proven—probably. Surely someone’s proved it scientifically. Oh, who cares. It works, scientific or not. So grab a bunch before you start getting the jitters!

When you get discouraged, remember, if it were easy, everyone would be doing it! I’d rather mess up on the field than watch from the sidelines.

Happy Practicing!

Making Children (and Adults) Practice Their Violin

How do you make young children enjoy practicing their instrument? That’s the million dollar question.

When I tell people I play the violin, I almost always get one of two responses. The first, proclaimed with joy is,“Violin is my favorite instrument!” The second, muttered with a hint of remorse is, “I played violin in fourth grade.” When I ask if they still play, they give me a hapless shake of the head.  If violin is everyone’s instrument of choice, why doesn’t everyone play it? Why don’t they keep it up after they started in 4th grade?

If you play violin or have a child that does, you probably already know the answer. Violin is a difficult instrument to learn. Period. Like mastering any complex skill, it requires an immense amount of dedication and self-discipline. That’s one of the reasons we all want our children to take music lessons, right?

Most children are excited to learn violin but after a couple months, once that honeymoon phase has worn off, they all begin to wonder if the juice is worth the squeeze. This is one of the most critical times for a young player. They will pitch fits, whine, refuse to practice, beg to quit lessons, and drive parents insane. It’s at this point when students are on the brink of understanding all that wonderful self-discipline, that parents give up the struggle and let their children quit lessons, thereby erasing whatever self-discipline they were about to learn.

The Hump

I call this moment, “The Hump.” (You’re supposed to whisper it with great fear and trembling.) Don’t think you or your children are immune. It hits everyone, young and old.  I was there as a young piano student and my mother let me quit. Now, being a violin teacher, I would give anything to be a better pianist. Remember, you never hear adults say “I’m so glad my mother let me quit music lessons.”

 If you’re an adult experiencing the Hump, this is the point when you have to push through. But if you’re a parent, you’re going to need some different tactics. (I call them tactics because this is WAR!)

Make a Plan With Your Teacher

First, talk to your teacher. Sometimes it’s not obvious to them that your child is going through the Hump. I change my own tactics during this time to help students stay engaged. Your teacher probably has their own ideas to help you.

Creating a Rewards System

There’s definitely something to be said about rewards, especially at a time when children haven’t learned to do something for it’s intrinsic value. Developing a reward system for your students is a great idea to get them over the Hump. Ice cream at the end of good lessons. A dollar for every song completed. Being excused from doing the dishes to practice (this was my mother’s tactic).

On the flip side of rewards, you have to be firm in withholding them when progress is not made, otherwise they’re worthless. Keeping your child motivated with live performances or youtube videos are other great ideas.

Make Practicing Fun

There are lots of ways to make practicing something children look forward to. One way is to learn violin as well. When I have children and parents learning violin together, the children always progress faster and enjoy playing more than the students whose parents aren’t involved. Even if you can’t learn violin too, keep students motivated with performances (whether live orchestra concerts or YouTube videos). Getting creative with your practice time can keep it from being another chore.

It’s All in the Mindset

Watching parents over the years, I’ve learned there is one tactic that is essential to keeping your child in lessons during the Hump. It’s the “over my dead body” tactic.

Even the most innocent children will turn into little devils and try to make you bargain. They will think of reasons to skip out on lessons, forget their music books, use practice time to make the most painful, inhuman sounds on their instrument—just to drive you mad. The minute you start to bargain and say things like “Maybe we’ll take a break for a few months,” YOU’VE LOST.

You don’t bargain with them about attending school or taking showers. Why would you bargain on something you know will make them better, well-rounded adults? When parents adopt the “over my dead body” approach, something amazing happens. Students resign themselves to lessons and within a few more months and they’re surprised at how good they sound!

Remember, if you give up now, music lessons were nothing more than an expensive experiment. Students have also inadvertently learned that’s it’s okay to quit when the going gets tough. Stand your ground! Make your children practice! Trust me, in about twenty years, your children will thank you.