Why Does My Violin E String Whistle? And How Do I Stop It?

Violin E strings are notorious for whistling occasionally. This whistling is common and can be extremely frustrating. But why do E strings whistle like that?

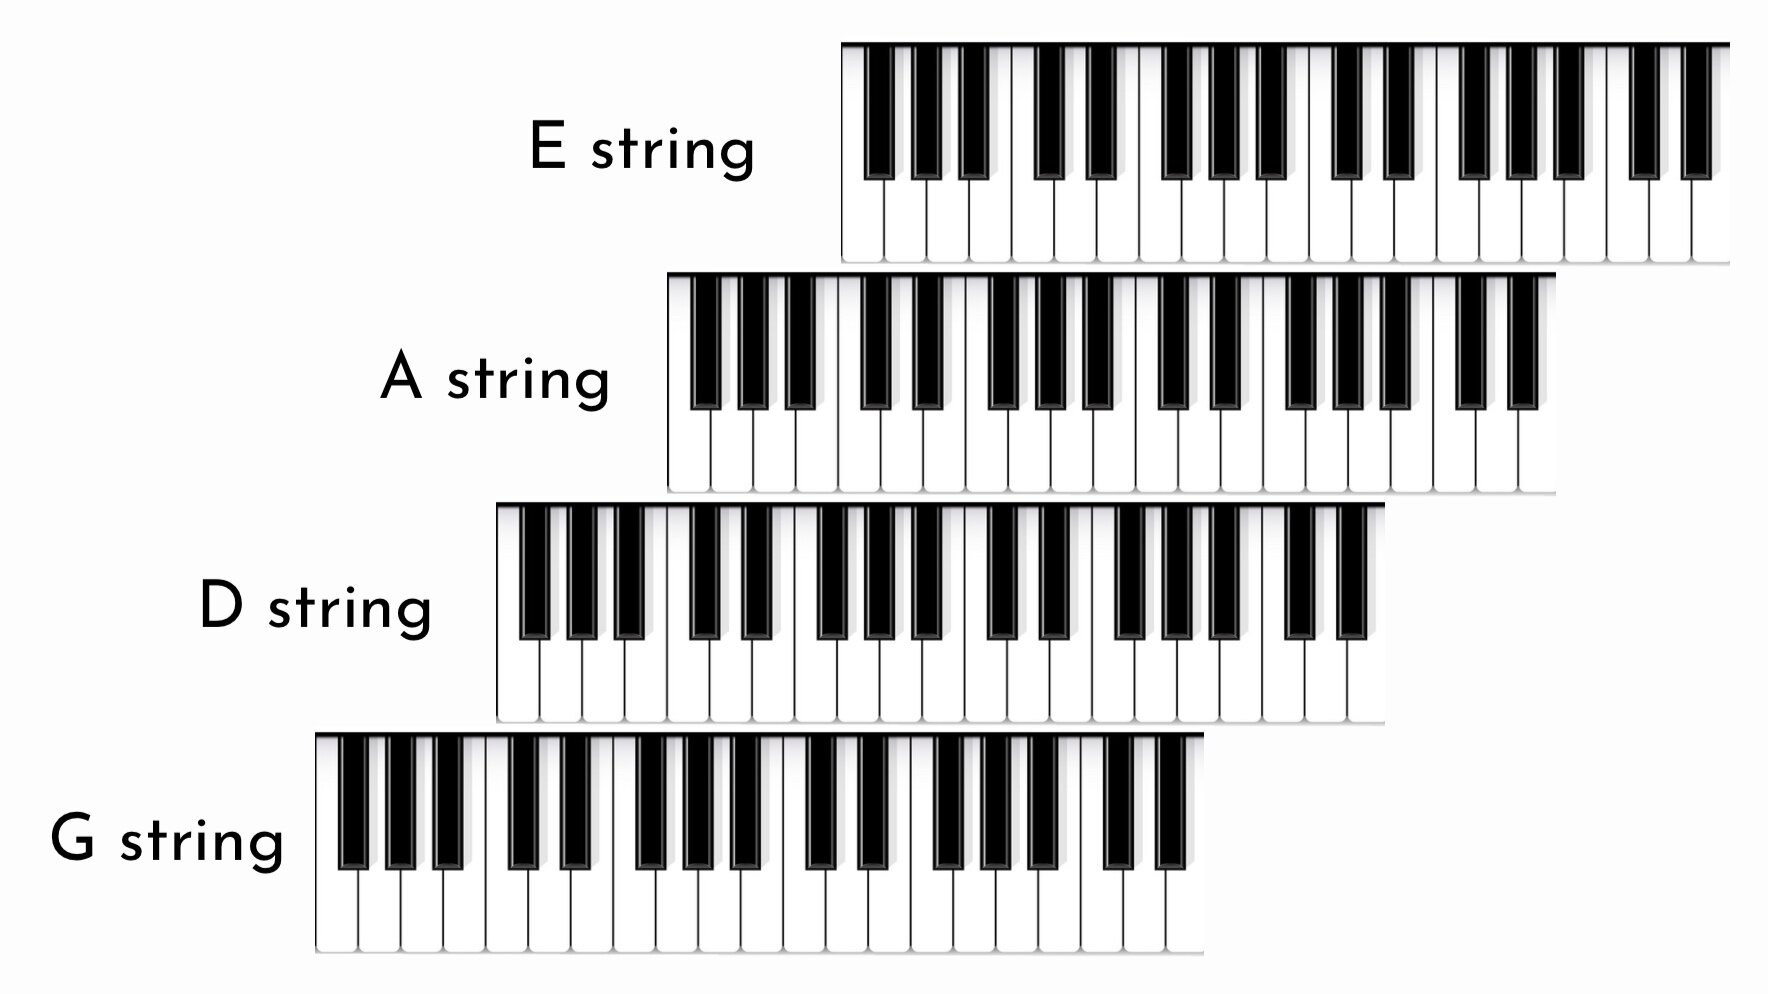
Normally, the bow causes the strings to vibrate side to side, but when the string vibrates abnormally in a torsional or twisting motion, you get an E string whistle. This whistle only occurs on the E string because E strings on the violin are normally unwound. Wound strings, like your G, D, and A strings are not as susceptible to this abnormal twisting motion of the string.

How can I stop my E string from whistling?

Anything that detracts from a clean start can cause the violin E string to whistle. Dirty bow hair or too much or too little rosin can contribute to the whistle.

However, I’ve noticed that the most common culprit is slurring and bow speed. You might notice the E string whistles more when slurring from the A string. This is often because the bow speed is too fast for the E string, resulting in a sloppy start to the vibrations, causing the twisting motion of the string.

Here are my recommendations for stopping your E string from whistling.

  • Wipe off excess rosin off of the E string

  • Slow the bow speed as you change over to the E string.

  • Add more weight in the bow as you change to the E string (I imagine something pulling my right elbow down to help me add more weight).

  • Play closer to the bridge with more weight to get a cleaner start.

  • Change the bowing so you avoid slurs over to the open E string.

  • Change the fingering so you avoid playing the open E string.

  • Some strings tend to whistle more than others. You may also try changing your E string.

Happy Practicing!

5 Reasons You Struggle to Play Fast on the Violin

A common question I get is “why can’t I play fast on the violin?” Or “how do I play fast on the violin?” The question isn’t really how do I play fast. The real question is how do I play fast on the violin and sound good!

Today I’m going to talk about 5 reasons you struggle with playing fast on the violin, how you can fix those problems and start playing fast on the violin!

Out of the 5 reasons you can’t play fast, the last two reasons are some of the often forgotten culprits that can make playing fast on the violin very hard. So stick around to make sure you’re focusing on these two areas so you can improve your ability to play quickly, but let’s start with reason number one…

Also visit 5 Exercises to Help You Play Fast on the Violin for more tips on playing fast.

#1 Bad Left Hand Technique

One of the most common bad habits that I see is a crooked left wrist. This will really impede your ability to play fast on the violin. If your wrist is crooked your fingers have to go up to reach the finger board. If your wrist is straight, your fingers go down to reach the finger board.

A crooked wrist also introduces tension and it’s very hard or impossible to play fast on the violin if your left hand is tense. Try this. Without the violin, make your wrist crooked and try to wiggle your fingers really quickly. Now straighten your wrist and wiggle your fingers. Can you feel the difference?

Crooked wrist impedes fast finger motion

straight wrist allows for fast violin fingers


Playing with your wrist straight will also help you to curve your fingers and play right on the tips of your fingers and both of those things will help you play much more accurately and quickly.

P.S. Check out my free course, Bad Habits That Are Killing Your Progress

#2 Flying Fingers or Not Leaving Fingers Down

If your fingers fly off the string when you don’t need them it’s going to take them that much longer to get back to the string. That’s going to translate to sloppy passages when you’re trying to play fast on the violin. So keep your fingers close to the fingerboard so you can use them immediately.

You also want to leave fingers down as much as you can. You want to avoid what I call “tap dancing” on the strings. For instance, if you have a passage that has a first finger followed by a second finger, do you lift off the first finger?  There’s usually no need to lift it off, so keep it down. Less unnecessary motion will translate to cleaner fast passage.

Now most people have no idea that their fingers are lifting or flying off the strings, so try recording yourself to see if you’re guilty of those very common bad habits.

#3 Inaccurate Pitch

If you’re trying to play something fast on the violin, and it just sounds bad and out of tune, you’ve got to go back and play the passage very slowly. If it sounds even slightly out of tune when you’re playing slowly, it’s only going to sound worse when you speed it up.

If you’re playing slowly and constantly sliding your fingers around to find the right pitch, when you speed up that passage, you’re not going to have time to slide your fingers around to get in tune. The passage will just sound sloppy and out of tune.

So you have to practice pitch accuracy at slow tempos. Aim for being right on the note at the start of the pitch. If you play a note and it’s out of tune, remember what your tendency was and go back and play the previous note and then the out of tune note again and try to correct your tendency. Do this until your muscle memory for accurate pitch is solid and then start speeding up the passage.

#4 Coordination

When we think of how to play fast on the violin, we tend to focus on the left hand. But playing fast and sounding good has a lot to do with your coordination with the bow.

The left hand could be perfectly in tune and super fast and clean but if it’s not coordinated with the bow, it’s still going to sound sloppy. I’ve got some great exercises for coordination and speed here.

#5 Flexibility

You’ve got to have flexibility in both hands to be able to play fast on the violin. If either hand is stiff or tense you’re going to struggle playing fast and sounding good.

For that left hand, that means avoiding the death grip and using light finger pressure. But I think being able to play fast actually depends a lot on right arm flexibility.

For instance, if I’m playing very fast, separate notes and my right arm is stiff and locked, what do you think it will sound like? Not very good. It’s like trying to run with your knees locked.

To be able to change bow directions very quickly your right arm, wrist, and fingers need to act more like shock absorbers, reacting and absorbing all of that quick motion that’s involved in fast bow changes. Try practicing just open strings, changing the bow from down to up very quickly and relax your right hand fingers and wrist so that they are passively following along with the bow.

Now the skills related to a relaxed, flexible bow hand are not things that you’re going to learn over night. It does take a lot of training and practice and I’ve got a lot of resources to help you with that in my online studio.

You should also make sure that you are working on playing your scales and arpeggios at faster tempos using a metronome. If it’s hard to play a scale quickly and cleanly, it’s going to be even more difficult to play a fast passage in a song well.

So if you’re struggling with playing fast on the violin, slow it down. Take your time focusing on accurate pitch, relaxed hands, and coordination. Gradually speed up those fast passages and you’ll be able to play fast, and sound good at the same time!

Happy Practicing!

5 Exercises to Help You Play Fast on the Violin

Playing fast on the violin and sounding good is something we all have to practice, no matter how advanced you are.

You might also want to visit 5 Reasons You Struggle to Play Fast on the Violin to help you understand why you’re struggling. This blog will also help you fix any bad habits that could be keeping your from playing fast.

Here are my top 5 exercises to help you play faster and cleaner on the violin!

First of all, isolate that fast passage and isolate groups of notes inside of that larger passage. For instance, don’t try to conquer all of these notes at once.

Divide the passage into groups of 4 notes or groups of 8 notes.

Try each of the following exercises with each of the smaller groups and then combine and do the exercise again with the whole passage. With the right practicing mindset, you can start to play violin faster and cleaner!

#1 Add a Note

Isolate your fast passage and start by playing just the first two notes. When that sounds clean, add the third note, then the fourth note, and so on. Remember, you can do this for each small group of notes, starting the process over again with each group and then try doing the whole passage, one note at a time.

Taking our original first passage as an example, this is how we would use this technique to gradually speed up the passage.

Play just the first two notes

then add the third note, repeat, Add the 4th note, repeat, etc.


#2 Loop Passages

Take a small group of notes, and play it at a slow tempo, repeat the passage, like you’re playing in a circle. When you can play the passage cleanly at a certain tempo, gradually start speeding it up with each repetition.

For instance, from our original passage, we would take the first grouping of sixteenth notes and loop it like this.

#3 Long Short/ and Short Long

Imposing rhythms onto your tricky passage is one of the best things you can do to clean up a fast passage and play faster on the violin. Not only are you working on speeding up the left hand fingers, you’re also making sure your left and right hands are coordinated as you get faster.

When you write the rhythms down, it looks a lot more complicated than it is. Play these exercises by ear. But here’s what the rhythms would look like.

Take a passage of 8th notes or 16th notes and instead of playing the notes as written, add in this rhythm as you play (you don’t have to write it down).

Long Short Rhythm/Making the first note long and the second note short

Working in groups of two, making the first note long and the second note short. Long short long short, etc. Play through the whole passage this way and then reverse the rhythm and do it again. Now play the first note short and the second note long.

When you practice this way, your’e working on speeding up notes, but not all at once. You’re working on speeding up only two notes at a time. When you reverse the rhythm you work on speeding up two different notes. When you’re practicing fast passages with these rhythms, hold the long note for as long as you want. Use that long note to think about the next two notes.

Once you practice this this, way try playing the whole passage with the normal rhythm.


#4 One Our of Every 4

This is a similar technique for playing faster on the violin. This rhythm works with 8th notes or 16th notes. Instead of working in groups of two, you’re going to be working with groups of four notes. Make the first note of every four notes long. Play through the whole passage this way.

Make the first note of every grouping long and the next three notes short

Then make the second note of every four notes long. Then make the third note long, then the fourth note long.

Do you see how you’re speeding up three notes at a time? As you do different variations of that rhythm, you’re speeding up 3 different notes each time.

This technique for speeding up your playing on the violin also works for groups of 3, like triplets. Simply move which note is the long note.
Once you finish practicing this technique, always try play the whole passage with the normal rhythm.

#5 Up 4 Back 2

It’s always great to use a metronome to help you gradually speed up fast passages on the violin, but I love the up 4 back 2 technique when it comes to speeding up tricky spots. Start with whatever beat mer minute where you can comfortably play the passage. Now go up 4 clicks and play the passage again. Now go back two clicks and play it again. Repeat the process, up 4 back 2. When you play the up 4, it might feel a little hectic and rushed. Then when you slow it down to the back 2 tempo, it feels relaxed and doable, but you’re still faster than your original tempo. So you’re tricking your mind into thinking that playing faster isn’t that bad. You can also do this with up 10 back 5.

I hope these 5 techniques help you speed up tricky passages on the violin. They’re my go-to exercises anytime I need to speed up a passage, clean it up, or just get more comfortable with the finger patterns or bowings.

Let me know in the comments below if it’s helpful or if you have other techniques to help you play faster.

Happy Practicing!

Down Bow, Up Bow, Slurs, or Separate? Choosing Good Violin Bowings

How do you know when to use a down bow or an up bow? What’s the difference between down bows and up bows? How do you add in bowings when none are written? How do you change bowings when they are written? Are there any rules for choosing good violin bowings?

These are all very common questions about violin bowing that don't get enough attention. Let’s dive into the world of violin bowings!

Down Bows or Up Bows: How to Choose the Correct Bowing Direction

First let’s talk about up bows and down bows. Down bows are when the bow moves from the frog towards the tip. Up bows are when they bow moves from the tip towards the frog. Down bows and up bows are notated by two different symbols.


In general (and this is very general), use down bows for strong beats or down beats and up bows for off beats or weak beats. If you have a single pickup note, it’s usually an up bow. Some passages might feel awkward starting on a down bow, or they might feel awkward starting on an up bow, sometimes it doesn't really matter.

To understand if you should use a down bow or an up bow, try experimenting with both and see what makes sense. You can also try starting in different parts of the bow. This can greatly affect how comfortable and natural the bowing feels.


Down Bows vs. Up Bows: General Rules for Violin Bowings

Most “rules” in music can be broken! But here are some general rules for choosing between down bows and up bows on the violin.

Use down bows for:

  • Strong beats or down beats

  • Forte or loud sections

  • Accents

  • When you need to travel to the upper half of the bow

  • Decrescendos

  • Long, slow bows (especially when they have a decrescendo at the end)

  • The last note of a phrase or song (especially when the last note ends with a decrescendo)

Use up bows for

  • Weak beats or pick up notes

  • Piano or softer sections

  • When you need to travel to the frog

  • When approaching a note that needs to be played “off” the string

  • Crescendos

  • The last note of a song when you want to end with a flourish, a crescendo, or come off the string.


Slurs and Separate Notes

A slur is when we connect multiple notes into one bow. This bowing is notated by a curved line connecting all of the notes in the slur.

Separate notes, or notes that are not connected by slurs are notated different ways. Most often, notes that are separate don’t have any indication other than the absence of a slur. Sometimes separate notes have individual down bows and up bows over each note. Other times you will notice dots or dashes over the notes to indicate articulation and to show that each note is distinct or separate and not slurred together. Playing each note on a different bow is sometimes often referred to as a detaché bow stroke.


How to Choose Good Violin Bowings

Choosing good violin bowings depends on several factors. I would break down my bowing strategy into five groups: ability/ease of playing, sound, tempo, style, and necessity. Let’s talk about each violin bowing strategy!

Ability: How the Level of Your Playing Affects What Bowings You Choose

Sometimes I’ll see a printed bowing and think, “there's no way I can play that bowing!” Or at least, I’m not ready to do it yet!

So I change the bowing to make it easier for my playing ability. For instance, if I’m learning a piece and the printed bowing wants me to slur eight notes in one bow, I might split that up until the tempo is faster and I’m ready to tackle all of those notes in one bow. If I’m dealing with big string crossings, I usually avoid a slur because it’s harder to make it sound good. It’s fine to change bowings to make it easier on yourself. Although you also want to challenge yourself to be able to play more difficult bowing combinations sometimes as well!

Slurring two notes will be easier than slurring four notes at slower tempos.

Easier

Harder


Sounds: Choosing Violin Bowings Based on the Sound You Want to Portray

This is where slurred bows or separate bows come in to play. If I want a smoother sound, I’ll slur the notes together. How much do I slur? Do I slur two notes, three notes, four notes? It depends on the tempo and how much bow I want to use, and what I can comfortably fit into one bow. Separate bowings have their place too and often add to a variety in sound. If EVERYTHING is slurred together in various combinations of slurs, playing detaché or using separate bows can make something stand out (in a good way or a bad way!) It depends on the sound you’re aiming for.


Tempo: Speed Affects What Violin Bowings You Should Use

This is a big one that I don’t think we think about enough. Tempo plays a big factor when determine what bowing you should choose.

The slower something is, the harder the slurs and long bows will be to play on the violin. It’s much easier to slur eight sixteenth notes in a fast tempo than eight quarter notes in a slow tempo. This is also one reason why the bowings might change from your initial “learning” tempo, to your actual performance-ready tempo.

Style and Musicality: Choosing Violin Bowings for Different Musical Styles

When it comes to musicality, more advanced bow strokes come in to play like hooked bowings, louré bowings, “off” the string strokes like spiccato and staccato, or even bow lifts. As you get a feel for different styles of playing (Baroque, Classical, Romantic, Fiddle) you’ll get an idea for what bow strokes would work best in certain areas. When it comes to musicality, if you have an important, long, accented note you would probably want to start it on a down bow at the frog. If you want to start something very softly, you would start at the tip on an up bow.


Necessity: Choosing Violin Bowings Often Depends on What Needs to Happen

A lot of decisions fall into this category. You might change a bowing somewhere just to make a bowing further down the line work out. Sometimes certain bow strokes or bowings are used for musicality, but sometimes they’re more for bow planning. For instance, if there was a certain note you really wanted to start at the frog, you might slur the previous notes into one long up bow to get you where you need to be. Use the bow as a tool to help you!


When You Can’t Change the Bowings

As a violin teacher, I always encourage my students to make their own decisions when it comes to choosing bowings. If there is a bowing you don’t like, as long as you are consciously changing it and have a good reason, that’s fine with me!

However, there are certain times when changing a bowing to fit your own needs is a no-no. And that’s orchestra time! Everyone needs to bow in the same direction in orchestra. So if you’re part of an orchestra, coming up with your own violin bowings probably isn’t the best idea unless you are the concertmaster or principal second! However, if you do have suggestions for bowings, ask your section leader or conductor.

The Takeaway When it Comes to Choosing Violin Bowings

So as you can see, when it comes to deciding on violin bowings the main thing to remember is…it depends. Choosing good violin bowings depends on your ability, the tempo, style characteristics, and your own personal decisions of musicality and phrasing. Most of all, deciding what bowing to choose comes down to trial and error. And this is where experimenting comes in handy. And you know what I think about experimenting!

Happy Practicing!

P.S. The bow is your most useful tool for creating musicality, expression, and phrasing. Do you want to learn more about how to control the bow, relax while playing, and develop a better sound? The Secret to Better Bow Control is just one of the courses you get access to when you become a Meadowlarker and sign up for my online studio! Learn more here.

Master the Basics: Easy Violin Scales and Arpeggios for Beginners

Hello, fellow violin enthusiasts! I'm Lora from Meadowlark Violin, and today I'm excited to share with you the secrets of mastering three super easy scales and arpeggios tailored for beginners. Scales are the backbone of every violinist's practice routine, serving as the essential building blocks for honing your technique. Whether you've just started playing or have a few weeks or months of playing under your belt, these scales and arpeggios will set you on the right track.

I’ll be teaching you all of these scales by ear, no sheet music required! Learning scales and songs by ear is great for intonation, even if you already read music.

The Magic of Finger Patterns

What makes these scales super easy, you ask? Well, they all share the same finger pattern. That means learning one pattern opens the door to playing three different scales. Understanding finger patterns can simplify the learning process, and repetitive finger patterns don’t just stop with easy scales. As you progress on the violin, you’ll notice advanced scales spanning several octaves can share the exact same finger pattern as another scale in a completely different key. (Learn more about universal scales and violin finger patterns here.)

Dive into D Major

Let's kick off our exploration with the D major scale. With two sharps (F# and C#), we delve into the world of half step pairs. Half steps occur where two fingers are touching on the violin.(Learn more about half step pairs and how scales work here.) F# and G, and C# and D, form our two half step pairs for D major. As we start on the open D string, I'll guide you through the notes, creating a musical journey akin to the first two notes of "Happy Birthday."

On the D string, play the open D string followed by the first finger, second, and third finger. All of the notes will be a whole step apart except for the second and third fingers. These notes are F# and G and that’s one of our half step pairs, so those fingers will be touching. Repeat that exact pattern on the A string for a complete D major scale.

Transition to A Major

Next on our musical adventure is the A major scale. With three sharps (F#, C#, and G#), we adjust our half step pairs. Our new half step pairs are between G# and A, and C# and D. The finger pattern remains consistent, allowing a smooth transition from D major. Simply play the exact same finger pattern, but on the A and E strings. Tada! An A major scale.

Venture into G Major

Our final destination is the G major scale. Utilizing the same finger pattern, we seamlessly navigate between the G and D strings. The magic lies in the continuity of patterns – one pattern, three scales. The consistent approach makes G major as accessible as the previous ones, empowering you to expand your repertoire. Can you determine what the half step pairs are for G major based on the finger patterns? The half step pairs are B and C and F# and G.

Arpeggios Unveiled

Now that we've mastered the scales, it's time to delve into arpeggios – a sequence of individual notes forming a chord. Let’s start with the D major arpeggio, which consists of the notes D F# and A. On the D string, play the open D followed by the second finger. Then move over to the A string. Play the open A followed by the third finger. That’s a basic arpeggio pattern! The same pattern is applied to A major and G major arpeggios, simply start on the A string for an A arpeggio and start on the G string for a G arpeggio.

Conclusion: Embrace the Patterns

In conclusion, mastering the basics of violin scales and arpeggios is akin to unlocking a musical treasure chest. By discerning and embracing these patterns, you pave the way for easier and more enjoyable learning experiences. Remember, the violin might seem intricate, but patterns are your allies.

10 Tips for Better Violin Intonation

How do you play in tune on an instrument with no frets or markings? If you feel like you are never in tune on the violin, here’s 10 reasons why you might be struggling with bad violin intonation and how to play more in tune!

There’s a lot that goes into playing in tune on the violin. If you feel a little bit overwhelmed at all the reasons that might be affecting your violin intonation, make sure you stay to the end because I’ll give you one practice technique that will help you solve all of these problems.

#1 Using finger tapes or finger decals

Wait, what? Aren’t these supposed to help you play in tune? Not really, in fact it will contribute to bad intonation in the long run. Think about it, playing in tune on the violin is an auditory skill. Finger tapes are visual cues. How can a visual cue help you with an auditory skill? Finger tapes might help when you’re just starting off, but they will also force you to rely on your eyes and you’ll never build those ear training skills that you need to play really in tune on the violin.

(Watch the Pros and Cons of Using Finger Stickers on Your Violin)

So work on developing your aural skills instead of your visual skills and your intonation will improve.

#2 Incorrect left hand technique

If you’ve got a crooked wrist or maybe your thumb is pulled far back, it’s going to make it harder if not impossible for you to consistently play in tune. Crooked wrists and other left hand problems can introduce tension, which make playing in tune very difficult. Incorrect left hand technique can also force you to play with flat fingers. And flat fingers is the next reason you may struggle to play in tune.

#3 Flat fingers

Your left hand fingers need to be curved like little arches or boxes. This allows you to hit the string with accuracy. If your fingers are flat or sloping you won’t be able to be as accurate with your pitch, resulting in inconsistent or bad intonation.

#4 Not leaving fingers down

My rule is that if you put a finger down you should leave it down until you absolutely have to move it. Let’s say you play first finger and then you play 3rd finger. Are you leaving the first finger down? Or is it flying off the fingerboard when you aren’t using it?

Leaving fingers down gives you anchor points and helps you compare other notes.Those anchor points will help you build muscle memory in your left hand which is essential to playing in tune.

#5 Using tuners

If you’re relying on a flashing green screen to tell you if you’re in tune on the violin, once again you’re relying on a visual indication for an auditory skill. It might help in the short term, but it’s going to hurt your progress in the long-run because you’re not developing those vital auditory skills that you need to help you play in tune.

Instead of using tuners, use music play back programs or music writing software like MuseScore, or or get a piano or piano app, play the notes you’re having trouble with on the piano. That way you know what the note should sound like and you can match that pitch on your violin.

#6 Not practicing ear training

You need to train your ear to hear intonation problems the same way you train your eyes to read music or train your right hand to hold the bow. Unfortunately ear training is a topic we don’t talk about enough in the violin teaching world. EarMaster is a great ear training tool. I also have a complete course on ear training for violinists in my online studio. Ear training is a topic I cover a lot in my studio and show you lots of ways you can develop your ear for better violin intonation.

#7 Thinking of intonation as a one note problem

Intonation is not a one note problem. It’s a two note problem. With the exception of the first note of a song, every note follows another note. No note exists in a vacuum. You have to think about what note comes before the out of tune note. Practice those 2 notes, think about how you get to the out of tune note, how you stretch for it, or how you prepare for it.

For instance if you have a big stretch to a 4th finger and then a low 2 after the 4th finger, that big stretch to the 4th finger is going to affect the low 2nd finger. You’re going to have to stretch back for the low 2 to get it in tune. Thinking of any violin intonation problem in terms of two notes will help you play more in tune.

#8 Tension

Tension is a big reason for bad intonation on the violin.

First of all I want you to remember this rule: there is no such thing as perfect intonation. There is the illusion of perfect intonation.

As you progress on the violin, ideally your ear is progressing as well. Your ear begins to identify when a note is out of tune and your ear will tell you how how that note is out of tune: too sharp or too flat. Your left hand finger quickly adjusts to match what your ear is telling you the note should sound like. Ideally this whole process happens quick enough that your listeners have no idea that you originally played the note out of tune.

The point here is that your fingers need to be able to adjust and move with lightening quick speed and if you are tense or have a death grip on the violin, your fingers will never be able to move quick enough to play in tune.

(Watch How to Get Rid of the Death Grip)

#9 Not preparing the fingers

When you’re playing one note, you need to be thinking about the next note and your finger needs to be preparing for that next note. For instance, if I’m playing 1st finger and my next note is a 4th finger, while I”m playing the 1st finger, I need to be stretching up with my pinky, maybe moving my thumb up, and hearing in my head what that next note needs to sound like. If you’re not thinking ahead, every note will catch you off guard and you’ll always be playing catch-up.

If you’re thinking, that’s a lot to think about, you’re right. If you’re also thinking there’s no way I could ever think about all of those things while I’m playing violin, you’re wrong. That brings me to my last reason you may be struggling with intonation.

#10 You’re not practicing slow enough

You need to dedicate time for every scale, song, and passage and play it unbelievably slow. Like, unbelievably slow.

When I play that slowly, I actually have the time to think about all of the those things I talked about. I have time to prepare the note, I have time to force my hand to relax, I have time to think about intonation in terms of two notes, I have time to curve my fingers, I have time to think about leaving fingers down, and I have time to understand what my left hand is actually doing.

Playing unbelievably slow is one of the best tools we have as violinists, but unfortunately it’s one of the tools we use the least.

So take some time to play unbelievably slow every day and I think you will hear a major improvement in your violin intonation!

How to Practice the Violin in 8 Steps: Ultimate Practice Routine

Practicing violin is a skill, just like learning to play in tune is a skill. You have to practice practicing! Once you learn how to practice violin the right way, you’ll be able to make more progress in less amount of time. That means you’ll have more violin practice time to devote to other areas.

I’ve tried many practice routines for violin, but I’ve decided this structure is the best practice routine for maximum results and progress. These 8 practice steps are what I do every day!

Ultimate Violin Practice Routine for the Best Results

You want to make sure you are getting the most out of your practice time with the violin, but more importantly, you want to make sure that you aren’t reinforcing bad habits while you practice.

One reason many beginner violin students get frustrated with the violin is that they can’t ever tell they are making progress. This problem is fixed by getting a practice routine and sticking with it. By practicing the same things everyday and sticking with a routine, you’ll be able to see progress every single day. If you jump around and never practice the same scale, exercise, or song more than a few days, you never truly master any skill or song, and therefore you can never tell if you are making any progress. So if you want to know how to practice violin the right way, here’s what I’ve learned after playing violin for over two decades!

  1. Start With Stretches

Stretches are so important to practicing violin the right way. Stretches get your muscles warmed-up and ready to play. They also help you to relax and will help you to avoid tension while you’re playing.

I start by stretching large muscles, like my back, my shoulders, and my arms. Then I stretch smaller muscles, like my neck and wrists. Finally I stretch my fingers and hands. Now you’re ready to pick up your violin and practice!

2. Warm-Ups

During your warm-up period, you are focusing on warming-up each hand separately. Don’t try to combine hands yet! I don’t start playing scales until I’ve done several minutes of warm-ups.

Warm-ups for the violin include things like playing long bows on open strings and doing slides for the left hand. This is also a great time to incorporate some experimenting into your practice time (I’ll talk about that later).

If you need some ideas for warm-ups, watch my 5 Essential Warm-Ups for the Violin.

3. Scales

Scales are absolutely crucial to making progress on the violin. I can’t stress this enough. I know because after I graduated from college, I thought I would cut out scales for a few weeks. (It was my first time in a decade I didn’t have regular weekly lessons with an instructor so I was trying to spread my wings). That experiment didn’t end well. After two weeks of playing scales on and off, I could tell my playing was really suffering. My fingers weren’t hitting the strings precisely, nor where they quickly adjusting to being in tune. Back to scales!

Scales should never be boring. They offer a blank slate to incorporate all of those various tricky passages in your solo pieces. Experiment with your scales and watch your progress soar!

Want a free violin scale book? Sign up below and get my free violin scale book, Creative Scales for the Experimental Violinist!

4. Etudes/Exercises

What are etudes? They are like a mix between a song and a scale. They are usually shorter compositions that focus on one technique element, like trills, 4th finger, or slurred bowings. The options are endless when it comes to etudes.

If you’re not currently playing etudes, this would be the time where I would practice exercises from your method book, or tetrachords.

5. Solo Pieces

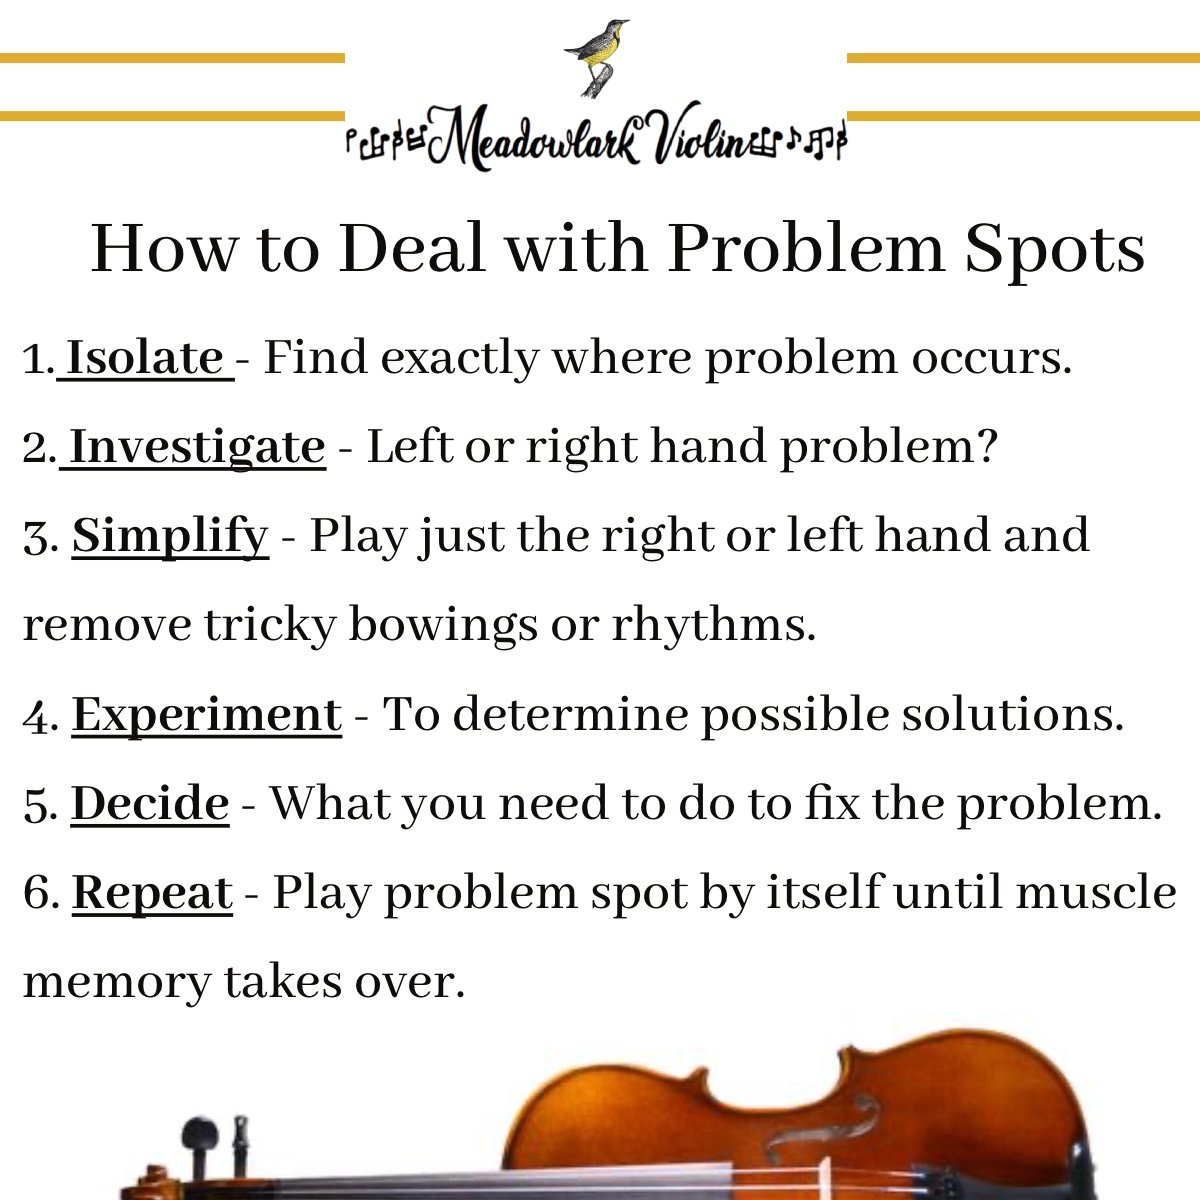
Next up in our ultimate practice routine for the violin, your solo piece! Now it might be tempting to just play through your solo piece from the beginning, but this isn’t always the best way to approach practicing. Start with the problem spots while your focus is fresh. Don’t just repeat the tricky spots, be a detective. Try to determine if it’s a left or right hand issue. Simplify the tricky measure as much as possible. Take out tricky bowings or rhythms. Once you’ve isolated the exact problem, play it correctly several times until you start to feel muscle memory taking over.

Then start at the beginning and work your way through the rest of the piece!

It’s tempting to have a lot of solo pieces you’re working on. There are so many great pieces for classical violin and for fiddle that it’s easy to get distracted always playing new songs. But this means you’re spreading out your practice time and never really mastering any one song. My general rule is a max of 2 songs that are your main focus songs. You can have songs that you are polishing or songs that you always play as well. But for new songs, try to keep your practice time focused on one or two songs.

6. End on a High Note

You’re not done practicing quite yet! End your practice time playing something you love. Maybe an easy song you’ve already learned or a measure you do particularly well. It’s important to end your practicing feeling good about what you’ve accomplished. That will make you excited about practicing the violin again!

7. Experiment

Okay, that was the structured part of your violin practice routine. Now it’s time to experiment. Save a special time during or after your regular practice routine to add in some experimenting.

Your experimental time has no structure, no goals, no expectations. Feel free to experiment playing way up high, try doing dynamics with your bow, or pick out a song by ear. Experimenting is crucial to your progress as a violinists but we violin teachers rarely talk about it. Why? It’s hard to teach and it’s impossible to critique! That’s also the beauty of it. So make sure you take time out of your practice routine to experiment!

8. Don’t Practice All At Once

Don’t feel like you have to fit all of these items into one practice session. In fact, it’s best if you split it up. Do your stretches, warm-ups, and scales in one practice session, then take a break and do the rest. Maybe have an entire practice session where you just review old songs or another practice session dedicated entirely to experimenting. Taking breaks will keep you fresh and focused. Before you start practicing after a break longer than an hour, do some type of abbreviated warm-up and stretches. Maybe do some open strings and a scale just to get your fingers and muscles limbered up again.

How Often Should I Practice Violin?

Practice every day. Shorter segments are better than massive practice marathons where you are more likely to loose focus. Don’t feel like you have to do this practice routine all at once. Feel free to split it up, but always start each new practice session with a warm-up or scale. It’s hard to start playing cold!

While it’s important to practice every day, it’s also important to take at least one day off a week. This allows you to refresh and come back the next day ready to practice again!

Use your off day to listen to more music or just relax and go for a walk! If you really want to practice on your off day, you can. But remember, whatever you do on your off day is a bonus!

I think once you implement this practicing strategy you’ll notice drastic improvement, better progress, and more joy from playing the violin! Write in the comments below and let me know how you practice!

Happy Practicing!

~Lora

Easy Violin Harmonics Explained!

Harmonics on the violin often seem over-complicated and confusing, but harmonics on the violin are actually some of the easiest notes to play on the violin! Not only are they easy to play, they’re easy to recognize in music. After you go through this easy guide to violin harmonics I think you will find these special notes on the violin not only easy, but fun to play!

Here’s some common questions about violin harmonics that we’ll cover in this easy guide to harmonics. (Skip ahead if you like).

What are violin harmonics?

How to play violin harmonics?

What are the different types of harmonics?

What’s the difference between natural and artificial harmonics on the violin?

How are harmonics notated?

What are the most common harmonics on the violin?

How are artificial harmonics notated?

What’s the most confusing way to notate harmonics that I’ll probably never see in violin music? (I’m glad you asked. I’ve got an answer for you)

What Are Violin Harmonics?

The definition of a harmonic is: a wave whose frequency is multiple of the frequency of the same reference wave.

Got it? Okay, good. Moving on.

Just kidding. You don’t need to know anything about waves, overtones, nodes, frequencies, etc to understand violin harmonics.

What is my definition of a harmonic? A note that is played by lightly touching the finger to a particular place on the violin string, which produces a whistling sound.

When you are playing a harmonic, you are touching the string so lightly that you are actually allowing both parts of the string to vibrate (the parts of the string to the left and right of your finger). Think about it. When you put a finger down on the violin fingerboard normally, you’re allowing the string in between the finger and the bridge to vibrate, but the part of the string in between your finger and the nut of the violin doesn’t vibrate.

Allowing both sides of the string to vibrate is one of the things that gives a harmonic its characteristic whistling sound.

How to Play Harmonics on the Violin

Look at your string from the nut (the grooved part at the bottom of the peg box where the strings are touching) to the bridge. Do you see that distance between the nut and the bridge? On a full size violin that’s about 13 inches. You can either measure or just eyeball it, but lightly touch your finger to the string at the mid-point of the string. I do this with my fourth finger but you can do it with any finger. Move your finger around until the harmonic speaks.

Tada! You’ve found the most common harmonic on the violin. The harmonic will occur on the same place on every single string.

What you are playing is a natural harmonic on the violin. It occurs when you divide the string in half. That ration of 2:1 is the simplest ratio you can get, so the harmonic produced there is going to be really easy to play.

There are other natural harmonics on the violin. For instance, if you divide your string length into thirds, you’ll find there’s a natural harmonic right where your 3rd finger would go in first position. (Ever wonder why that finger is a “ring tone” on your violin that really rings when it’s in tune? Now you know).

There’s also a natural harmonic where the fourth finger goes in first position. Just try lightly touching the string and scoot your finger all the way up the fingerboard. You’ll hear lots of natural harmonics. The ones that sound clearly are more simpler ratios. The harmonics that don’t speak so easily are more complicated ratios like 7:1.

What Are the Different Types of Harmonics on the Violin

There’s only two types of harmonics on the violin: natural harmonics (what you just played) and artificial harmonics.

What's the Difference Between Natural and Artificial Harmonics?

Natural harmonics occur when you lightly place your finger on the string. On a full size violin the length of the string from the nut to the bridge is about 13 inches. So you’ll find natural harmonics at certain places, like 6.5 inches up from the nut (the exact middle of the string) Or 4.3 inches up from the nut (the string divided into thirds).

Well those same ratios exist even when playing on a different length of string.

Let’s say we put our first finger down firmly on the first finger in first position. Guess what?! You’ve changed the string length! You’re no longer dealing with a 13 inch string. You’re dealing with something more like a 12 inch string. That means those harmonics that occur when you divide the string in 2 or divide by 3 are going to occur at different places.

So if you keep your first finger down and lightly touch the 4th finger with your pinky, you’re essentially dividing that string into thirds. That’s an artificial harmonic!

An artificial harmonic occurs on the violin when you create an artificial “nut” by placing the first finger firmly down on the string and then placing another finger lightly on the same string to divide the string into thirds and play a harmonic.

How Are Harmonics Notated on the Violin?

There are four ways to notate natural harmonics on the violin. The first two are the most common, but you’ll occasionally see the second two.

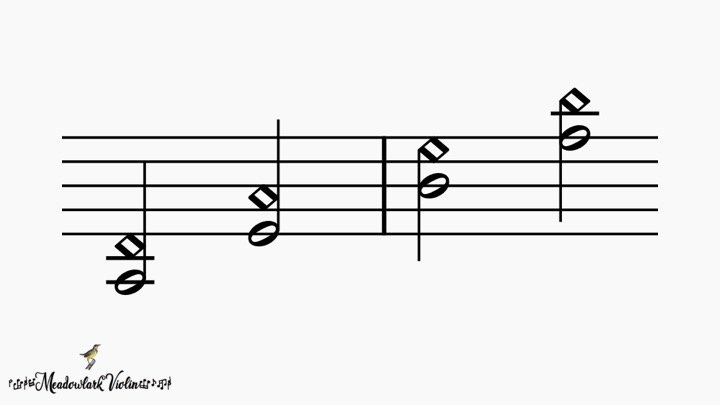
The most common natural harmonics are usually notated with a 4 and a 0 or circle. You’ll find this notation for that common natural harmonic that occurs right in the middle of the string.

For the other natural harmonics, it’s common to see the note head in an open diamond shape. Sometimes you will also get a number like 3 and a 0 to indicate that note is a harmonic.

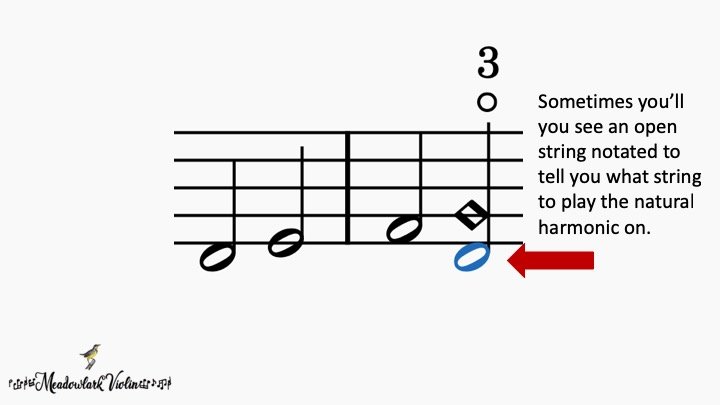
Sometimes you will see an open string below a diamond shaped note. The lower string is telling you what string to play this harmonic on. In the example below, you would lightly place your 3rd finger on the “G” note on the D string.

What Are the Most Common Harmonics on the Violin?

These are the most common natural harmonics on the violin. You can play them with third finger in first position, 4th finger in 1st position, or 4th finger in 4th position.


How Are Artificial Harmonics Notated?

Artificial harmonics often look like a double stop (two notes at once). But the bottom note will look like a normal note and the note on top will be diamond shaped. This is telling you to firmly place the bottom note wherever you would normally place it if it were just by itself. Now lightly place your pinky on whatever note the diamond shaped note is indicating (always on the same string).

Sometimes artificial harmonics look like this.

That’s really all you need to know to be able to identify harmonics in music. Sometimes you’ll see the word harm. to indicate the notes are harmonics. Sometimes you’ll see the word flag. which is short for flageolet, another word for harmonics. But that is somewhat rare.

What's the Most Confusing Way to Write Harmonics?

Wait, you mean you’re not confused? You’re disappointed because you thought harmonics would be sooo much more complicated? Alright, alright. Let me try and confuse you with this form of harmonic notation that you’ll rarely see in most violin music.

So what in the world is this trying to tell us? Are these artificial harmonics or natural harmonics? They’re natural harmonics trying to masquerade as some unnatural aberration.

Sorry natural harmonics, you’re just not that confusing.

Okay, stay with me here. The bottom note tells you what open string to play the harmonic on. The diamond shaped note tells you where to lightly place your finger. And the note in parentheses tells you what pitch is actually sounding.

The diamond note is the only important note in my opinion. The other two notes are completely unnecessary. The bottom note is not needed because where else would you play those diamond shaped notes? How about that first one? Do you want to try and play that G on the E string? Hmmm….probably not a good idea. Why don’t you just play it where you would always play that note! On the D string!

What about the second example? Where else are you going to play that low B? Well there’s only one string you can play that harmonic on, the G string, so your options are kind of limited.

How about those top notes in parentheses? Those are the pitches you are actually producing when you play that natural harmonic. The good news about natural harmonics is that if your finger is in the right place, the harmonic is in tune! No need to get out your tuner to see if that natural harmonic on the D string with 3rd finger is actually indicating that high D.

Composers have already done all the hard work to figure out what pitch they want to sound at that particular place in music. So the parenthetical notes are way more information than you need and often left out of most violin music.

I hope you enjoyed this easy guide to violin harmonics! If you would like more music theory, check out my course on Music Theory that covers pretty much every topic imaginable!

Happy Practicing!

~Lora


What is Third Position on the Violin (And Why is it Hard!?)

What is third position on the violin

What is third position on the violin? What do we gain by learning a new position? Why do we learn third position after first position? What are the notes in third position? And most importantly, why is learning third position so hard?

These may be some of your questions as you’re getting ready to learn third position on the violin. I remember learning third position turned my world upside down and I’ve heard similar stories from other professional violinists. For a longtime I watched my own private students struggle with learning third position. Then I finally realized the problem wasn’t with third position, but with the way we teach it!

Traditionally, we teachers plop a third position book up on the music stand and watch our students slog joylessly through reading music in third position. The reason third position is so hard is because students have never been taught to understand and speak the language of the violin.

Let me explain. I took a couple Spanish courses in college. I learned to parrot back a couple phrases. To this day, I sing a little ditty I learned titled, “Me gusta la leche, me gusta cafe.” Now I can say a couple things in Spanish. At one point I might have even convinced a few non-Spanish speakers that I could speak the language. But did I actually known and understand Spanish? NO! All I could do was repeat phrases I had learned. That’s not knowing a language in my opinion. But unfortunately, we violin teachers teach violin in the same way.

We teach you to memorize little things. “Play a high 2nd finger on this string, but not on that string. Just remember when you see this key signature you have to do it that way. Don’t ask why. There’s not enough time to explain.”

So when you get to third position, no wonder it’s so confusing! You’ve never learned the basic rules of the language and when you throw in an advanced concept, your world falls apart.

My method of teaching third position is completely different. I teach you the language of the violin through ear training and music theory so third position makes sense. If you want the real third position experience, check out my course on Mastering Third Position Basics (you’ll get the entire course as part of my Online Membership).

For now, let’s talk through these questions about third position.

What is Third Position on the Violin?

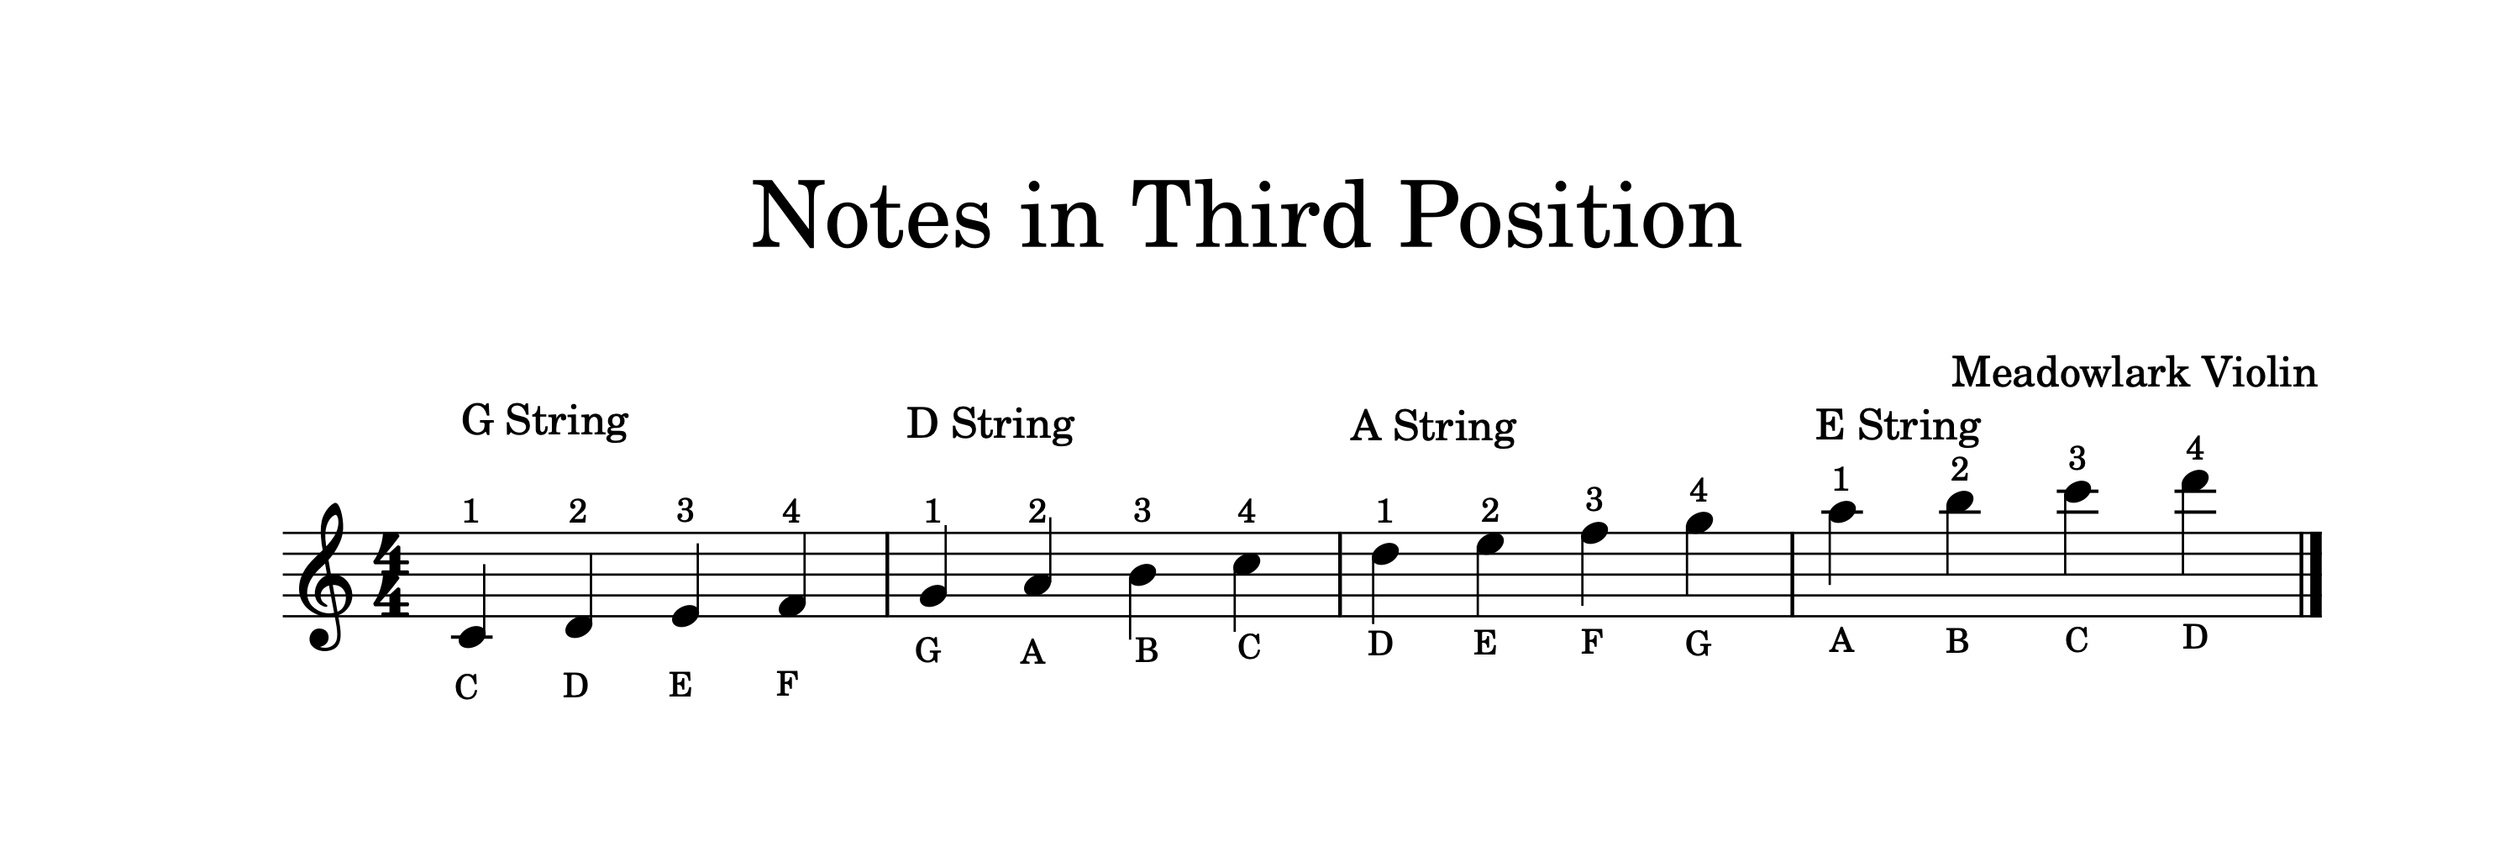
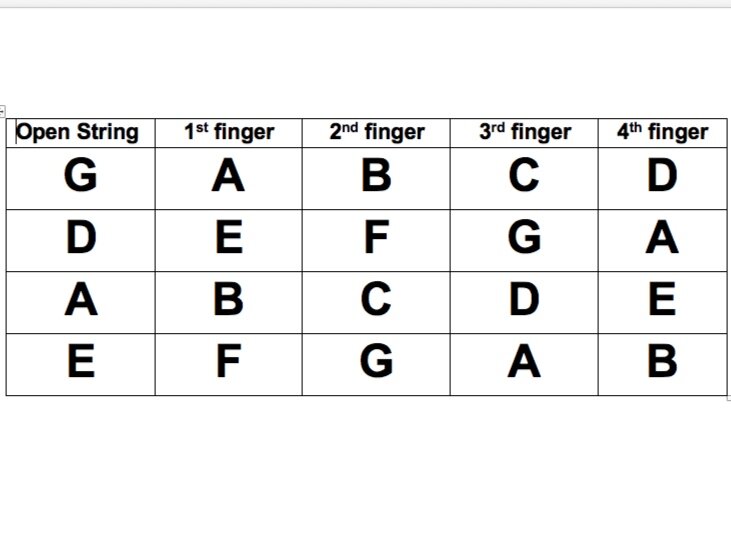
Simply put, if you put your first finger where your second finger normally goes in first position, you’re in Second Position. Now go back to first position. If you put your first finger where your third finger goes, now you’re in third position. The first finger in third position on the G string is on the C note, on the D string first finger is G, A string first finger is D, E string first finger is A.

Every time you change to a higher position, you gain one new note that you didn’t have in the lower position. You also lose a note on the lower end as well.

When Should I Learn Third Position?

You should wait to learn third position until you are pretty comfortable in first position. Once you can play all of the notes in first position with pretty good intonation and muscle memory, you’re probably ready to start learning third position. However, I think it’s very important to experiment during your practicing. Experimenting means not knowing what the outcome will be, so you can’t beat yourself up if the outcome wasn’t what you expected. It’s very important to experiment with the violin during your playing. You’ll discover so much about your violin by just “playing around.” So if you want to experiment playing in third position even if you are fairly new to the violin, I say go for it.

How Do I Get Ready for Third Position?

Well, I’ve got 7 tips for making sure your set-up and violin hold is ready for third position. You can watch the video here.

What are the Notes in Third Position on the Violin?

Here are the notes in third position for each string. You’ll notice you gain a high C and D on the E string. These are notes you didn’t have in first position. But you also lost the low A and the low B on the G string.

Why Do We Learn Third Position Before Second Position?

Certain key signatures fit well with certain position. In first position, you probably learned D, A, or G major first. Trickier keys in first position are B Flat, F Major, E Major, etc. These are tricky because they involve “low 1s” or “high 3s,” notes that don’t fit in that normal finger pattern.

Every position has keys that fit will in that position. Third position tends to favor the same key signatures in first position, and therefore, favors keys that are very popular on the violin. Second position however, favors B flat, F major, etc. So when you’re learning your first higher position on the violin, it’s best to learn one that favors keys you are already very comfortable with.

Another reason we teach third position before second position is because third position can feel more comfortable and stabilizing since your palm will be touching the actual body of the violin (with most hand shapes). In second position, your hand just feels like it’s floating out there in outer space. There’s not a lot of physical cues to help you know where you are.

How Do I Play In Third Position?

To get up to third position on the violin, you need to start in first position. It’s very important to prep third position. Play 0-1-2-3 in first position on any string. Make sure your third finger is very in tune (hint: ring tones!)

Now replace your third finger with your first finger. Or move your hand so your first finger is playing the exact same note you were playing in first position. Ta-da! You’re in third position. Yep, it’s that easy. However, it does take a LOT of practicing and muscle memory and ear training to get that transition really smooth and seamless. Don’t worry, I cover these topics in depth in my Third Position Course.

Scales in Third Position

Before you learn scales in third position, it’s very important to learn the universal scale pattern for the violin. Once you learn this pattern, playing scales in third position will be so much easier. Watch the video below to learn about the universal scale pattern. I think you’ll be surprised how easy it can be to play in higher positions when you aren’t worrying about READING music.

If you are ready for more easy scales in third position, learn more here.

Ready to Master Third Position Basics?

Learning third position shouldn’t be a struggle. Let me show you how easy it can be! Click below to learn more.


Easy Scales in Third Position for the Violin

If you are starting to learn third position then it’s time to start practicing third position scales on the violin. You’ll notice certain key signatures make more sense in certain positions. For instance, with first position scales on the violin, the keys of G, D, and A major make a lot of sense. In second position, the keys of B and F major seem to fit well. With third position scales on the violin, C major, G major, and D major feel very comfortable.

This is one reason why we generally teach third position on the violin after first position. Since first position favors most of the same key signatures, it makes sense to learn third position next.

Now if you’re not familiar with scale theory, learning third position scales might be pretty tricky. Don’t worry, if you need to brush up on how scales work, watch the following video for a quick overview. By the way, every violinist should know the half step patterns in scales. It will make the violin instantly make more sense! I talk about this in depth in my Creative Scales Course for the Experimental Violinist (part of my online studio).

Many people find third position difficult to learn, and I think that’s because they don’t truly understand the language of the violin. And if you don’t understand how to “speak the language” then learning advanced concepts like third position will always be a challenge. My Online Violin Studio has several courses that will help you “speak the language” like a native speaker!

Courses That Will Help You Learn Third Position

Let’s start off with the easiest one octave scales in third position.

Easy One Octave Third Position Violin Scales

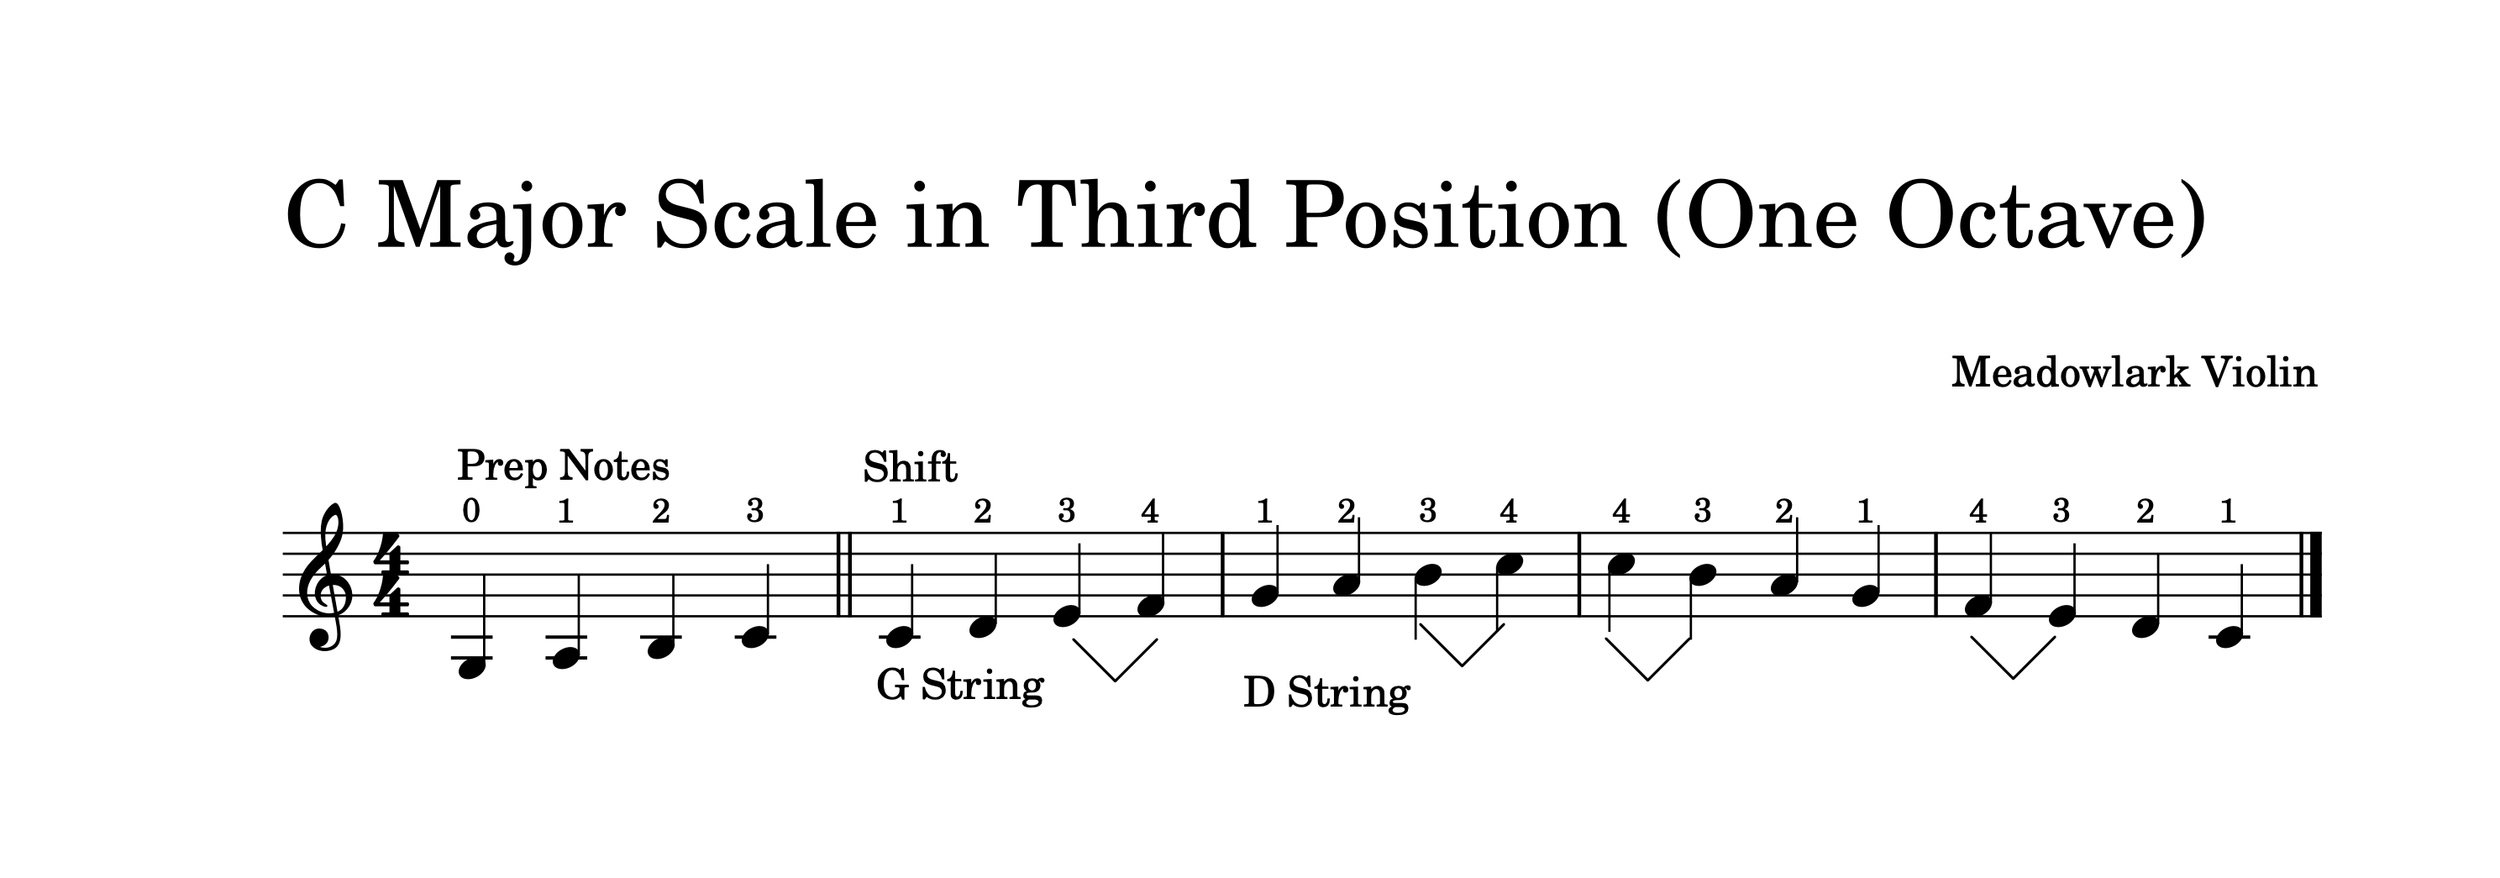
C Major Scale in Third Position on the Violin

First off, let’s learn the C major scale in third position. Now if you know the universal scale finger pattern that I talk about in my violin third position course, this makes so much more sense! Basically, the universal finger pattern involves two strings with the same finger pattern on both strings. There will be a whole step between the first and second fingers, a whole step between the second and third fingers, and a half step between the third and fourth fingers. You can play this universal finger pattern pretty much anywhere on the violin (just don’t start on the E string) and you’ll get a scale.

Okay, on your violin fingerboard, start on the G string and let’s build our way up to third position. Play open string, then 1st, 2nd, and 3rd fingers. You should be on a C. Now replace that 3rd finger and put a 1st finger where the 3rd finger was. Tada! You’re in third position!

(P.S. It’s VERY important when you are starting to learn third position to always prep your notes. Start in first position and build up, then replace the notes. I go over this a lot in my course to make it easy to hear and understand.)

Now that you are up in third position, play that universal scale pattern up to 4th finger and the next string, then come back down and you’ve got an easy C major scale in third position!

By the way, those little arrows mean half steps!

Easy G Major Violin Scale in Third Position

Next is a one octave G major scale in third position and the good news is that it’s just like the C major scale you just played, only it starts on the D string instead. So remember, prep your notes in first position, replace the third finger with the first finger and you’re ready to play the G major scale in third position.

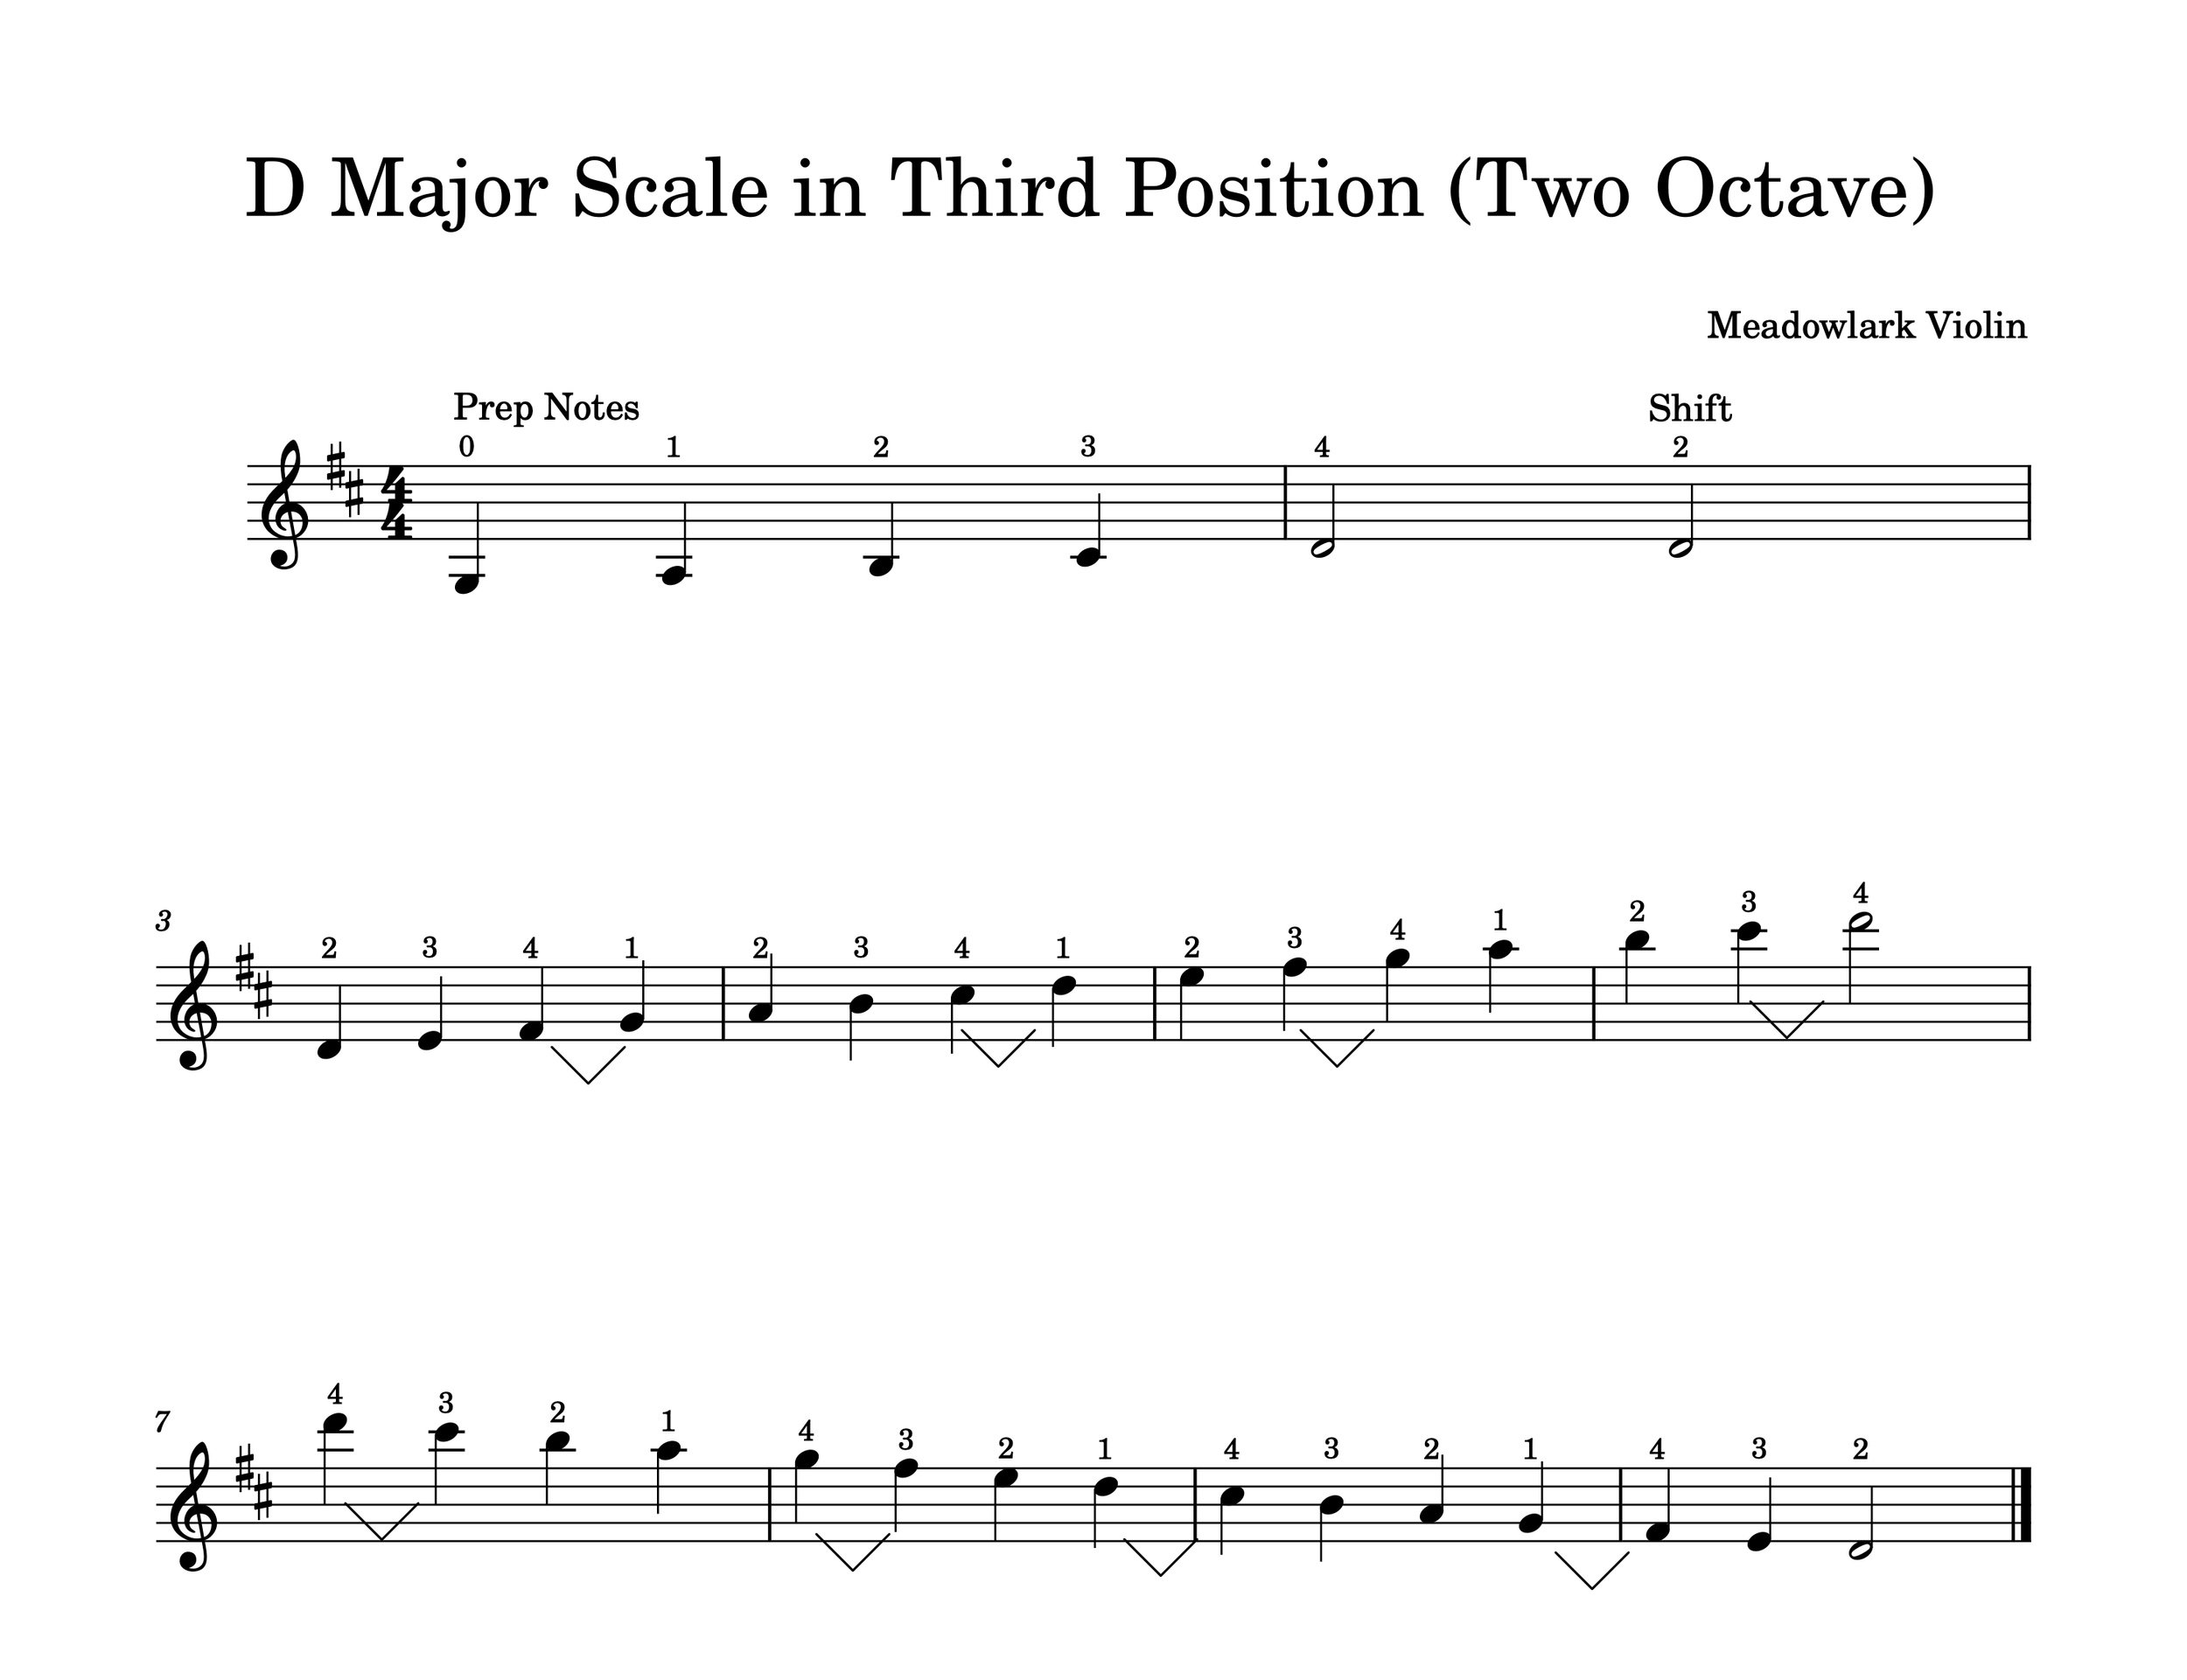
Easy D Major Violin Scale in Third Position

Next up is the D major scale in third position and yep, you guessed it. It has the exact same finger pattern as the C and G scales. See what I mean about knowing that universal scale finger pattern? It really shows up all over the violin fingerboard. The fun thing with the D major scale in third position is that you will gain two notes that you didn’t have down in first position. Those two high notes are C sharp and D.

Ready to Master Third Position?

I’ll teach you how! Click below to learn more.

Two Octave Violin Scales in Third Position

Two Octave C Major Scale in Third Position

Now that you’ve learned the first octave of the C major scale in third position, let’s learn the second octave! If you remember that your half step pairs in the key of C major are between B and C and in between E and F, then you’ll realize why you change finger patterns for the A and E strings. On the A and E strings, your 2nd and 3rd fingers will touch. Just go up to the third finger on the E string (the C) then go back down.

Two Octave D Major Scale in Third Position

You’ve already learned the higher octave of the D major third position scale, so now let’s learn the lower octave. The bottom octave is a little bit trickier. It starts on 2nd finger on the G string, so build up to 4th finger D in first position, then replace the 4th finger with the 2nd finger (test it against your open D to make sure it’s in tune). Now you’re ready to play the scale, but remember, D major has two sharps, C sharp and F sharp. That means those 4th finger on the G and D strings in third position are going to be sharp which means you are going to have to stretch for them!

Those scales are the easiest violin scales in third position. If you’re ready to learn more about third position, my Third Position course will show you all the tips and tricks to master third position that you NEVER learn in private lessons. Click here to learn more!

Happy Practicing!

How to Have Better Intonation on the Violin


Playing in tune can be one of the trickiest skills to master on the violin. Without frets or keys, knowing where to put your fingers is challenging. Violinists use muscle memory and their ears to know where to place their fingers, which means a good practice routine revolves around finger training and ear training. While it does require lots of practice, playing in tune does not have to be a struggle! Here are 8 tips to help you have better intonation and play in tune on the violin.

Note: Violin teachers like to throw around the word intonation. It means the accuracy of your pitch. Good intonation=accurate pitch. 


1.Don’t Use Finger Tapes 

This may seem backwards, but finger tapes actually hurt your intonation. You are using a visual indication for an auditory skill. Doesn’t make much sense, does it? It’s kind of like hiring a musician to do your taxes. In my Complete Beginner’s Course, I’ll show you exactly what you need to do to be able to play without finger tapes.

2. Use a Drone 

Most tuners also have a drone function which produce a constant pitch. As you play through your scales and songs you will be able to compare the pitches you are playing with the drone pitch. The more you use a drone, the more your fingers will adjust to play in tune with the drone automatically.

How do you know what pitch to use for the drone? Start off by using whatever key you are in as the drone pitch. If you are playing a song in the key of D, use a D drone. Some notes will be naturally dissonant with your drone, but even dissonances need to be in tune!

3. Compare to Open Strings

Your open strings are great tools to help with intonation. Your third finger in first position is always an octave higher than the open string below it. If you are playing third finger D on the A string, you can compare that note to your open D string and adjust your third finger until it is in tune with your open string.

If you are playing fourth finger in first position, the next open string will be your fourth finger note exactly. For example, if you are playing fourth finger E on the A string, your next open string is an E string. Adjust your fourth finger to match your open string.

4. Know How the Song Sounds

When you are starting out, playing in tune is easier if you know how the song or problem spot sounds. If you can’t hear the pitches before you play them, you won’t be able to adjust as quickly. 

Record your teacher playing the song. Or, play the song on the piano. The great thing about piano is that the intonation is not up to you! As long as the piano is in tune, you are in tune. You don’t have to be a virtuoso to play your song on the piano. A quick tutorial on the basics is all you need. If you don’t have a piano, there are many piano apps and free online programs.

Another way to hear your song with perfect intonation is to have your computer play it for you using music composition software like Musescore. After you learn the basics of the program, you can type your song then let the computer play it back. 

Try this exercise. Play your problem spot and stop after each note. Can you hear the next note you are about to play in your head? Can you sing it? If you can’t hear it, you won’t know if it’s in tune or not. Listening to the song as much as possible will make this exercise easy.

5. Sing it

Singing a song is the best way to teach your ears what the right intonation sounds like. Once your ears know what they are listening for, they can help your fingers adjust to the right pitch. Use a piano to check you are singing the right pitch. If you are self-conscious about how you sound, close the door, find a closet, or hum the song. Singing not only helps your intonation, it will also help with phrasing and dynamics. 

6. Use Light Finger Pressure

Your fingers are constantly adjusting to play a pitch in tune. No violinist is 100% in tune all of the time. The key to good intonation is hearing and adjusting very quickly to the correct pitch. If you have a death grip on your fingerboard, it will be hard to move your finger with lightening-quick accuracy. Try this exercise. Play your problem spot with your fingers barely touching the strings. It will sound awful. Don’t worry, it’s supposed to. Play the passage several times, gradually using more pressure. You’ll find that you don’t need that much pressure for the notes to sound properly. 

7. Play Slowly

Don’t play faster than your ears can hear. Even if a song is fast, play through it several times very slowly. You have to play slow enough for your ears to tell your fingers how to adjust! 

Learning to play slowly is one of the best things you can do to help your intonation. It will also help all aspects of your violin playing. Next time you pick up your violin, try playing every scale, etude, and song very slowly before you play at a normal tempo. If you are paying attention to your intonation while playing slowly, you will be pleased with the results!

8. Listen to Other Violinists

Listen to as many violinists as you can. It’s not only inspiring, it’s a fun way to teach your ears good intonation.

If you’re getting frustrated with intonation, don’t worry. It’s something we all struggle with. Take a deep breath, practice slowly, and enjoy the results. Happy Practicing!

When Can I Learn Violin Vibrato?

When Should I Learn Vibrato.jpg

Vibrato is perhaps one of the skills that gives the violin its quintessential gorgeous sound. Of course, when it’s done correctly. And there’s the rub for most beginner violinists.

If you’ve been playing violin for a few minutes, you might already be wondering, “when can I learn vibrato?”

Everyone wants to learn vibrato but most teachers want to wait until a student has reached more intermediate levels before introducing this skill. There are two reasons for this.

1. Vibrato is icing on the cake

It really isn’t what makes someone sound “good” on the violin. A violinist sounds “good” because they have an even, rich tone, consistent intonation, and good rhythm. If you don’t have these basics under control, adding vibrato isn’t going to help. In fact, it could make your playing sound…worse! Before you start adding icing, you want to make sure you have a cake to put it on.

2. When students learn vibrato, it’s ALL they want to do

I think beginner violinists should be introduced to the basics of vibrato, but often the problem lies in how students divide their practice time once they get a taste of the glorious vibrato. Instead of dedicating a few focused minutes to vibrato, they start trying to add vibrato to everything all at once. They are no longer focusing on bow control, tone, or intonation. All they’re thinking about is vibrato, which can hinder progress.

As long as students are aware of those first two warnings, I think the basic building blocks of vibrato should be taught to advanced beginners. Vibrato is all about being relaxed and if you don’t start practicing being relaxed as a beginner, then when you do get ready to learn vibrato, it will be much harder and take longer.

So if you are asking yourself, “can I be too early to learn vibrato?” The answer is…NO! Here’s my list of 10 things you can start working on NOW. Follow these practice tips and you’ll not only be learning vibrato sooner, you’ll master it in less time as well!

3 Rules of Violin Vibrato Practice

If you want to learn how to play vibrato on the violin, you need to be familiar with these 3 rules of vibrato practice. Follow these 3 rules and you will ensure that you learn violin vibrato the right way!

  1. Practice Vibrato By Itself. Don't practice vibrato while you're also trying to perfect intonation, rhythm, or bow issues. Focus on just the vibrato when you're first learning.

  2. Practice vibrato less than you practice scales and open strings. For how ever much you practice vibrato, practice three times as much on scales.

  3. There are certain areas of your practice time where vibrato is never allowed--it will only hurt your progress. Don't practice vibrato during scales or when you are learning something new.

1. Get Your Violin Hold Stable

If you aren’t comfortable holding your violin, you’re probably dealing with tension which will inhibit learning violin vibrato. Make sure you aren’t trying to hold the violin up with your arm or hunching up your left shoulder to get comfortable. It might be worth changing shoulder rests or chin rests to get that tension-free hold. Check out my video on adjusting your shoulder rest for the most comfortable hold here.

2. Fix That Left Wrist!

Is your left wrist crooked? Is the palm touching the fingerboard? Pretty much every single beginner (and some intermediate students) I’ve had have dealt with this issue. Keep your wrist straight. Don’t let the violin neck rest on your palm or wrist. This incorrect hand position will make it impossible to do vibrato on the violin…so fix it now!

3. Be Aware of Tension

The first step to getting relaxed so you can learn violin vibrato is being of aware of tension. Most beginner violinists don’t realize how much tension they are holding and you can’t relax until you realize you are tense. Our bodies are symmetrical so if you are tensing up your bow hand, that tension could translate to your left hand. So be aware of ANY tension ANYWHERE in your body and try to relax it!

4. Do Your Stretches

Stretching will help your muscles relax and help you be aware of where your tension is lingering. Don’t skip this step. It’s very important when it comes to learning vibrato on the violin.

5. Don’t Grip or Squeeze with the Left Hand

If you have a death grip with your left hand, there’s no way you are going to be able to vibrate that thing. So relax!

6. Use the Least Amount of Pressure Possible to Press the String Down

This will not only help you do vibrato, it will help you play more in tune because you’ll be able to adjust your fingers to the right pitch faster.

7. Practice Slides

Warm-up everyday with slides. I’ll show you how here. Put one finger down on the string and slide it up and down the violin (bringing your thumb with you). Do this with all fingers on all strings. This is essentially the same motion vibrato, just slower and more drawn out. If you have trouble sliding up and down the fingerboard, learning violin vibrato will be very difficult.

8. Relax Your Left Hand Knuckles

The knuckle closest to the fingernail must be relaxed and have some “give” in it for vibrato. Without a violin, you can push on these knuckles with your opposite hand to get them to start moving the way you want to for vibrato.

9. Practice Your Rhythms

Use a metronome. Get comfortable with quarter notes, eight notes, sixteenth notes, and all variations of rhythm. Vibrato should be rhythmic and the best way to learn vibrato involves slowing the motion down and speeding it up gradually using…a metronome and rhythms! This rhythm exercise is essential to building a natural and relaxed vibrato on the violin.

10. Focus on Good Intonation

Intonation means putting your finger down in the correct place for the correct pitch (or being able to adjust it quickly to the right pitch). When students can play something in first position hitting the right pitch about 90% of the time, I know learning to play vibrato is around the corner. The sooner you perfect your intonation, the sooner you can really learn vibrato. If you aren’t playing in tune, vibrato isn’t going to help your sound…it will make it worse! So make intonation practice and relaxing your body your primary practice goal! My Everyday Exercises Course helps with getting notes in tune all the time!

FAQ’s About Vibrato

Here’s the most frequently asked questions I receive about vibrato.

Is vibrato difficult to learn?

Vibrato is an awkward skill. You just don’t use the motion in any other avenue of life. So yes, it can be difficult. One reason violin vibrato is difficult is because students try to rush the process. It takes time to teach your muscles what to do. Learning violin vibrato is a process that takes several months on average.

Vibrato can also be difficult to learn if violin students are tense while playing. It’s difficult to learn to relax and learn vibrato at the same time. Learning to identify tension and understanding how to relax will make vibrato much easier to learn.

Is vibrato natural or learned?

For 99.9% of violin students, vibrato is a learned skill. I’ve taught violin vibrato to hundreds of students. Only one student picked it up “naturally” without having to dedicate the practice time to learn vibrato like the rest of us. Learning how to ply vibrato can be an awkward motion for beginners and requires dedicated practice time to make it feel “natural.”

How long does it take to learn vibrato?

Learning vibrato on the violin can take a few weeks or months to learn the basic technique. However, mastering vibrato and being able to incorporate it effortlessly in your playing can take much longer. Depending on you much you practice, plan on spending 6 months to a year before your vibrato feels natural.

When should I learn vibrato?

Wait to learn vibrato until you can play in a variety of keys and be in tune the majority of the time. However, an introduction into the basics of learning violin vibrato can also help you ensure that you aren’t playing with tension or gripping the fingerboard. So I say it’s okay to learn the basics to play violin vibrato as a beginner.

Can I be too early to learn vibrato?

Yes and no. You’re never to early to start learning the necessary building blocks of vibrato, like relaxed left hand technique. However, if you start trying to learn vibrato before you have consistent bow control or good intonation, you may be slowing your progress and learning incorrect techniques that will take you more time to unlearn once you are ready for vibrato.

To sum it all up…relax! Focus on relaxing while you are playing, making a good tone with your bow, and having good intonation and you’ll be ready to learn vibrato in no time!

Learn How to Master Vibrato with My Vibrato Course!

Get all of my tips and tricks on vibrato. I’ll start from scratch and give you all the tools you need to build a beautiful, natural vibrato. Learn more!


Happy Practicing!

10 Reasons Why Your Violin Bow is Bouncing and How to Stop It!

Stop-bouncing-violin-bow

If you are starting to learn the violin, you may be asking yourself the question that all students ask at some point: “Why is my violin bow bouncing?” Or perhaps, “How do I bow smoothly on the violin?” Or “how do I stop my violin bow from shaking?” 

If those thoughts have come to mind, you’re not alone! All violinists deal with unintentional bouncing bows. Violinists often blame bouncing bows on nerves when performing, but many of my violin students complain about bouncing, shaky bows when they are practicing by themselves in the comfort of their own homes! 

There’s a reason bouncing bows affect nervous performers and beginners alike. Tension. 

Just trying to relax is harder than it sounds. If you want to fix your bouncing violin bow, I’m going to cover 10 reasons why your violin bow is bouncing and how you can make it stop!

First, let’s cover 3 reasons why your violin bow is bouncing that don’t have to do with tension.

Why Does My Violin Bow Bounce When I Play

1. Not Using Good Equipment

It might not be you. If your violin bow is bouncing when you play, it could be poor quality equipment. A cheap violin outfit (anything under $200-$500) means a cheap violin bow, a cheap violin, and cheap strings—all of which can contribute to a shaky violin bow and prevent you from bowing smoothly.

Check out my top picks for violins and strings here.

2. Not Starting From The String

Before you start playing, make sure your violin bow is set on the string. Then move the bow. If you are coming down to the string and want to play a note as soon as your bow hits the string, that speed you have coming down is going to translate into a BOUNCE! Think about a bouncy ball or landing an airplane. Excess speed and descent rate= bouncing bows.

3. Not Starting or Playing in the Right Place in the Bow

Some parts of the violin bow are bouncier than others (like the middle). To stop the violin bow  from bouncing, try bowing in a different area, like the lower half.

Why Tension Makes Your Violin Bow Bounce

4. Not Warming-up or Stretching Before You Play Violin

Any tension, anywhere in your body, can create stiffness which leads to a shaky violin bow. Stretch before you play the same way you would stretch before you go for a run.

Warming-up includes open strings and scales. This is vital to warming-up your muscles so you can bow smoothly on the violin.

Are your scales getting boring? Or perhaps you don’t practice scales at all (*gasp*). Download my free violin scale book here! It’s got lots of different exercises to keep you engaged.

5. Using Pressure Not Weight To Get A Good Tone

You can’t let your violin bow gloss over the strings. You have to apply some sort of downward force to “dig into” the string to produce a tone. You want to use the relaxed weight of your shoulder and arm to produce this tone. The weight should transfer from your relaxed shoulder through your bow arm through your wrist and fingers into the bow. 

What you don’t want to use is pressure. Pressure is using just your hand or fingers to “press” the bow into the string. This always results in tension as well as bouncing bows, shaky bows, scratchy sounds and a myriad of other unwanted noises. 

6. Tensing Up Your Bow Hold

If your bow hold is not formed correctly, or if you are gripping the bow, it’s impossible to transfer that relaxed weight from the shoulder and arms to the fingers. That relaxed sound will stop as soon as it reaches your fingers and your violin bow will shake, wobble, and roll. Okay, it might not roll, but it will do things you don’t want it to do…

In my Complete Beginner’s Course, I’ll show you the right way to hold the bow, and the common mistakes people often make with the bow hold that lead to bow bouncing.

7. Having Improper Right Arm Position

Relaxed weight is like gravity. It can only go one way: down. If your elbow is below your wrist while you are playing, you can’t transfer the relaxed weight up your arm to your wrist and fingers. So position your bow elbow so it is even with your wrist (it can be slightly below your wrist but not too much). Also make sure your wrist is above your fingers so all the weight can be transferred down. This will help stop shaky violin bow.

8. Not Transferring the Right Amount of Weight into the Bow

Depending on where you are playing (upper, middle, or lower half), you have to transfer the right amount of weight into the bow. Too much or too little weight can cause the violin bow to bounce while you are playing. The amount of weight also differs depending on what string you are playing. I know, I know…it’s complicated. If you are getting overwhelmed or confused, keep reading. I’m going to tell you how fix all of these problems.

9. Tensing Up During Changes in Bow Direction

While you are chaging bow directions, the weight must be transferred to the bow smoothly on the violin. Students tend to add too much weight when going from an up bow to a down bow, which makes the violin bow bounce. Imagine throwing a bouncy ball down on the ground. This is the same thing that happens when you add too much weight or you tense up when change directions.

A common problem I see is the violin bow bouncing when students change from an up bow to a down bow. (Watch this video to learn why the bow bounces here and how to fix it).

10. Not Playing Long Enough, Being Out of Practice, Getting Frustrated While You Play

Bowing smoothly on the violin takes time. Your muscles have to learn how to control bow bounces on the violin. You wouldn’t expect a newbie weight-lifter to be able to lift hundreds of pounds without effort? Those muscles must be conditioned and trained. It’s no different when learning not to bounce your bow on the violin. Give yourself time!

If it’s been a while since you’ve played, that might be a reason your violin bow is bouncing. Your muscles simply aren’t warmed-up and relaxed. 

And last of all, if you keep asking yourself over and over again “why does my violin bow bounce when I play?” You are probably getting frustrated during your practice time. Frustration leads to tension which causes your violin bow to bounce. When you get frustrated, walk away and come back when you are more relaxed.

How Do I Stop My Violin Bow From Bouncing?

Now that you know the 10 reasons why your violin bow is bouncing, how do you stop the violin bow from bouncing?

Here’s the best practice routine to prevent tension, shaky bows, and develop a relaxed tone.

1. Practice regularly

2. Stretch Before You Play

3. Warm-up on open strings and scales

4. Experiment

Experimenting is probably the most important way you are going to stop your violin bow from bouncing. You must take time to experiment. I can’t tell you exactly what muscle you need to relax to stop your bow from bouncing, you have experiment to find out what you need to do to stop the bounce. Play lots of open strings with varying weight. Practice bow changes on open strings. Practice long bows, short bows, you name it!

So go ahead, let your bow bounce! Then try to figure out why it bounced. Go through the 10 reasons your bow is bouncing then try again. If you take time each day to experiment, let yourself make mistakes and learn from them, I promise you will stop your violin bow from bouncing!

The Best Thing You Can Do To Stop Your Violin Bow From Bouncing

What’s my number one piece of advice when helping students stop bouncing violin bows? Learn to make the bow bounce on purpose! When you intentionally bounce the bow, it’s called spiccato. You don’t have to be an advanced violinist to learn the basics of spiccato. In fact, learning the basics will help you understand the physics behind why your bow bounces and will help your muscles to learn how NOT to bounce.

In my course, The Secret to Better Bow Control, I’ll show you how to play spiccato. Not only will it teach you better bow control, it will help you to stop letting your bow bounce. The course is part of my Online Studio Membership. Learn more here.


Happy Practicing!

How to Play with a Straight Bow on the Violin

Straight Bow.jpg


Playing with a straight bow is essential to producing a great sound on the violin—but you already knew that. Getting your arm to move a three foot stick up and down in a perfectly straight line while simultaneously moving it horizontally to make string crossings, now there’s the trick. Add in slurs, dynamics, different bowings, rhythms, oh yeah, and whatever your left hand is doing, and you can see why violin is such a challenging instrument. 

If you’re just staring to learn violin, or maybe you’ve been playing for a while and you’re wondering why your bow sounds scratchy, crunchy, or any other nasty sounds, there’s a chance it’s because your bow isn’t straight. If you’re wondering how to keep the violin bow straight and get a good tone, you’re in the right place. Having a straight bow is hard, there’s no doubt about it. But if you approach it the right way, you can be playing with a straight bow, without having to devout 100% of your mind to it, pretty quickly. The key is developing muscle memory, but we’ll get to that in a second. First, let’s take care of a little housecleaning. There are a couple things you want to make sure you are doing correctly before beating yourself up about your crooked bow. 

Straight bow.jpg

A nice, straight bow.

1. Know what a straight bow is. A straight bow means your bow is always parallel to the bridge and your bow is contacting the string in the center between the fingerboard and the bridge. The place where the bow contacts the string in relation to the fingerboard and the bridge is called the contact point. It’s the whole reason this straight bow things is a big deal. If your bow is at an angle and part of it is close to the bridge and the tip is pointing in the direction of your scroll, your contact point is messed up and trust me, you’ll hear it.

2. Make sure you are holding the bow correctly. Check out my video on holding the bow correctly without any tension. You also want to make sure your wrist and elbow are level (while playing in the middle of the bow) and your fingers curve down below the wrist to let the bow hang from the fingers. You shouldn’t be playing with the bow hair flat, but slightly tilted so the bow hair is facing towards you a little.

3. Make sure you are holding your VIOLIN correctly. This is one many people overlook. What does holding the violin have to do with your bow? A lot actually. The violin should be pointing to your 9:00 position directly off your left shoulder. It should be level with the scroll neither pointing up or down. Many people hold their violin with the scroll pointing towards 10:00 or 11:00. This brings the fingerboard closer to your bow and makes it impossible to NOT play over the fingerboard. 

4. Keep your right upper arm still. If you are swinging your upper arm from the shoulder, you are moving your arm in a circular motion. Circles and straight lines do not mix. 

Daily Exercises for a Straight Bow

Muscle memory is the key here. To practice having a straight bow, you need to warm-up every day on just open strings. No left hand—that’s an order. Developing muscle memory means you need to devote all of your attention on keeping that bow straight. You don’t have to spend hours doing this. The more the better of course, but if you only spend a few minutes warming up with open strings you’re doing better than no open strings at all.

Notice how it’s impossible to tell if the bow is at an angle when you are looking from the side.

Notice how it’s impossible to tell if the bow is at an angle when you are looking from the side.

To ensure you aren’t wasting your time doing this, you MUST play open string exercises in front of a mirror. It’s almost impossible to use your peripheral vision to see if your bow is straight or not. You can’t trust what your eyes are telling you. Look in a mirror. Make sure you can only see the top line of the bridge, not the sides. Now see how easy it is to tell if your bow is parallel to the bridge? You must only see the top line of the bridge. Since the whole goal of having a straight bow is keeping it parallel to the bridge, it’s a waste of time to try and make something stay parallel to a curved line.

Make sure you adjust yourself so you can only see the top line of the bridge when practicing in front of a mirror. Now you can easily see if your bow is at an angle (like this picture!)

Make sure you adjust yourself so you can only see the top line of the bridge when practicing in front of a mirror. Now you can easily see if your bow is at an angle (like this picture!)

Don’t feel like you have to practice this entire list everyday. In fact, don’t. For several weeks, stay on numbers 1-2 and eventually add the next step.

1. Down up down up: start off playing 4 bows on each string in the middle of the bow. Watch yourself in the mirror. You’ll be able to tell immediately when your bow is crooked and be able to correct it. Yes, at first it is like trying to walk a cat on a leash, but eventually your muscles will start to understand what you want them to do. You could spend hours in a lesson with your teacher telling you “a little to the right, not too much, now back to the left.” But nothing compares to practicing in a mirror—this makes you your own teacher. 

2. Rhythms: Staying in the middle, now practicing moving your bow with different rhythms. This makes you move your bow at different speeds, giving your muscles something else to practice. Any short, repeatable rhythm works. Try my beginner rhythms.

3. Repeat steps 1-2 at the tip. This requires you to push out with your bow to keep it straight. Notice your fingers are also leaning into your bow and your pinky might even come off the stick. 

4. Repeat steps 1-2 at the frog. 

5. Repeat step 1 with the entire bow—starting at the frog and going all the way to the tip. Some of the rhythms might be difficult to play using the entire bow, so don’t give yourself a hard time. Once you get to full bows, concentrate on even, equal tones. Once you get to this stage, do this every single day! Work on getting smoother string crossings, connecting the bow changes, having equal tone whether you are playing at the tip or the frog. There are a million things to think about with open strings! In fact, if you only have a few minutes to practice, I would do this step and nothing else. You’ll make more progress doing this than trying to cram in everything you’re learning.

6. Add in slurs. Slur all 4 open strings in one down bow and then in one up bow. 

7. Add in dynamics. Play forte, then piano, then do decrescendos from from frog to tip and tip to frog, then crescendos from frog to tip and tip to frog.

This whole muscle memory thing can difficult to understand. When I was struggling with this, a teacher once told me it takes 10,000 open strings before your muscles really understand what to do. If you are at open string straight bow number 2,347 and getting frustrated, here are a couple other exercises to help you get the hang of it.

1.  Ring on top. When concentrating on straight bows, most students focus entirely on the bridge and the bow and forget about the tip entirely. Do the exercises watching your tip. Better yet, place a ring, cheerio, or lifesaver on the tip of the bow. Now try to play without the object falling off. You have to keep your bow straight. 

3. Hold your right upper arm. If your arm won’t stop swinging from the shoulder, take your left hand, reach over, and grab your bicep while playing. This will keep your arm from swinging. 

4. Buddy bowing. Hold your violin and bow as usual but have a friend hold the stick and make the bow stay straight while you concentrate on what your muscles are doing. Repeat ad nauseam. 

Keep in mind, having a straight bow 100% of the time is not something that will happen with one or two practice sessions. It takes time. Do a little bit every day and you’ll be well on your way!

I’ll show you exactly how to keep a straight bow and common problems that I see students make in my Complete Beginner’s Course (it’s not just for beginners—intermediate students love it too!) The course is part of my Online Studio Membership which includes over 20 courses and 800+ lessons, including more courses on bow control like The Secret to Better Bow Control. Learn more here.


Happy Practicing!

The Importance of Tetrachords on the Violin

Tetrachords.jpg

Tetrachords: a fancy name for a four note scale. These simple little scales can do wonders for your violin technique. They are great warm-ups and if you find yourself strapped for time, I would skip the scales and focus on tetrachords. Tetrachords are particularly useful on the violin because you can use each left hand finger (1-4) to play a tetrachord without changing strings. Tetrachords aren’t terribly difficult, but they offer a great way to incorporate all the basic elements of violin technique. And you change them up for endless possibilities, different finger patterns, different bowings, but we’ll get to all that in a bit.

Why are tetrachords so important for the violin?

Tetrachords can greatly improve your intonation and finger dexterity. I once asked a veteran violin teacher what the best exercise for intonation was and she quickly responded, “TETRACHORDS!”

When playing a tetrachord I start on the open string and then place 1st finger, 2nd finger, 3rd finger, and 4th finger respectively. Then go back down, 4-3-2-1. This is actually framing your basic hand position for the violin. Everything you play on the violin generally happens in the confines of the tetrachord framework from 1st finger to 4th finger. Sure, occasionally you will have a “low 1st finger” or a “high 4th finger.” Both of those involve stretches outside of this basic tetrachord hand shape, but most of the time your hand stays in this standard distance from 1st finger to 4th finger (the interval of a perfect fourth).

Practicing tetrachords solidifies muscle memory and the more you practice them, the quicker your fingers will be able to move, which means better intonation!

How to Practice Tetrachords

Repetition. That’s the key to tetrachord practice. It’s the repletion that reinforces muscle memory and ear training—two of the most important components of playing in tune. While it’s great to play tetrachords and tetrachord exercises over and over again, don’t give in to mindless repetition. Here are the things you want to keep in mind as you are playing these exercises.

If you want the best warm-up exercises for better intonation, my course, Everyday Exercises will show teach you some great exercises based on tetrachords that will transform your left hand and help you get the intonation you’ve always wanted! The course is part of my Online Studio Membership. Learn more here.

What to Think About When Doing Tetrachords

Don’t try to think about all of these things at once when playing tetrachords. The beauty of tetrachord exercises is that they are short, so each time you repeat the tetrachord, you can either think of something different to work on, or you can focus on one aspect of your technique.

  1. Train your ear. Don’t just play through the notes. Listen carefully to each pitch. Try to determine if you placed your finger too high, too low, or just right. When you repeat the exercises, try to fix the problem you had in the pervious go.

  2. Straight wrist. Repetition gives you a chance to ensure your left hand wrist is straight. If your wrist is straight, you will be able to play quickly with great dexterity. If your wrist is flat like a pancake, forget about it and just accept that everything you play will be slow, sloppy, and probably painful.

  3. KFD: (Keep Fingers Down) As much as you can on the violin, you want to keep fingers down until you absolutely have to move them. When you put down 1st finger, keep it down and add 2nd finger, keep 1st finger and 2nd finger down as you add 3rd finger, etc. Then when you get to 4th finger and are about to go back down, all you have to worry about is peeling off each finger—the correct note is already there! Lifting up fingers creates unnecessary movements which will slow you down.

  4. Play on the tips of your fingers—for better clarity and dexterity.

  5. When you do lift fingers, don’t flick them up. Just lift them far enough so they aren’t touching the string. Let them hover over the string. The further they are from the fingerboard, the longer they are going to have to travel to get back to the fingerboard and more movement = slow and sloppy.

  6. Use light finger pressure. You really don’t have to press very hard to get a clean sound. Practice pressing down with only the bare amount of pressure. I can’t tell you how important this concept is. If you are playing with a death grip, your fingers will once again, never be able to move quickly. Tense fingers = slow and sloppy. Practice being relaxed as possible with your left hand and your left thumb, you’ll be happy you did once you start learning vibrato!

  7. Prepare for 4th finger. Before you even put 4th finger down, start stretching for it or adjust your thumb so your thumb is more across from the 4th finger. Make sure you aren’t tucking your 4th finger underneath the neck when you aren’t using it, this will slow you down.

Tetrachord Exercises

Here are my favorite tetrachord exercises. The first one is a basic tetrachord exercise. While everything is on the D string, you can practice these exercises on all strings using the same fingerings. Always use 4th finger for the top note instead of an open string. Repeat each grouping until it sounds clean and crisp.

Basic_Tetrachords-1.png

You can also practice tetrachord “arpeggios.” Now you are practicing skipping notes going from an open string to 2nd finger to 4th finger then back down. If you want an extra challenge, you can also practice this exercise with a “low” 2nd finger.

Tetrachord__Arpeggios_-1.jpg

Adding in bowings and rhythms allows you to perfect your bowing technique with an easy finger pattern. Like all tetrachord exercises, practice these in all parts of the bow: upper half, middle, and lower half.

Download the Basic Tetrachord exercise, Tetrachord “Arpeggios", or Tetrachords with Advanced Bowings and Rhythms.

Tetrachords_with_Advanced_Bowings_and_Rhythms-1.jpg

Now you’e ready for an advanced tetrachord exercise. It starts off with the traditional finger pattern where 2nd and 3rd fingers are half steps apart. Each line is a different string but the finger patterns are the same for every string. Notice the repeat signs? Repeat every two measures several times until you are comfortable and then move on to the next two measures.

Download the advanced tetrachord exercise here.

Tetrachords-1.png


Once you have the advanced tetrachord exercise under control, move on to different finger patterns. Next do “minor” tetrachords with a “low” 2 where the 1st and 2nd fingers are half steps apart. (If all those low 2s and high 2s are confusing you, you aren’t alone. It’s a quick way to describe a crucial music theory concept. If you want to know the real reason why we have “lows” and “highs,” read about the basics of key signatures and scales).

Download the Minor Tetrachord exercises here.

Tetrachords+Minor-1.jpg


As you progress in your technique, you’re going to start playing in different key signatures—that’s going to mean a lot of going back and forth between “low” 2s and “high” 2s. Generally, everyone tries to split the difference and play “narps,” something that is not quite a natural and not quite a sharp. So make sure when your 2s are high, they are right next to 3rd finger and when they are low they are right next to 1st finger. Use this tetrachord exercises to help you switch back and forth between high 2 and low 2 quickly. It’s the same exercise as before, now you are just combining the basic tetrachord exercise with the minor tetrachord exercise.

Download the low 2 vs. high 2 tetrachord exercise here.

Tetrachords Sharp Vs. Natural-1.png

Once you’re ready for more of a challenge, start adding in rhythms, slurs, and bowing variations. There’s really no limit to what you can learn from tetrachords!

Happy Practicing!

5 Ear Training Exercises for Violin

Ear Training Exercises.jpg

How do you play in tune on the violin? How do you develop good intonation? How can you even tell if you are too sharp, too flat, or perfect? These ear training exercises for the violin will help your ear hear the slight subtleties in music and help you play better in tune!

With fretted or keyed instruments, you can get away with putting your finger down and not really listening to the quality of the note you are producing. As long as the instrument is in tune and you placed your finger on the correct key or fret, the note you are trying to play should be in tune. Not so with the violin! Since there are no keys or frets, your ear has to be in control. Muscle memory alone won’t cut it. Your ear must tell your finger if the note you just played was too high, too low, or just right. And to do that, your ear has to be the boss when you are playing violin. 

This is a hard concept for many students to learn. Students generally focus on their left hand fingers and let their fingers try to control the show. But to truly master the violin, your fingers must be lowly employees to the CEO—the ear!

For most of us, our ears aren’t natural born leaders. You have to teach your ear how to take over. Here are some exercises to help your ear listen better.

1. Pitch matching

Do this first without an instrument at all. When you hear a note from a song, try to match it. Either sing it, hum it, or whistle it. You can do this in the car while listening to music. You can also try playing a random note on a piano or on your violin and try to replicate it with your choice or vocal replication (singing, whistling, of humming). 

Now try the same concept, but with the violin. You don’t have to worry about playing the note with the “correct fingering.” Use any finger you want to achieve the correct pitch. Try to sing a random pitch and then find where it exists on the violin. One way is to simply put your finger on a string and start sliding it around until you find the pitch you are looking for. You will discover that one note can exist on several different strings. 

2. Identify if music ascends or descends

This is just a listening exercises. As you listen to music, try to determine when the music is going up and when it is going down. While this sounds easy, it might be harder than you think. 

Sing one of your favorite songs, move your hand up and down depending on whether the next note in the song goes up, goes down, or stays the same.

3. Identify skips and steps 

Another listening exercise. As you listen to music, determine if the notes are moving by step—one note after another like a scale (A B C D) or by skips (A C E). 

4. Learn what intervals sound like

Intervals are those skips between notes. We can measure the distance between notes using intervals. A to B is the interval of a second (always start counting with the bottom note). A to C is a third. C to the next highest C is an octave—8 steps. 

Each interval has a certain sound and it’s easiest to associate that interval with a song. For instance A to B is a second (a major second to be specific) and it sounds like the first two notes of Happy Birthday. C to C is an octave and sounds like Somewhere Over the Rainbow. Listen for the first two notes in the word “somewhere.” 

Use this chart to help you choose songs to be able to identify each of the intervals. As you learn them, you will be able to hear intervals in the music you listen to and the music you play.

5. Try to play simple songs on the violin without using music

This exercises is not only great for your ear, it’s lots of fun. Once you develop this skill, you won’t have to spend hours searching the internet for sheet music to your favorite song, you’ll be able to pick out the notes yourself.

You’re going to use all those other skills we just talked about. First, you’re going to have to pitch match. Sing the note that your song starts on and try to find that on the violin. Next, decide if you are going to have to go up for the next note or down? Or maybe you’ll stay on that same note? If you do move up or down, are you moving by step or by skip? If you are moving by skip, by what interval? Once you determine what the interval is, you’ll know what note comes next. 

Do these steps for every note in the song. Eventually, with enough practice, your fingers will start to know what note comes next. 

Start off with simple folk songs or hymns. These songs generally don’t skip around a lot so it’s easy to pick them out by ear. 

You are never too good for this exercise! As you progress, pick harder and harder songs to play by ear. Since you aren’t looking at music, doing this exercises leaves your ear no choice but to take over!

Practice these skills everyday, with the instrument or without it. The more you exercise your ear, the better it will be able to hear small details and variations in pitch. You’ll know if you’re playing a note too sharp or too flat. Your ear will tell you! Once you let your ear be the boss, it will turn into a little tyrant—but that’s a good thing! 

Happy Practicing!
Where Do You Put Your Fingers on the Violin?

man-playing-violin-3451162.jpg

Any beginning violinist can tell you what makes violin is so hard—knowing where to put your fingers! While decals like First Frets can help, you can’t put a sticker where every single note exists on the violin. You can memorize where certain notes are on the violin, and your muscle memory might get pretty adept at finding those notes, but if you don’t understand two important concepts, then you will never truly understand where to put your fingers. 

These two concepts are essentially the two reasons learning violin is so hard. However, these two concepts are often left out of violin lessons all together. Why would teachers leave out the two things that could help everything make sense? Well these two concepts take a lot of self-study to master. They also require in-depth study. You can’t understand these concepts with just a few words of advice from your teacher every week. When you only have 30 minutes to talk about songs, tone production, rhythm, note reading, posture, and so on, there’s hardly time to focus on these concepts. 

But if you don’t learn these concepts, it’s the same as just learning certain phrases in another language as opposed to really understanding how the language works. You may be able to play songs and read challenging music, but without understanding these two things, you will never truly understand the language of the violin. These two concepts are not dry by any means, but they can be hard to grasp. But I’m going to help you with that! 

Are you ready to learn the real language of the violin? Are you ready to know what two secrets could help everything make sense? Here they are: ear training and music theory.

Before I explain why these two concepts are so important, let’s take a moment and talk about where to put your fingers in first position. The violin strings are (starting from the lowest string) G, D, A, and E. Your left hand fingers are numbered 1-4. Index finger being 1st finger, middle finger is 2nd finger, ring finger is 3rd, and pinky is 4th finger. (Remember that the musical alphabet goes from A-G. After G, your next note is A but a higher A than the first A you played).

Okay, notice how there are three letters separating each string? 

G (A B C)

D (E F G)

A (B C D)

E

Those notes in parentheses are going to be your 1st, 2nd, and 3rd fingers respectively. What about 4th finger? Well it’s the same note as your open string below it.

Screen+Shot+2020-02-12+at+11.15.07+AM.jpg

When you are first learning, you will learn a finger pattern in which the 2nd and 3rd fingers are touching on every string (half steps apart) and all the other notes will be whole steps apart.

Just knowing what note you are playing won’t necessarily help you know where to put it on the fingerboard. Sometimes your fingers will be right next to each other, sometimes they will be a step apart. You have to understand how each note relates to the note before it in order to know where the finger goes. You have to be able to hear how the next note sounds. Which brings me back to those two big concepts. 

What are these concepts? 

Ear Training

Ear training is a term we use to describe the process of teaching our ears to to discern certain things in music. You might have heard of people with perfect pitch—people who have the ability to say what a note is just by hearing it. (You don’t have to have this ability. I definitely don’t! But you can get close). Or you may have heard of “playing songs by ear”—without looking at music. These are both ear training skills, but ear training is more complicated than just that. Ear training involves the ability to hear and understand the distances between notes, the quality of chords, whether a song moves by step or by skips, and most importantly for the violin, whether or not a note is in tune! 

Since there are no frets or keys on the violin fingerboard, you have to be able to hear a note in your head before you play it in order to know if it’s in tune once you put your finger down. This sounds complicated, but with practice it can become second nature. 

Before we talk about how to start tackling ear training, let’s discuss that second big concept: music theory.


Music Theory

Music theory is the the structure behind songs. It’s like the frame of a house. You don’t always see it or understand it, but without it, music would be a big mess. Theory involves understanding how all the notes work together.

For instance, when students first learn violin, they often learn “high 2” or high second finger. Teachers rarely take time to explain why the 2nd finger is high because it would take too long. “Just make sure you call it F sharp on the D string and not F. Don’t worry about why it’s sharp right now. Oh and yes, the 2nd finger on the A string and E string are also called sharps, but not the second finger on the G string. It’s just B natural, but you don’t have to say natural. Just call it B.”

Confused yet? Just wait until you start learning to lower that 2nd finger and play “low 2.” “Now that 2nd finger on the A string is no longer sharp, it’s C natural, but you’re still going to need to play “high 2” on the D string and G string those are still sharp, well except for the G string. That one’s still just B natural. Don’t worry about why it switches around, we’ll tell you later!”

If you don’t understand the framework behind music, you will just be trying to memorize worthless rules to put your fingers in the right place. But those “rules” will only apply when you are in first position. (The collection of notes that you learn first. Eventually you will learn higher positions and move up the fingerboard.) With a little music theory knowledge, you’ll know why some of those notes are sharp, which ones are sharp, when they’re not sharp, and how to play those notes all the way up the fingerboard and not just right there in first position.

If you look at a piano key board, you can see all the notes and their relationships to each other. Each violin string works the same as a keyboard, except you can only see the notes in your head! And there are 4 strings, each string starting with a different note, so really something like THIS is what you should be seeing in your head (this isn’t an exact representation of the notes on each string. It just gives you an idea of how each string is like a keyboard).

piano+keyboard+on+violin.jpg

If it looks confusing, don’t let that deter you. With just a little bit of theory, you will be able to build this structure in your head when you play. 

So how do you start learning the language of the violin? Check out my easy ear training exercises to get started teaching your ear to be the boss! As you learn about ear training, you’ll see how it’s intertwined with music theory. Check out my music theory lessons to start learning how to see the structure behind music. 

Learning ear training and music theory might seem like big tasks, but gaining even a basic understanding of these concepts will not only make playing the violin easier, it will make it more enjoyable! You will not only be able to understand the language of music when other’s play, you will be able to speak the language and make your own music! How wonderful is that?

Happy (ear training, music theory) Practicing! 
How Do I Play Music Faster?

Learn to play faster and sound better!

Learn to play faster and sound better!

“How do I play faster?” That’s one of the questions I am asked the most. Even if students don’t ask it, I know they’re thinking it based on the tempo of their performances. When students ask about playing faster, I sometimes say, “Just move everything faster.” That’s not the answer they’re looking for because they don’t want to know how to play faster. What they really mean to ask is, “How can I play faster and actually sound good?”


Ahh. There’s the rub. What is it that makes us sound bad when we play fast? There are lots of potential problems but I boil it down to two: our left hand fingers aren’t hitting the right notes and our bow and left hand fingers aren’t coordinated.

Left Hand
Let’s tackle the first problem. You’re fingers aren’t hitting the right notes, a.k.a. you’re not playing in tune. Even if you have finger tapes, playing in tune involves more than just putting your finger down. There are two must-do’s to playing in tune.


1. You must hear the note before you play it. If you can’t hear the note before you play it, how do you know if it’s in tune? Practice playing a note then singing the next note before you play it. That’s a big eye-opener. I know what you’re thinking. “That means I have to play SLOW!” Yes. I’m getting there. You know it’s coming.


2. You must relax. You have to be able to quickly adjust your finger if it is out of tune. You can’t do this if you are tense. Try tensing up your left hand and wiggling your fingers as fast as you can. Now relax and try it again. This is another reason to practice slowly. It gives you time to think about relaxing and placing your fingers as lightly as possible.

Coordination
Now the next big problem with playing fast. Coordinating your bow with your left hand. As you place a left hand finger, your bow should move almost simultaneously. If your coordination is off, you’ll get that overlapping “blub blub blub” sound. The faster you play, the harder coordination becomes. Add in slurs and string crossings and it gets even harder. There are two parts to staying coordinated.


1. Putting down fingers as soon as possible. As you advance in technique this will become more crucial to playing cleanly. If you are about to play a fingering of 3-2-1, go ahead and have all fingers downs. This allows you to move your fingers quicker than placing and releasing each one. You can’t always put a finger down ahead of time (for instance, if you’re going from 3rd finger to another 3rd finger). Even when you can’t get the finger down before you play, you can get as close as you can to actually putting the finger down. If you are going from a 1st finger to a 4th finger on the same string, let your 4th finger stretch and hover right over where it needs to go. Practicing this way requires planning and forethought and it also requires you to practice…ahem…slowly to make sure the fingers are doing what they need to do.


2. Coordinating the bow with the left hand. First put down your bow and play the excerpt pizzicato until your fingers move quickly and smoothly. Add the bow but play very slowly and stop in between each note. Place the finger and then move the bow. For string crossings, make sure you stop the bow, drop or raise your elbow to the new string level and continue. Play the passage again making the pauses shorter and shorter. You are training your muscles to do exactly what they need to do so you can play quickly without having to work as hard.

Tempo
Students often start out playing something smoothly and cleanly and before long they get excited and finish the song like they’re at the Kentucky Derby. Using a metronome helps you stay consistent and keeps you from rushing. I like to start slow then move the metronome up 10 clicks then back 5 and on and on until I get it to the tempo I want.

Keeping everything in proportion
Generally, the faster you go, the less bow you will use. Otherwise you will start a small fire on your violin. Using the right amount of bow helps everything stay coordinated.

What’s the real key to playing faster?
Playing slower. There’s really no other way around it. I’m not talking a brisk walk, I’m talking turtle slow! And just because you play it slow once doesn’t mean you can go back to tempo and expect major improvement. You have to start slow and increase your speed gradually. Remember, any listener would rather hear a song played slowly and cleanly than to hear something quick but messy and unrecognizable. When you choose a a tempo to play a piece (whether for a teacher or an audience) choose the fastest tempo you can play cleanly. This might be slower than what you achieved at home but you’ll know you’re playing at a tempo you can actually manage with all those extra nerves and sweaty hands.

In order to play faster, you’ve also got to make sure your form is correct. If your left wrist is like a pancake or you can’t bow straight, you’ll want to tackle those things first. Learning how to practice can also help you improve your speed.

Remember, it’s never a waste of time to practice something slowly. On the flip side, playing something fast before you are ready can be detrimental and even hamper your progress. You are also less likely to get frustrated when you play something at a relaxed tempo. So take a deep breath, before you start playing fast, play slow. I promise you’ll be pleased with the results!

Happy (Slow) Practicing!


Stop Wasting Your Practice Time! How to Set Up a Great Practice Routine

Making your practice time "golden."

Making your practice time "golden."

A good practice routine is the key to staying motivated to play the violin. But if you don’t have a good practice routine, chances are you will just dabble with the violin and never make any lasting progress. Does the following story sound familiar?

You get out your violin to practice. You know you’re supposed to start out with scales so you whiz through them so you can get to the good stuff. You play through the piece you’re working on. If it’s a good day, you make it all the way through. If not, you stop when it gets hard and go back to play the parts you sound good on. Let’s say it’s a good day. You make it all the way through. What do you do next? Start at the beginning and play it all the way through again. It might sound a little better, chances are, not much has changed. You decide to buckle down on the two or three hard lines. You play through the measures once. Ugh. It sounds awful. You try again. Even worse this time! Stupid fingers. Maybe if you try it faster…nope. Slower? That’s agony, too. You’re frustrated but you’re determined to get it right. You play it again but nothing is sounding right today and your practice time is up. You put the violin up for another day.

Sound familiar? What progress did you make? Not much of any. In fact, you probably reinforced some bad habits. You may not be doing all of these practicing no-nos but everyone is guilty of some of them from time to time (including me)!

What’s the key to being a better player? What’s the key to staying motivated? Practicing smarter. Not practicing more or practicing harder but having quality practice that yields tangible results. Practicing smarter is a skill you must learn. It might be slower going at first but as you get better at practicing, you’ll advance quicker.

Here are some tips to get more out of your practice time and keep your motivation up.

1. Get a warm-up routine—Doing the same warm-ups every day makes it easier to measure progress. Don’t rush it. You’re not only warming up your muscles, you’re getting your mind primed to focus. Start off with some stretches focusing on your upper body. Next I do “windshield wipers” with my bow. Then I move on to open strings. This is yoga for the violin. It’s a time to focus on relaxing, breathing, and making a good tone (one of the hardest things to do!). Draw your bow as fast or as slow as you need to make a good sound. Experiment with different parts of the bow. Try adding more weight or less weight. Think about the angle of the bow.
Next I play scales and arpeggios. You might think scales are easy and therefore don’t require much attention. Teachers prescribe scales because they are easier than your piece and are a great way to perfect difficult skills. Start by focusing on intonation then move on to varying the speeds and using different bowings. There are a million things you can focus on while doing scales. If you can’t think up any, I’m sure your teacher has tons of ideas. For now, only focus on one problem for each scale.
Depending on your level, you’ll want to transition to etudes or other method books and then you’re ready for the main song you’re learning. What’s the number one rule?

2. Keep your expectations low—Then you won’t be disappointed! That’s my life motto. Dream big for long-term goals, but for day to day practice, keep your goals short and manageable. Don’t try to conquer an entire song in one 30 minute practice session. Focus on one ore two measures. Even then, don’t repeat them aimlessly. Focus on one thing at a time to work on like getting your F sharps in tune of smoothing out your string crossings.

3. Keep a practice log—Before you start practicing, write down what your overall goal for the day is. Keep it manageable and tangible. Nothing like “I want to make my song sound better.” Pick something specific and simple like keeping your bow straight and relaxing your grip. If other things fall by the wayside, don’t beat yourself up. If you’ve progressed a little on that overall goal, you’re doing better than if you had no goal at all. As you practice certain measures, again write down what you want to achieve. This keeps you safe from aimless repetition. But, to determine what you need to work on, you need to stop and do some thinking first. Which brings me to my next point.

4. Be a detective—When something doesn’t sound right, don’t play it over and over again the same way hoping that one day it will sound better. Stop. Think. Is it a left hand or a right hand problem? Is it a difficult fingering or a difficult bowing? Are you correctly reading the notes or the rhythm? Once you’ve determined the problem, you or your teacher can come up with a way to fix it. You must do this for every measure and every note that doesn’t sound right! This is what your teacher is doing during your lesson. Learning to practice this way means learning to be your own teacher! That means you can use your lesson time to talk about other exciting things.

5. Stay focused—These tips won’t get you very far unless you can devote your utmost focus to the task at hand. For me, 5-10 minutes is the max I can focus on any one measure or problem, and that’s assuming I’m rested and removed from distractions. When you are past the peak of your focusing ability, simply move on to something else or take a break altogether. It’s better to practice shorter amounts and be focused. Otherwise you could be developing bad habits or reinforcing incorrect bowings, rhythms, etc. Like wise, if you start to get frustrated, put the violin down immediately and come back when you are refreshed.

6. Stop practicing on a high note— When you are nearing the end of your practice time and you play something well, STOP! Put the violin down and walk away while you are still happy! Sure, you could plow through a few more measures and risk getting frustrated but it’s much better to end feeling good about something. It will make you want to practice the next day.

Happy Practicing!