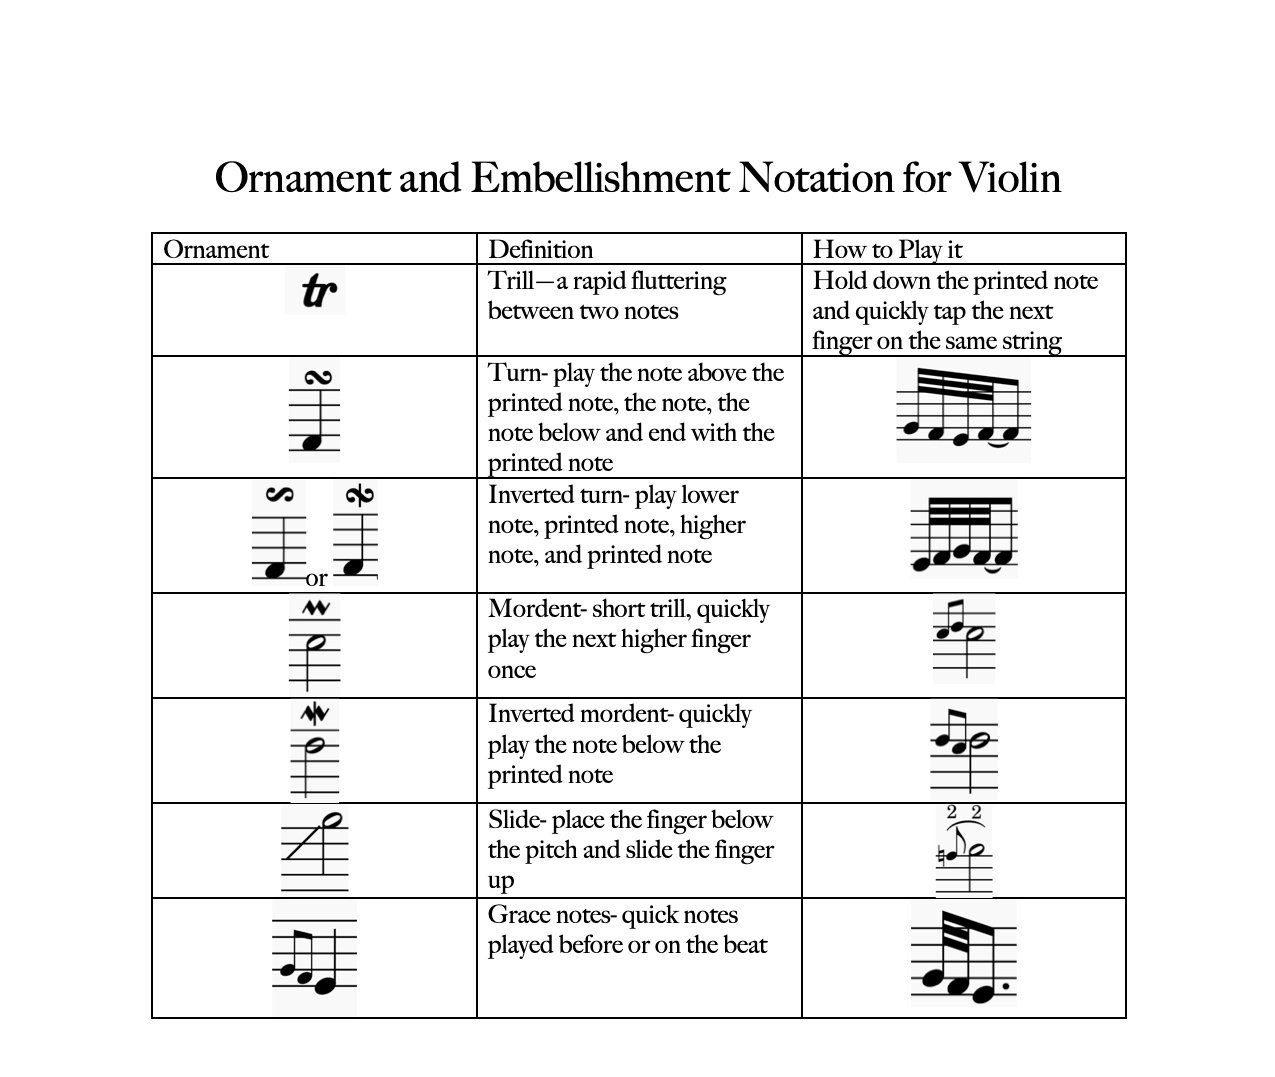
Trills, Turns, Mordents, Slides, and Grace Notes (Common Violin Ornaments Explained)

If you’ve ever seen a sideways “S” in music or maybe some squigglies above a note, you’ve run into some violin ornaments or embellishments. Not to worry! These crazy looking symbols aren’t that hard to understand. I’ve identified the 5 most common violin ornaments you will see in classical violin music and fiddle music. Get ready to finally understand trills, turns, mordents, slides and grace notes in violin music!

Want to Download and Print This Ornaments for Violin Chart?

Just click here to print out this free chart!

How to Play a Trill on the Violin

Trills in violin music are notated with a “tr” over the note. To play a trill on the violin, simply hold down the main note that is printed and rapidly tap the next higher note. So if you have a trill over an F#, 2nd finger on the D string, you would rapidly tap the 3rd finger G while holding the F# down. This will make the trill sound like a bird trilling or a flutter. You can start slow and gradually speed up tapping the next higher note.


What is a Sideways S in Violin Music? A Turn!

You will often see some funny-looking sideways S’s in violin music. That’s a turn. How do you play a turn on the violin? It’s not as difficult as it seems.

If the turn is over an F, you would start on the note above the printed note, then play the actual printed noted, then go one step below the printed note, then back up to the printed note. Once you practice turns on the violin a few times, you will get the feel for what they sound like.

But sometimes the S is reversed, or sometimes the sideways S has a slash through it. That’s an inverted turn.

It goes the opposite direction of the normal turn. Start one note below the printed note, go up to the printed note, keep going one more note above the printed note, then back down to the printed note.

Remember, whether it’s a regular turn or an inverted turn, you always end on the printed note. What changes is what note you start on.

How Do I Play a Mordent in Violin Music?

First of all, what is a mordent!? Well it looks like a squiggle above a note. Like this.

See how it kinda of looks like an “m.” Use that to help you remember “mordent".” You can think of a mordent in violin music like a min-trill. To play a mordent on the violin, all you do is quickly play the next higher note once and then return to the original printed note.

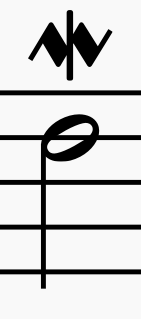
You also have inverted mordents. That’s the squiggle with a line through it like this.


To play an inverted mordent, you’ll just start on the printed note, go down one note and then back up to the printed note. Simple as that!

How to Play a Slide in Fiddle Music?

Slides are very common in fiddle music. A slide is notated by an angled line leading up to a note. Like this.

To play a slide on the violin, just place the finger about a half step below where you would normally place the finger then slide up into the printed note. Think of it like you accidentally played an out of tune note and you’re quickly sliding into the correct note and that’s a slide!

How to Play Grace Notes on the Violin

The last type of violin ornament we’ll talk about is a grace note. Graces notes can be single or multiple. Grace notes are the little notes before or after a normal, printed note. They can be played on the beat or before the beat.

Different Types of Grace Notes: Acciacatura and Appoggiatura

If the grace note has a slash through it, it’s technically called an acciacatura. Acciacatura means “crushed.” The acciaccatura or slashed grace note is played before the beat.

If the grace note doesn’t have a slash, it’s an appoggiatura. Appoggiaturas are played on the beat and essentially steal time from the main printed note. Appoggiaturas often have a sense of leaning on the grace note and resolving to the main printed note.

Those are the 5 most common ornaments and embellishments you’ll see in violin and fiddle music!

Do you want more music theory for the violin?

Check out my course on music theory for the violin. It’s over 6 and a half hours of helpful information on music theory! Everything you ever needed to know!

Happy Practicing!

Easy Violin Harmonics Explained!

Harmonics on the violin often seem over-complicated and confusing, but harmonics on the violin are actually some of the easiest notes to play on the violin! Not only are they easy to play, they’re easy to recognize in music. After you go through this easy guide to violin harmonics I think you will find these special notes on the violin not only easy, but fun to play!

Here’s some common questions about violin harmonics that we’ll cover in this easy guide to harmonics. (Skip ahead if you like).

What are violin harmonics?

How to play violin harmonics?

What are the different types of harmonics?

What’s the difference between natural and artificial harmonics on the violin?

How are harmonics notated?

What are the most common harmonics on the violin?

How are artificial harmonics notated?

What’s the most confusing way to notate harmonics that I’ll probably never see in violin music? (I’m glad you asked. I’ve got an answer for you)

What Are Violin Harmonics?

The definition of a harmonic is: a wave whose frequency is multiple of the frequency of the same reference wave.

Got it? Okay, good. Moving on.

Just kidding. You don’t need to know anything about waves, overtones, nodes, frequencies, etc to understand violin harmonics.

What is my definition of a harmonic? A note that is played by lightly touching the finger to a particular place on the violin string, which produces a whistling sound.

When you are playing a harmonic, you are touching the string so lightly that you are actually allowing both parts of the string to vibrate (the parts of the string to the left and right of your finger). Think about it. When you put a finger down on the violin fingerboard normally, you’re allowing the string in between the finger and the bridge to vibrate, but the part of the string in between your finger and the nut of the violin doesn’t vibrate.

Allowing both sides of the string to vibrate is one of the things that gives a harmonic its characteristic whistling sound.

How to Play Harmonics on the Violin

Look at your string from the nut (the grooved part at the bottom of the peg box where the strings are touching) to the bridge. Do you see that distance between the nut and the bridge? On a full size violin that’s about 13 inches. You can either measure or just eyeball it, but lightly touch your finger to the string at the mid-point of the string. I do this with my fourth finger but you can do it with any finger. Move your finger around until the harmonic speaks.

Tada! You’ve found the most common harmonic on the violin. The harmonic will occur on the same place on every single string.

What you are playing is a natural harmonic on the violin. It occurs when you divide the string in half. That ration of 2:1 is the simplest ratio you can get, so the harmonic produced there is going to be really easy to play.

There are other natural harmonics on the violin. For instance, if you divide your string length into thirds, you’ll find there’s a natural harmonic right where your 3rd finger would go in first position. (Ever wonder why that finger is a “ring tone” on your violin that really rings when it’s in tune? Now you know).

There’s also a natural harmonic where the fourth finger goes in first position. Just try lightly touching the string and scoot your finger all the way up the fingerboard. You’ll hear lots of natural harmonics. The ones that sound clearly are more simpler ratios. The harmonics that don’t speak so easily are more complicated ratios like 7:1.

What Are the Different Types of Harmonics on the Violin

There’s only two types of harmonics on the violin: natural harmonics (what you just played) and artificial harmonics.

What's the Difference Between Natural and Artificial Harmonics?

Natural harmonics occur when you lightly place your finger on the string. On a full size violin the length of the string from the nut to the bridge is about 13 inches. So you’ll find natural harmonics at certain places, like 6.5 inches up from the nut (the exact middle of the string) Or 4.3 inches up from the nut (the string divided into thirds).

Well those same ratios exist even when playing on a different length of string.

Let’s say we put our first finger down firmly on the first finger in first position. Guess what?! You’ve changed the string length! You’re no longer dealing with a 13 inch string. You’re dealing with something more like a 12 inch string. That means those harmonics that occur when you divide the string in 2 or divide by 3 are going to occur at different places.

So if you keep your first finger down and lightly touch the 4th finger with your pinky, you’re essentially dividing that string into thirds. That’s an artificial harmonic!

An artificial harmonic occurs on the violin when you create an artificial “nut” by placing the first finger firmly down on the string and then placing another finger lightly on the same string to divide the string into thirds and play a harmonic.

How Are Harmonics Notated on the Violin?

There are four ways to notate natural harmonics on the violin. The first two are the most common, but you’ll occasionally see the second two.

The most common natural harmonics are usually notated with a 4 and a 0 or circle. You’ll find this notation for that common natural harmonic that occurs right in the middle of the string.

For the other natural harmonics, it’s common to see the note head in an open diamond shape. Sometimes you will also get a number like 3 and a 0 to indicate that note is a harmonic.

Sometimes you will see an open string below a diamond shaped note. The lower string is telling you what string to play this harmonic on. In the example below, you would lightly place your 3rd finger on the “G” note on the D string.

What Are the Most Common Harmonics on the Violin?

These are the most common natural harmonics on the violin. You can play them with third finger in first position, 4th finger in 1st position, or 4th finger in 4th position.


How Are Artificial Harmonics Notated?

Artificial harmonics often look like a double stop (two notes at once). But the bottom note will look like a normal note and the note on top will be diamond shaped. This is telling you to firmly place the bottom note wherever you would normally place it if it were just by itself. Now lightly place your pinky on whatever note the diamond shaped note is indicating (always on the same string).

Sometimes artificial harmonics look like this.

That’s really all you need to know to be able to identify harmonics in music. Sometimes you’ll see the word harm. to indicate the notes are harmonics. Sometimes you’ll see the word flag. which is short for flageolet, another word for harmonics. But that is somewhat rare.

What's the Most Confusing Way to Write Harmonics?

Wait, you mean you’re not confused? You’re disappointed because you thought harmonics would be sooo much more complicated? Alright, alright. Let me try and confuse you with this form of harmonic notation that you’ll rarely see in most violin music.

So what in the world is this trying to tell us? Are these artificial harmonics or natural harmonics? They’re natural harmonics trying to masquerade as some unnatural aberration.

Sorry natural harmonics, you’re just not that confusing.

Okay, stay with me here. The bottom note tells you what open string to play the harmonic on. The diamond shaped note tells you where to lightly place your finger. And the note in parentheses tells you what pitch is actually sounding.

The diamond note is the only important note in my opinion. The other two notes are completely unnecessary. The bottom note is not needed because where else would you play those diamond shaped notes? How about that first one? Do you want to try and play that G on the E string? Hmmm….probably not a good idea. Why don’t you just play it where you would always play that note! On the D string!

What about the second example? Where else are you going to play that low B? Well there’s only one string you can play that harmonic on, the G string, so your options are kind of limited.

How about those top notes in parentheses? Those are the pitches you are actually producing when you play that natural harmonic. The good news about natural harmonics is that if your finger is in the right place, the harmonic is in tune! No need to get out your tuner to see if that natural harmonic on the D string with 3rd finger is actually indicating that high D.

Composers have already done all the hard work to figure out what pitch they want to sound at that particular place in music. So the parenthetical notes are way more information than you need and often left out of most violin music.

I hope you enjoyed this easy guide to violin harmonics! If you would like more music theory, check out my course on Music Theory that covers pretty much every topic imaginable!

Happy Practicing!

~Lora


Half Steps, Whole Steps, and Why They Are Important for the Violin

Half Steps.jpg

Most beginner violinists have a big fear: knowing where to put their fingers. While there are no frets, keys, or markers of any kind on a fingerboard, that doesn’t mean we aren’t using a framework to help us. That framework is built out of…you guessed it, half steps and whole steps.

What is a half step and whole step? First, let’s start with intervals which are measured distances between one note and another note. These distances are measured using half steps and whole steps. A half step is the smallest distance between one note and the next. On the violin, a half step is when your fingers are basically touching each other. A whole step is two half steps.


Half and whole steps are a lot easier to see on the piano. A piano keyboard is made up of white and black keys.

piano-keyboard-diagram.gif


Do you see how there is a repetition of 2 black keys then 3 black keys? This pattern continues all the way up and down the keyboard. A half step is the distance from a white key to the black key that touches it. If you move to the right, the closest black key is a sharp. If you move to the left, the closest black key is a flat. Take the note D. If you move up a half step, you’ve reached D#. If you move down (left) a half step from D, you have D flat. On the violin, moving up towards your bridge makes a note sharp and moving back towards your scroll makes it flat. On the piano, if you go from one black key to its nearest white key, you are also traveling a half step. D# to E is a half step.

If you study the keyboard you’ll notice there are two instances where white keys are touching each other with no black key in between them. These two instances occur between B and C and between E and F. That’s because B and C and E and F are half steps apart from each other respectively. If you go up a half step from B you get C (not B#). Other than these two instances, if you travel from one note to the next note in the musical alphabet you are traveling a whole step. For instance, G to A is a whole step (you can also see how you’ve traveled two half steps: G to G# and G# to A).

It’s very important to remember those two sets of half steps between white keys. It’s going to make a lot of sense once we start talking about scales. For now remember B and C and E and F. I use the mnemonic “Buy Chocolate” and “Eat Fudge” to help my students remember.

So how does this help your violin playing? Two ways. Half steps and whole steps make up your invisible framework on your fingerboard and they also help with intonation. This is where ear training can really come in handy. All intervals can be associated with certain songs to help you identify them. A half step sounds like the beginning of the theme song from Jaws.

Choose any note on the violin and play “Jaws” using one note and a half step above that note. Your fingers should really be touching. Almost all beginners have trouble with their half steps being too far apart. Try playing “Jaws” again but this time scoot your half step finger up a little from the first. It doesn’t quite sound right, does it?

C Major Fingering Chart for Violin

Now let’s talk about how half steps and whole steps make up your invisible frame work. Your half steps and whole steps will change depending on what key you are in. Let’s say you’re playing in the Key of C. There are no sharps or flats in the Key of C so your only half steps will be between B and C and between E and F (remember Buy Chocolate and Eat Fugde?) Here’s what the Key of C looks like on a violin in first position.


You can see the half steps, they’re the notes that are touching each other. You see how there are fewer half steps than whole steps. In fact there is usually only one pair of half steps for each string. Whatever key you are playing in, don’t worry about the whole steps, concentrate on remembering where the half steps are. This is how you build up your framework.

If I’m playing in the Key of C, all I have to remember is where the half steps are for each string. My framework looks something like this.

G string= B and C (2 and 3)
D string= E and F (1 and 2)
A string= B and C (1 and 2)
E string= No half steps (but your F is lower than your other first fingers since it is natural (not sharp or flat)

So when I am playing in the Key of C, I simply remember where my fingers touch on each string. Starting from the G string, I say to myself, 2-3, 1-2, 1-2, low 1. This way you don’t have to think, “Is that second finger high or low?”

As your fingers develop more and more muscle memory, you don’t necessarily have to think about these numbers, your fingers will naturally find where they need to be. But until then, practice thinking in terms of half steps.

Now you try. Let’s say we’re in the Key of G which has one sharp, F# (we’ll talk about why there’s an F# there in the next lesson). Your violin fingerboard is going to look almost the exact same except all of your F’s are going to move up one half step. What is your framework going to look like now? What are the numbers you are going to remember for each string?

Here’s the answer for your half steps in the Key of G:

Screenshot-2017-11-5 b3c9c739174d124e1bfdd1694c83d500--violin-fingering-chart-violin-music-sheets jpg (JPEG Image, 472 × 43[...](1).png

G string= 2 and 3 (B and C)
D string= 2 and 3 (F# and G)
A string= 1 and 2  (B and C)
E string= 1 and 2 (F# and G)


Try playing through a G scale starting at your open G string and going to your high G on the E string. Play it as fast as you can. You’re not thinking about notes, sharps, “high” 2s or “low” 2s. All you are thinking is 2 and 3, 2 and 3, 1 and 2, 1 and 2. Make those half steps fingers on each string super tight.

Can you play through the scale faster than you could if you were just thinking note to note? Keep working on it, just thinking about the half steps. The more you do it, the quicker it gets!

Try thinking of half steps in all of your scales. If you aren’t practicing scales, you should be! Check out my free scale sheets or order some of my favorite scale books. Scales really are the secret to better playing.

Embrace your half steps! They are the tiny building blocks for your left hand technique. Later we'll discuss  using half steps to help you play notes that span big leaps across the fingerboard, but first let’s talk a little about key signatures and scales.

Happy practicing!

To learn more about music theory and how it applies to the violin, check out my course Music Theory for Violinists: Everything You Need to Know. It’s part of my Online Studio Membership. Learn more here.

Major Scales and Key Signatures for the Violin

Major Scales.jpg

It would be pretty boring we played all music in the same key. But we can rearrange where the half steps are in a scale and get 12 different major keys. (Do you know how many half steps there are in a scale? That’s right, 12!) A major key can be built off of every half step in a scale.

C   D♭  D   E♭  E   F   F#   G   A♭  A   B♭  B  

You might be wondering why I sharped some notes and made others flat. That’s because you will play something in B♭ a lot more than you will play something in the key of A#. Look at the piano, B♭ and A# are the same note. That means they are enharmonic equivalents: the same note written two different ways.

Major Scales

How do major scales work? Well it all depends on the arrangement of whole and half steps. Start with C major. Can you write half or whole in between each note? Remember “Buy Chocolate” and “Eat Fudge". Half steps are going to be between those two pairs of white keys that touch on the piano keyboard.

Screenshot-2017-11-7 c major scale whole and half steps at DuckDuckGo.png

This is the order you get. Whole Whole Half Whole Whole Whole Half. I sum it up like this: WWHWWWH.

That’s the order of half and whole steps for all major scales which is why major scales sound the same. They have the same relationship between the notes. Try this exercise. Print out some blank sheet music. Notate an E (the first line on the treble staff). Without looking at a scale book and without thinking about your key signature for E, begin writing the scale just by the order of whole and half steps. Now compare your scale to an E major scale in your scale book. If you really  want to give yourself a workout, try doing this for the more complicated scales like A#.

So if you’ve ever wondered why the Key of G major has one sharp—F#, this is why. Start on a G, follow your half step whole step pattern for the major scale and you will end up with F#.

All scales have two sets of half steps. Think of the Key of C as your vanilla scale with your basic BC and EF half steps. Every time you add one sharp, you are changing these two sets of half steps. In the key of G, you haven’t changed anything with B or C so they are still half steps. But E and F are no longer half steps because you had to sharp that F. Now F# and G are half steps.

Screenshot-2017-11-7 what is a key signature - Google Search.png

What’s up with all those sharps and flats? They look like they are completely random but they always occur in a certain order. If you have one sharp, it will always be F#. If you have two sharps they will always be F# and C#. The order goes like this:

F# C# G# D# A# E# B#

Use the mnemonic “Fat Cats Go Down Allies Eating Birds” to help you remember the order.

For flats, the order is the reverse of what it is for sharps.

B♭ E♭ A♭ D♭ G♭ C♭ F♭

Remember “Bead Go Catch Fish” for flats.

You can number each note in your scale. We call these scale degrees. The numbers above the notes are the scale degrees.  Each note in a scale also has a name which are written below the note in the following picture.

Screenshot-2017-11-7 scale with scale degrees - Google Search.png

Don't worry about remembering the name for each scale degree. The most important ones are tonic, dominant, and the leading tone. Scale degrees and scale names are the same for major and minor keys.

Why do we call the seventh scale degree a leading tone? Because it wants to lead to tonic again. Try playing a scale and stop on the leading tone. You’ll be itching to play the tonic to feel complete. (Legend has it Mozart’s father would play scales in the morning ending on the leading tone. Young Mozart would jump out of bed, run down stairs, and play the tonic. Brilliant idea to get a prodigy up in the morning.)

You know what key you are playing in based on the key signature at the beginning of the music. Here’s a list of all the major (and their relative minor scales). Don’t worry about the minor scales for now. Try to memorize each key signature up through 5 sharps and 5 flats. In the violin, you will spend most of your time playing in the key signatures with 0-5 sharps or flats so focus on those.

key_signatures_chart.gif

Next we'll talk about minor scales!

Happy Practicing!


Understanding Minor Scales for the Violin

Minor Scales for violin.jpg

For every major key signature, there is a minor scale that shares that same key signature. We call these minor scales relative minor scales, since they are related to the major key signature. Relative minor scales will have a different starting pitch than their relative major scales. For instance, C major and A minor are relative scales since they both share a key signature (zero sharps or flats).

Minor scales are a little more complex than major scales because minor comes in three flavors: natural, harmonic, and melodic. Before we get to that, let’s figure out the half steps and whole steps in a minor scale.

We’ll start with the A minor scale. Can you determine the order of half steps and whole steps between each note?

a-minor-scale-treble-clef.png


Your answer is: Whole Half Whole Whole Half Whole Whole. Sum it up by remembering WHWWHWW

This is a natural minor scale. It’s in it’s “natural” state. Nothing has been changed or altered. Try playing it. It sounds a little strange doesn’t it? Remember how the seventh scale degree or leading tone should lead to tonic? When you have a whole step between the leading tone and tonic (scale degrees 7 and 8) it doesn’t really sound like the leading tone is leading anywhere. What if we raised that seventh scale degree to a G# so that it’s a half step between 7 and 8.

Our scale would look like this.

a-harmonic-minor-scale-on-treble-clef.png


This sounds a lot more “right” doesn’t it? That’s because the G# really leads to the A. When you raise the seventh scale degree in a minor key you get a harmonic minor scale. Most music written in minor keys has the seventh scale degree raised like in this scale.

The only problem with the harmonic minor scale is that it creates an awkward leap between the sixth and seventh scales degrees. Now, F and G# are three half steps away from each other! Since we are raising scale degrees, let’s just go ahead and raise that sixth scale degree too. That makes the big leap a little less big.

Now we have this:

a-melodic-minor-scale-on-treble-clef.png


That’s our melodic minor scale. Well, it’s half of our melodic minor scale. Natural and harmonic minor scales are the same ascending and descending but with melodic minor scales, we change things up on the way down. In a melodic minor scale you raise the sixth and seventh scale degrees on the way up and you naturalize them on the way down.

You might think that rule was created to torture music students but it does make sense. Why did we raise the seventh scale degree to begin with? Because we wanted it to “lead” to tonic. If we are descending and going away from tonic, there’s no need to have it raised. We practice melodic minor scales because that’s what we’ll see in most music written in minor. If we are ascending towards the tonic, the sixth and seventh scale degrees will be raised. If we’re descending, they will be natural. Here’s your complete melodic minor scale.

A_Minor_Scale_Melodic complete.PNG


Now that you know about scales we’ll move onto intervals how they can make a big difference in your violin playing!

Happy (scale) Practicing!