
Half Steps, Whole Steps, and Why They Are Important for the Violin
/
Most beginner violinists have a big fear: knowing where to put their fingers. While there are no frets, keys, or markers of any kind on a fingerboard, that doesn’t mean we aren’t using a framework to help us. That framework is built out of…you guessed it, half steps and whole steps.
What is a half step and whole step? First, let’s start with intervals which are measured distances between one note and another note. These distances are measured using half steps and whole steps. A half step is the smallest distance between one note and the next. On the violin, a half step is when your fingers are basically touching each other. A whole step is two half steps.
Half and whole steps are a lot easier to see on the piano. A piano keyboard is made up of white and black keys.

Do you see how there is a repetition of 2 black keys then 3 black keys? This pattern continues all the way up and down the keyboard. A half step is the distance from a white key to the black key that touches it. If you move to the right, the closest black key is a sharp. If you move to the left, the closest black key is a flat. Take the note D. If you move up a half step, you’ve reached D#. If you move down (left) a half step from D, you have D flat. On the violin, moving up towards your bridge makes a note sharp and moving back towards your scroll makes it flat. On the piano, if you go from one black key to its nearest white key, you are also traveling a half step. D# to E is a half step.
If you study the keyboard you’ll notice there are two instances where white keys are touching each other with no black key in between them. These two instances occur between B and C and between E and F. That’s because B and C and E and F are half steps apart from each other respectively. If you go up a half step from B you get C (not B#). Other than these two instances, if you travel from one note to the next note in the musical alphabet you are traveling a whole step. For instance, G to A is a whole step (you can also see how you’ve traveled two half steps: G to G# and G# to A).
It’s very important to remember those two sets of half steps between white keys. It’s going to make a lot of sense once we start talking about scales. For now remember B and C and E and F. I use the mnemonic “Buy Chocolate” and “Eat Fudge” to help my students remember.
So how does this help your violin playing? Two ways. Half steps and whole steps make up your invisible framework on your fingerboard and they also help with intonation. This is where ear training can really come in handy. All intervals can be associated with certain songs to help you identify them. A half step sounds like the beginning of the theme song from Jaws.
Choose any note on the violin and play “Jaws” using one note and a half step above that note. Your fingers should really be touching. Almost all beginners have trouble with their half steps being too far apart. Try playing “Jaws” again but this time scoot your half step finger up a little from the first. It doesn’t quite sound right, does it?
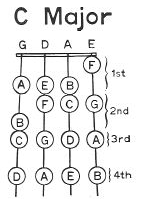
Now let’s talk about how half steps and whole steps make up your invisible frame work. Your half steps and whole steps will change depending on what key you are in. Let’s say you’re playing in the Key of C. There are no sharps or flats in the Key of C so your only half steps will be between B and C and between E and F (remember Buy Chocolate and Eat Fugde?) Here’s what the Key of C looks like on a violin in first position.
You can see the half steps, they’re the notes that are touching each other. You see how there are fewer half steps than whole steps. In fact there is usually only one pair of half steps for each string. Whatever key you are playing in, don’t worry about the whole steps, concentrate on remembering where the half steps are. This is how you build up your framework.
If I’m playing in the Key of C, all I have to remember is where the half steps are for each string. My framework looks something like this.
G string= B and C (2 and 3)
D string= E and F (1 and 2)
A string= B and C (1 and 2)
E string= No half steps (but your F is lower than your other first fingers since it is natural (not sharp or flat)
So when I am playing in the Key of C, I simply remember where my fingers touch on each string. Starting from the G string, I say to myself, 2-3, 1-2, 1-2, low 1. This way you don’t have to think, “Is that second finger high or low?”
As your fingers develop more and more muscle memory, you don’t necessarily have to think about these numbers, your fingers will naturally find where they need to be. But until then, practice thinking in terms of half steps.
Now you try. Let’s say we’re in the Key of G which has one sharp, F# (we’ll talk about why there’s an F# there in the next lesson). Your violin fingerboard is going to look almost the exact same except all of your F’s are going to move up one half step. What is your framework going to look like now? What are the numbers you are going to remember for each string?
Here’s the answer for your half steps in the Key of G:
.png](https://images.squarespace-cdn.com/content/v1/554545e3e4b0325625f33fa6/1509920162883-X31U76G5Y2ZW95957ZLB/Screenshot-2017-11-5+b3c9c739174d124e1bfdd1694c83d500--violin-fingering-chart-violin-music-sheets+jpg+%28JPEG+Image%2C+472+%C3%97+43%5B...%5D%281%29.png)
G string= 2 and 3 (B and C)
D string= 2 and 3 (F# and G)
A string= 1 and 2 (B and C)
E string= 1 and 2 (F# and G)
Try playing through a G scale starting at your open G string and going to your high G on the E string. Play it as fast as you can. You’re not thinking about notes, sharps, “high” 2s or “low” 2s. All you are thinking is 2 and 3, 2 and 3, 1 and 2, 1 and 2. Make those half steps fingers on each string super tight.
Can you play through the scale faster than you could if you were just thinking note to note? Keep working on it, just thinking about the half steps. The more you do it, the quicker it gets!
Try thinking of half steps in all of your scales. If you aren’t practicing scales, you should be! Check out my free scale sheets or order some of my favorite scale books. Scales really are the secret to better playing.
Embrace your half steps! They are the tiny building blocks for your left hand technique. Later we'll discuss using half steps to help you play notes that span big leaps across the fingerboard, but first let’s talk a little about key signatures and scales.
Happy practicing!
To learn more about music theory and how it applies to the violin, check out my course Music Theory for Violinists: Everything You Need to Know. It’s part of my Online Studio Membership. Learn more here.


![10 Best Violins for Beginners [2024] A Violin Teacher’s Ultimate Guide](https://images.squarespace-cdn.com/content/v1/554545e3e4b0325625f33fa6/1600433065588-JQV56M1W9LNI833AVGEE/10+best+violins+for+beginners+2020.jpg)