How (Not) to Hold the Violin Bow: 5 Steps to Form a Natural, Relaxed Bow Hold

The way you hold the violin bow is directly correlated to the sound you are producing. A relaxed bow hold will help you produce a good tone, allow for smoother string crossings, and eventually give you the tools to play fast sections and do advanced bow strokes.

Whether you are learning a beginner bow hold, of if you’ve been playing violin a while, it’s a great idea to rethink how to hold the violin bow properly for the best control and relaxation. So if you’re not completely happy with that tone you’re producing it might be time to reevaluate your bow hold.

Let’s talk about how to hold the violin bow for beginners and the common mistakes I see with bow holds and how those mistakes can negatively affect your sound.

Also visit, How Much to Tighten Your Bow: The Ultimate Guide to Tightening and Loosening Your Bow

Is it a Bow Hold or a Bow Grip?

When learning how to hold the bow, you will hear both terms: bow hold and bow grip. I dislike the term bow grip because “grip” implies force and tension. You want to avoid tension at all costs when it comes to the bow, so I avoid calling it a bow grip. The term bow hold is better but even that has its negative connotations.

You really aren’t even holding the bow. Once you learn to form a relaxed bow hold, you will realize you’re just balancing the bow between the thumb and the fingers. So instead of a bow hold, it should be called a bow balance. But I’ll keep calling it a bow hold for traditions sake!

Is There a Correct Way to Hold a Violin Bow?

While there are many variations on the violin bow hold, there are many common mistakes people have when it comes to learning to hold the violin bow. Holding the bow incorrectly will negatively affect your sound. The way you were originally taught to hold your violin bow can have a lasting affect on your bow hold, even if you’ve matured beyond those beginning stages.

So before we get into how to hold your violin bow correctly, let’s talk about some approaches to holding the bow that don’t yield good results.

A lot of methods use what I call the “one finger at a time approach.” You put this finger here and this finger here and the pinky on top and curve your thumb underneath… And then you usually end up with something unnatural.

The one finger at a time approach doesn’t work because each finger in the bow hold has to work together as one cohesive unit.

Another method I’m not a huge fan of is the “bow hold bunny.” This method involves the middle two fingers touching the thumb like the bunny’s teeth and the pinky and index finger sticking up in the air like the ears. When you do this on the bow it’s like the bunny is eating the stick and then you flop the ears down on the stick. In my opinion this approach to holding the violin bow has a lot of different problems. For one, it’s going to make the middle two fingers be unnatural close to each other. It also tends to make people pinch the bow with the middle fingers. And then the pinky and the index finger are unnaturally spaced.

Avoid the dreaded, unnatural, bow hold bunny monster

This approach might be fine for very young children. But I think mature children and adults benefit from a different approach when it comes to beginner bow holds and learning how to hold the violin bow properly.


How to Hold the Violin Bow

This is how I teach students to hold the violin bow. And even if you’ve been playing for a long time, I think it’s always a good idea to revisit the basics of bow hold and see if there’s anything you could do differently to relax more and get a better tone.

Bow Hold Step 1: Get the Fingers Relaxed

The first step to learning to hold the violin bow is to put down the bow! We’ll get to that later.

Get your fingers relaxed

Next I like to have students hang their right hand by their side and relax the hand. Shake the hand if you want to get rid of any tension. Don’t think about anything. Overthinking how to hold the bow usually results in bad bow holds.

Now, bring the hand up until the arm is horizontal. Continue to let the fingers dangle. That’s usually a perfect beginner bow hold. The fingers are naturally spaced with a gentle curve. They’re not abnormally straight, nor are they abnormally curved. The thumb is gently curved as well. For the standard bow hold, you also want the elbow to be even with the wrist and the knuckles. You don’t ever want the knuckles or the fingers to be above the wrist for a standard, beginner, middle of the bow bow hold.

Now we just have to figure out where will the bow touch the fingers?

Bow Hold Step 2: Learning Where the Fingers Touch the Violin Bow

When learning how to hold the violin bow for beginners, always start with a pencil. I use a pencil to demonstrate where the fingers are placed in a perfect violin bow hold. 

If I keep my hand relaxed with the knuckles, wrist, and elbow even, all I have to do is bring my pencil up until the pinky can rest on the pencil.

Bring the pencil up to your pinky

make sure you have part of your fingers on top of the pencil

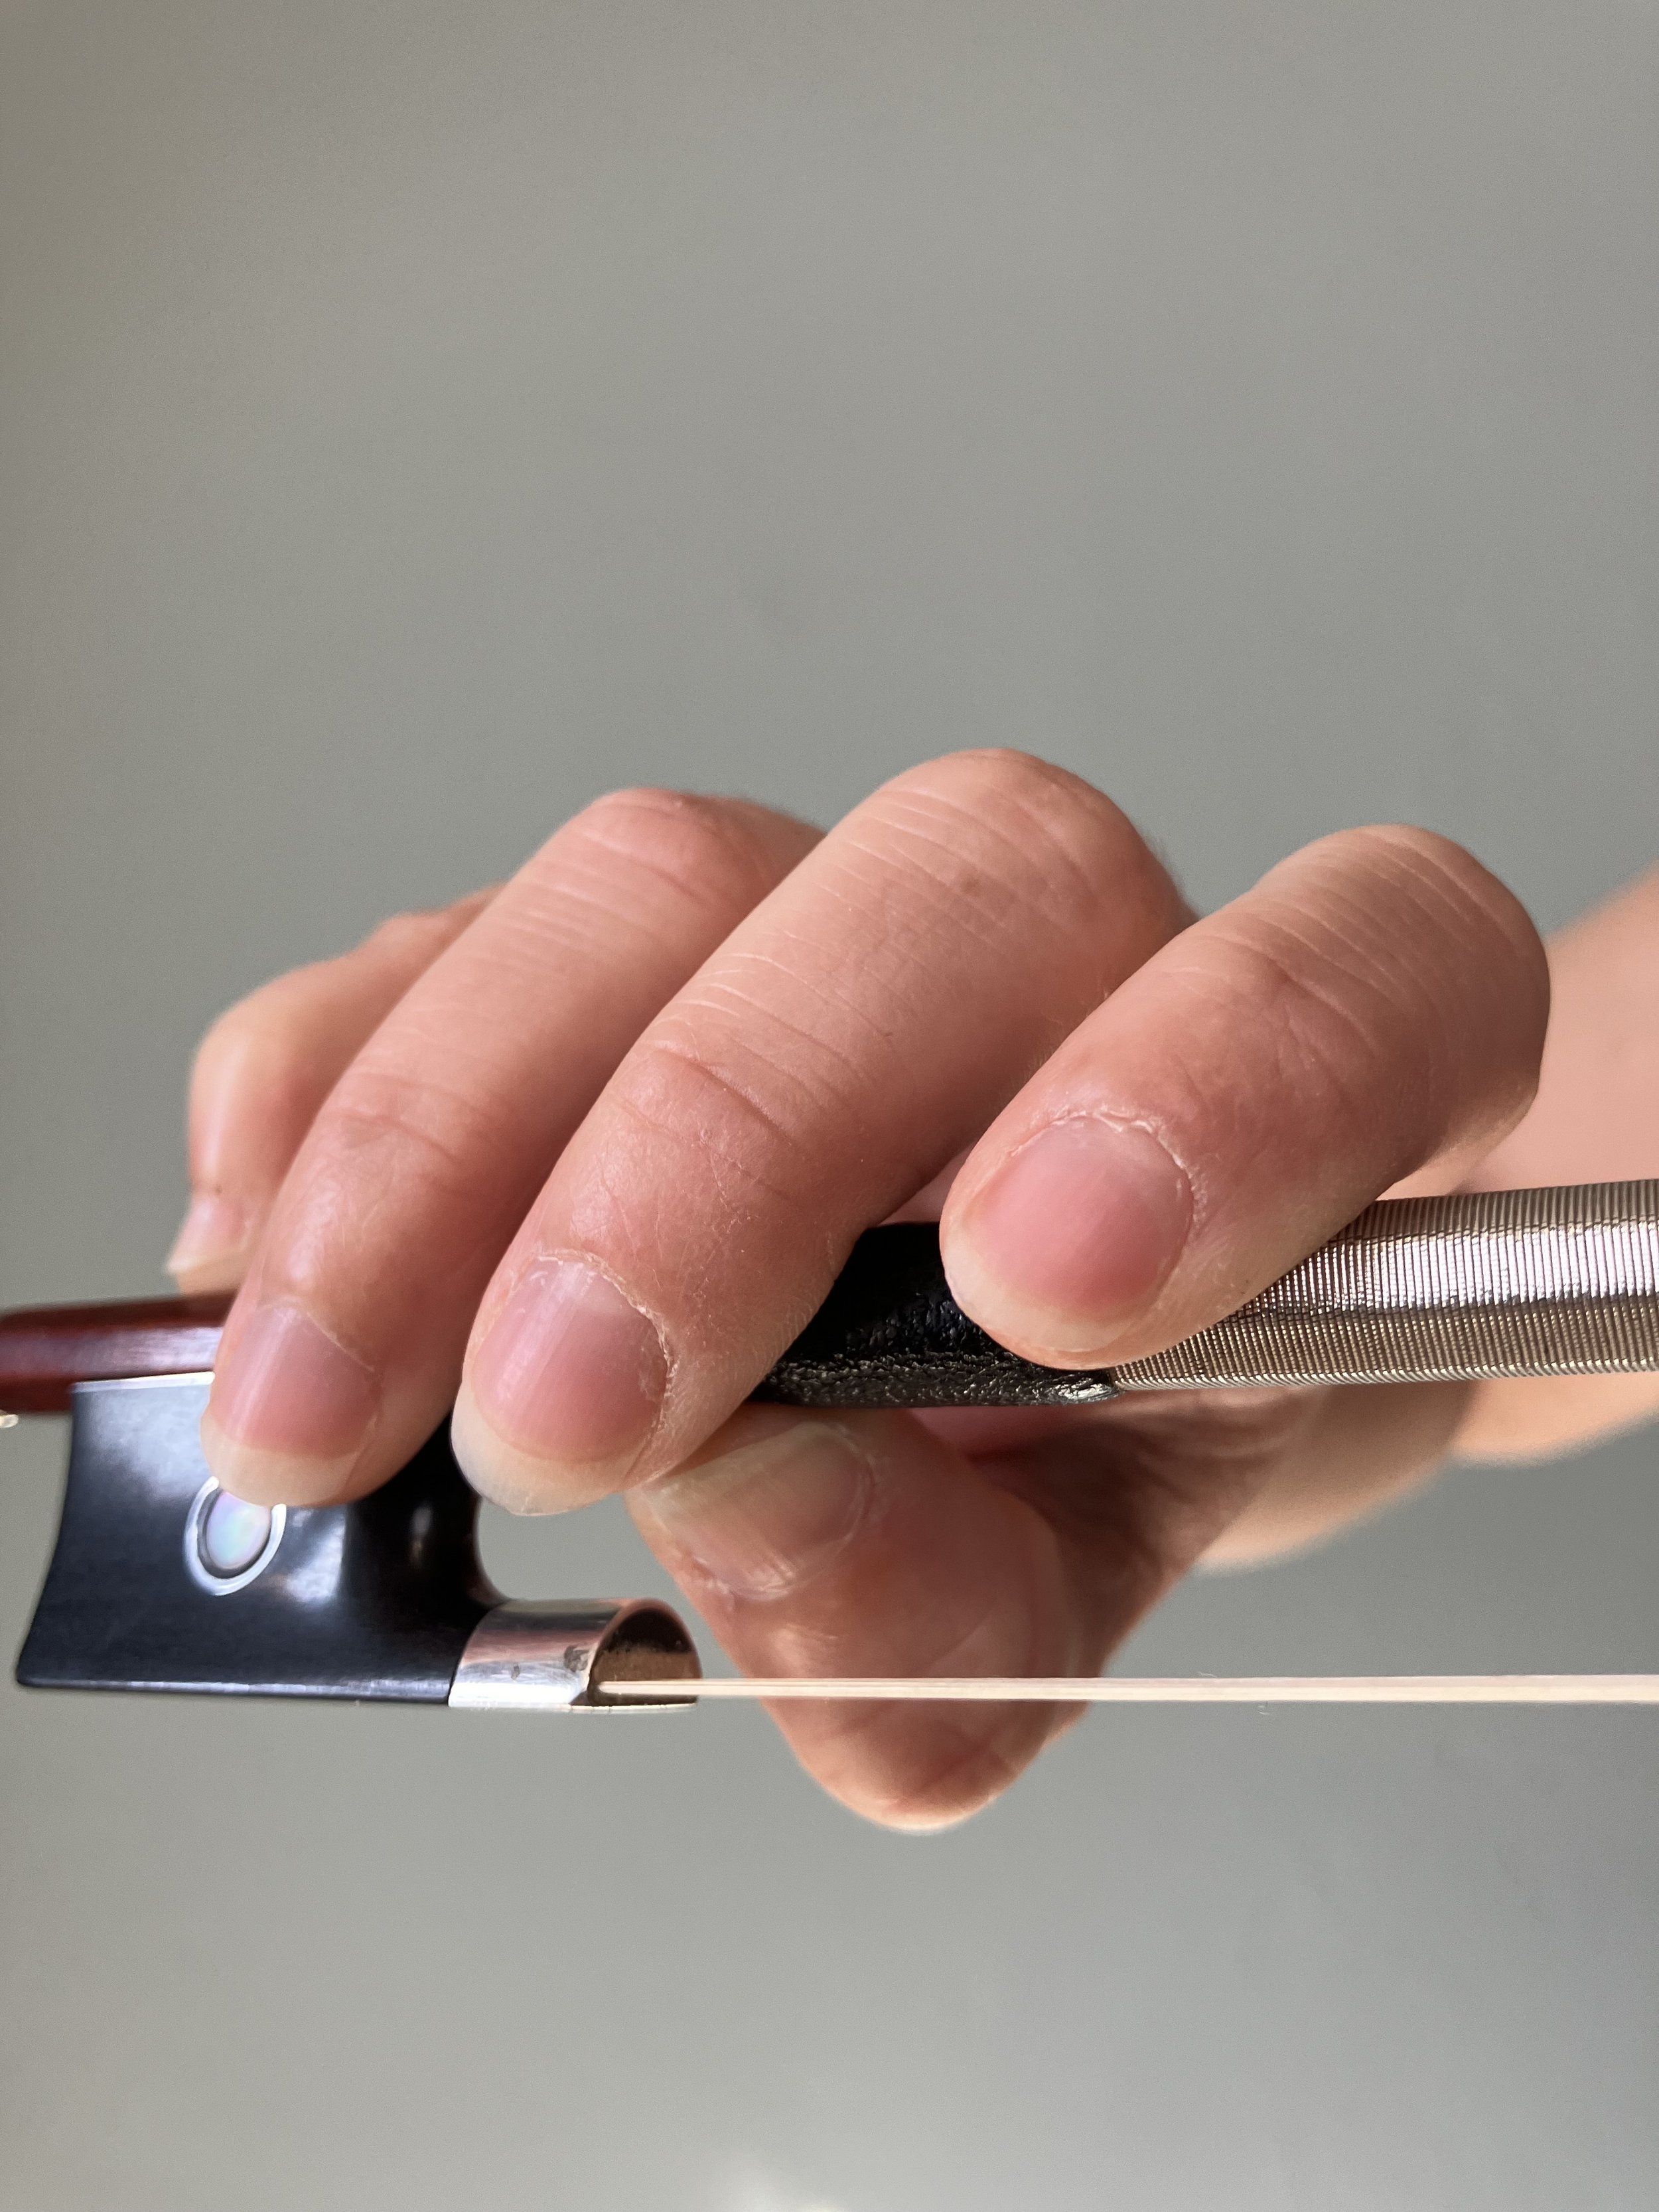
I bring my pencil up until the pinky comfortably rests on the stick and the middle knuckles or the area right below the middle knuckles are also resting on top of the stick.

Having fingers on top of the stick is very important because that’s how weight is going to be transferred into the stick and that’s how you produce and good tone.


Bow Hold Step 3: Place the Thumb

One of the most common questions I see when it comes to forming a beginner violin bow hold is where do I place the thumb?

Place the thumb underneath the pencil where ever it naturally falls, usually between the 1st and 2nd fingers. The important thing is to not overthink where the thumb is placed. Where does your thumb go to naturally balance the fingers that are on top of the stick?

One very important thing to remember when it comes to forming the bow hold is to gently curve the thumb. You never want a “hitchhiker’s thumb” that is unnatural bent backwards and locked.

Avoid the stiff, bent hitchhiker’s thumb

avoid bending your thumb back like this

Bow Hold Step 4: Slant the Fingers

You want to have a slight slant with the fingers so that everything is leaning just slightly towards the index finger.

Bow hold with no slant

bow hold with slight slant towards index finger

And that’s your beginner’s bow hold! Do you see how forming everything as one cohesive unit makes for a more natural and relaxed bow hold? Continue practicing your violin bow hold on a pencil wherever you are. But now let’s move on to forming the violin bow hold on the violin bow!

Violin Bow Hold Step 5: Forming the Violin Bow Hold With the Bow

When it comes to forming the violin bow hold on the bow, people tend to fall back into a “this finger goes here, this finger goes here approach.” Avoid this approach at all costs and try to always form the bow hold as one cohesive unit.

Start off by holding the bow horizontal with your left hand holding the bow at the tip.

Now, get your right hand relaxed again and place it on top of the stick right in the middle of the bow. That area is just like a pencil. Place your thumb, gently curved underneath the stick, wherever it naturally falls.

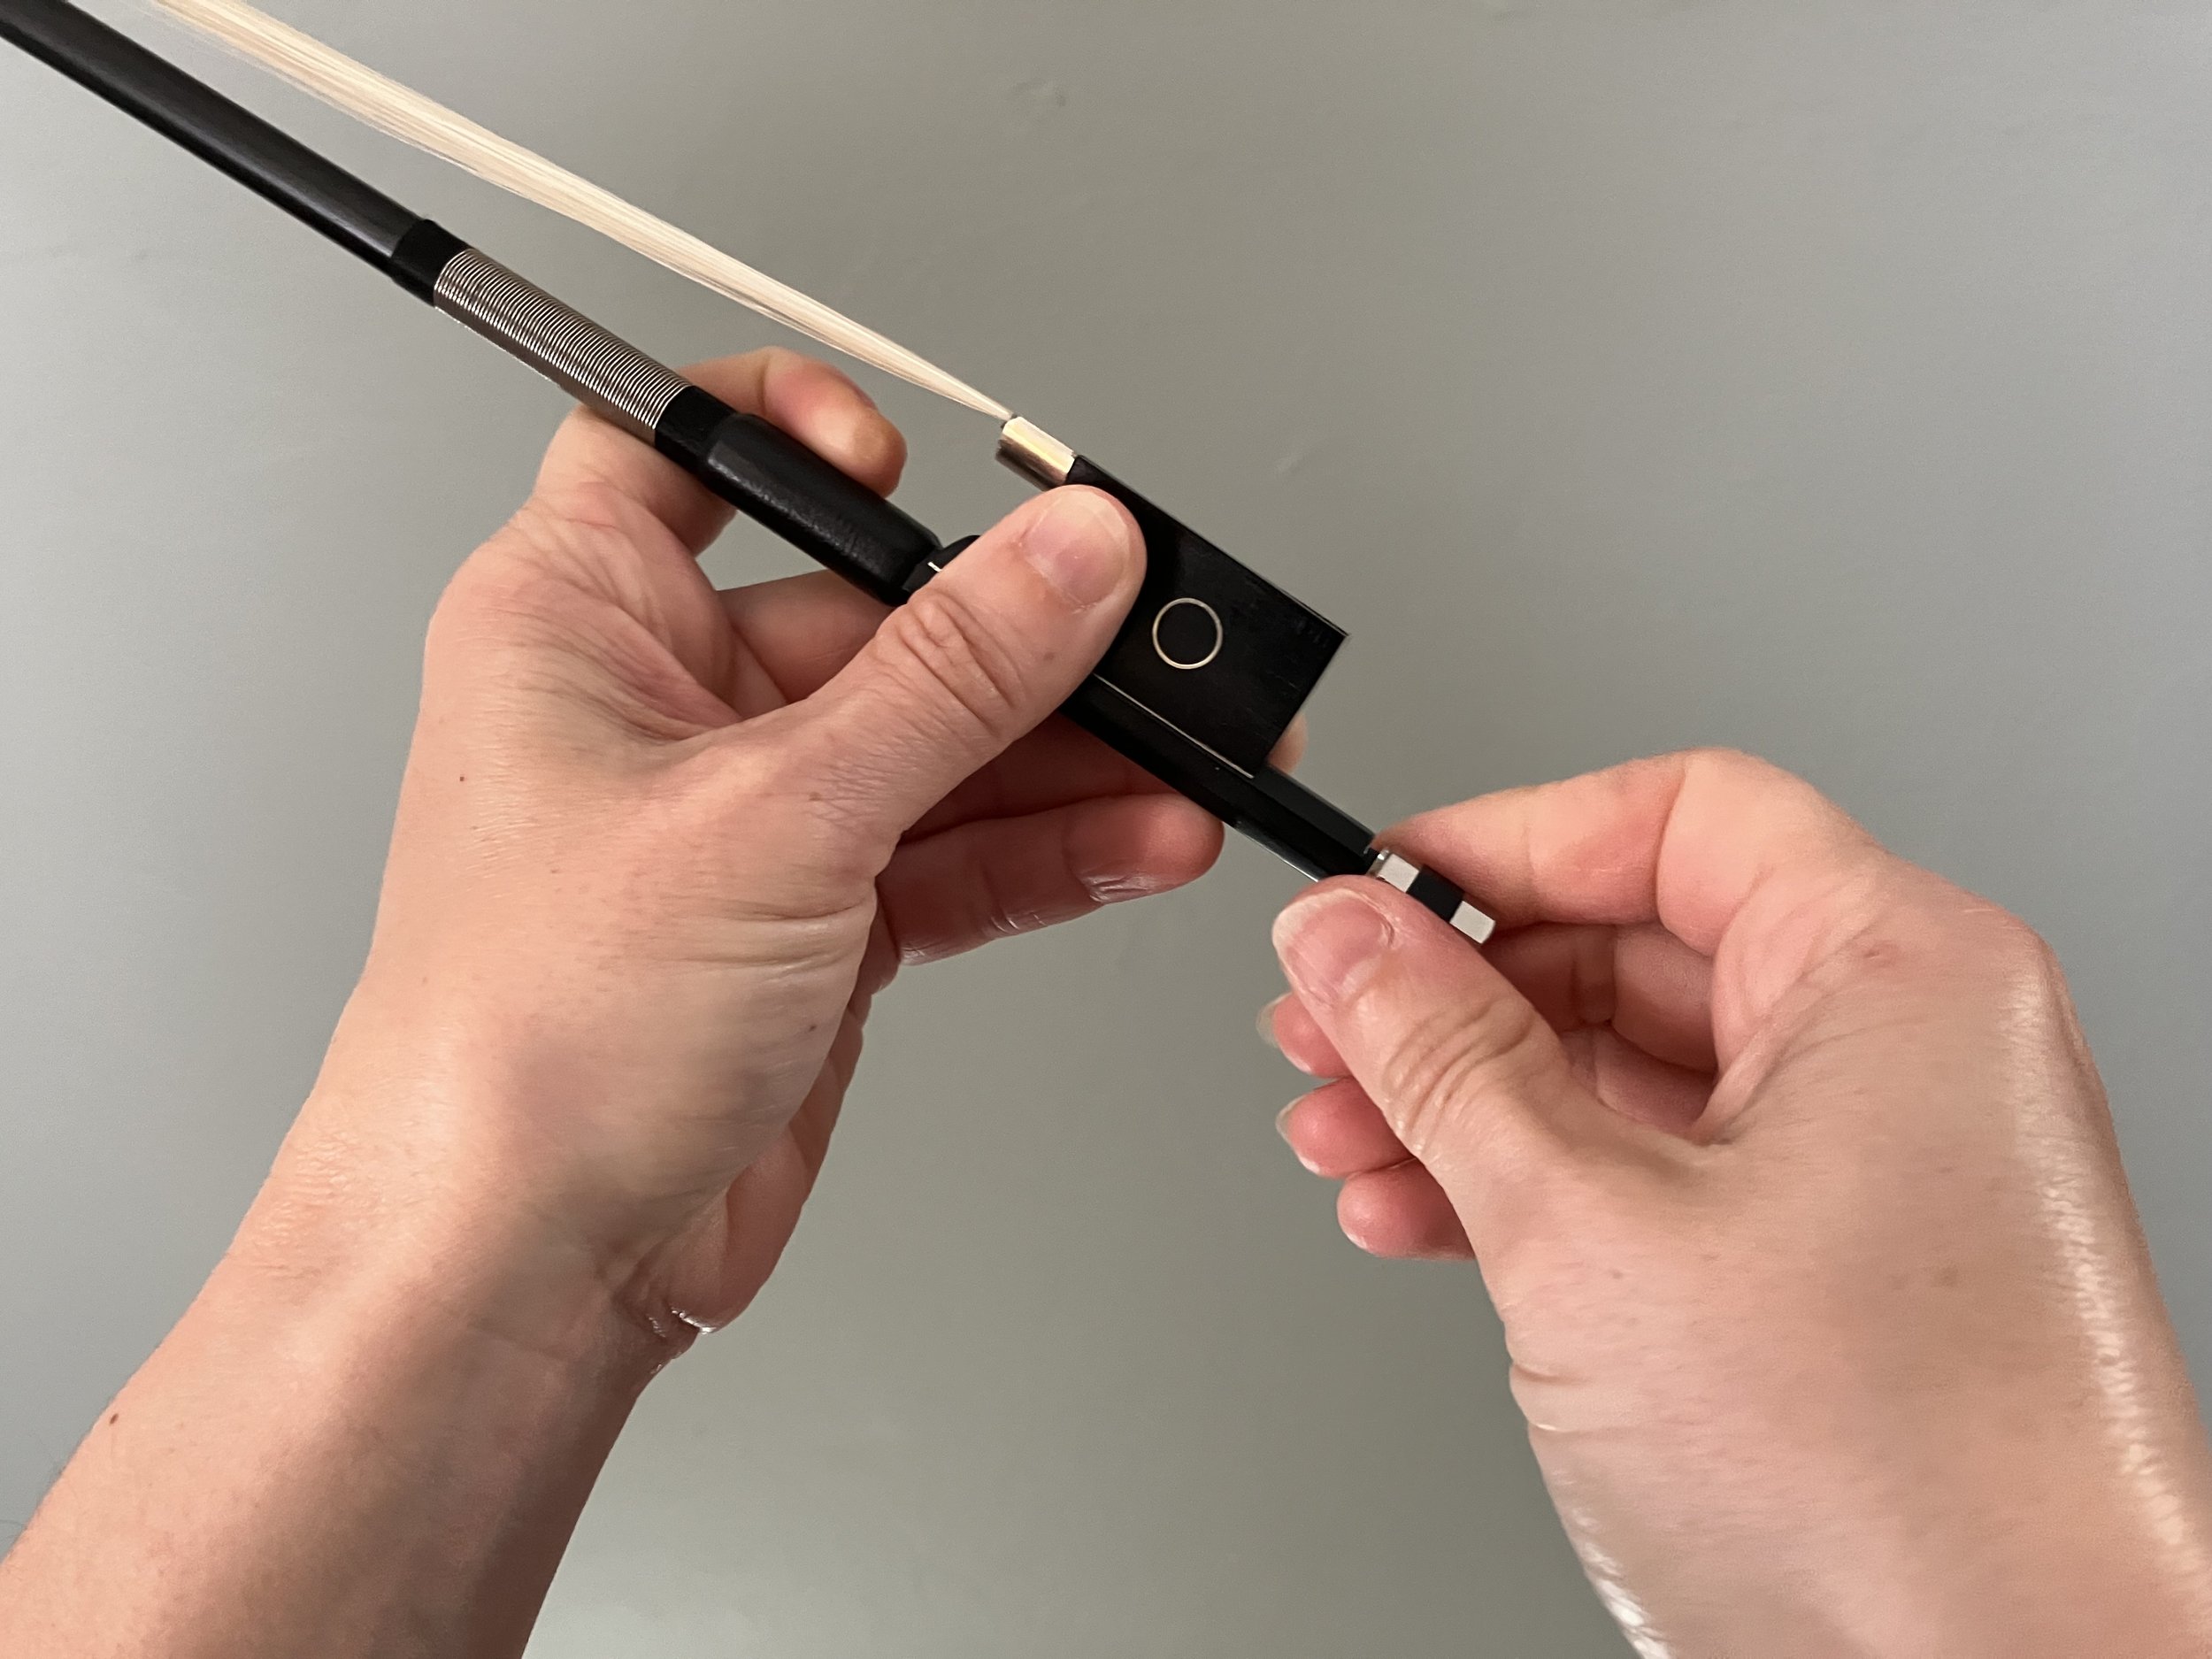
Then with your left hand, pull the bow and let your hand slide down to the frog until your thumb hits the tip of the frog. Your thumb will rest right at the tip of the frog, not inside that tempting little space inside the frog.

Form the bow hold in the middle of the bow

slide the bow hold down until your thumb hits the top of the frog

And that’s how you form a natural, relaxed bow hold.

Common Beginner Bow Hold Mistakes

When it comes to learning how to hold the violin bow, there are many mistakes beginners make that can negatively impact the sound and your joy of playing! Let’s talk through some common bow hold mistakes.

Bow Hold Mistake #1: Bending the Thumb Back

This locks the thumb and makes it unmovable and inflexible. You need that thumb to be relaxed to produce a lovely sound! So relax the thumb and let it naturally curve.

Bad thumb

good thumb

Bow Hold Mistake #2: Pinching the Stick with the Fingers

Don’t try to pinch the stick to hold the violin bow.

Let the fingers dangle over the stick. Remember, you aren’t really holding the bow and you’re definitely not gripping the bow! You’re really just balancing the bow between the fingers and the thumb.

Most people try to pinch the bow because they feel very uncomfortable balancing the bow on the thumb.

This is very understandable. Practice balancing the bow hold over a soft pillow or mattress if you are afraid of dropping the bow.

As you can see by the picture, pinching the bow with the tips of the fingers leads to a very straight pinky, and a bent back thumb.

All of the fingers are locked and inflexible which will contribute to a stiff sound. You need those fingers to move like little shock absorbers or springs, so loosen up and let those fingers drape over the stick!

Bow Hold Mistake #3: Not Curving the Pinky

Avoid locking the pinky straight

You also don’t want the pinky to be straight and locked (unless, you are playing in the upper half of the bow). Keep that pinky gently curved and on top of the stick.

Notice when your pinky is straight and locked how immovable it is. We need that pinky to flex just like all of the other fingers.

When the pinky locks on the violin bow, there’s a good chance it’s forcing the thumb to bend back and lock as well.

So relax all of the fingers. Practice holding your bow over something soft if you are afraid of dropping it.

And we’ve all dropped violin bows. It still happens to me sometimes and I’ll wonder what in the world just happened.

It’s not a bad idea to practice in a room with carpet, or place a rug in your practice area.

Bow Hold Mistake #4 Placing the Thumb Inside the Frog

It might be tempting to place your thumb inside that little dip in the frog, like the picture below. But don’t do it! Place your thumb at the tip of the frog, in between the tip of the frog and the leather grip.

Avoid placing the thumb inside the frog

place the thumb at the tip of the for and in between the frog and the leather grip

Do Fiddlers Hold the Violin Bow Differently?

A fiddler’s bow hold at the balance point

Is there a different way to hold the fiddle bow? While there is no difference between a violin bow and a fiddle bow, some fiddlers do hold the bow higher up on the stick. This facilities fast string crossings and easier double stops and compliments the style of playing.

If you are a beginner just starting to learn to play, I recommend holding the violin bow at the frog, even if you only want to fiddle. If you can hold the bow at the frog, you can hold it at the middle. But it’s harder to hold the bow in the middle and then transition to holding it at the frog.

Conclusion: Holding the Bow the Right Way

The bow hold is absolutely crucial to good tone production and advanced bow strokes. Having a natural, relaxed bow hold is not something you’ll be able to master in one day. It takes time to teach the muscles to relax and be in control of the stick. So give yourself time but reevaluate your bow hold often. Since the violin bow hold is so crucial to your sound, it’s a topic I talk a lot about in my online studio. I’ve got lots of lessons and workshops on the bow hold, so if you’re interested in seeing what my online studio has to offer, learn more here!

Happy Practicing!

Once you learn to hold the bow correctly, learn the secret to better bow control and relaxation!
How Tight Do You Tighten A Violin Bow?: The Ultimate Guide to Tightening and Loosening Your Violin Bow

When you first receive your violin bow, the hair will probably be touching the stick. You have to tighten the violin bow which forces the hair to stretch and move away from the stick in order to play. But a common question when it comes to learning how to tighten the violin bow is “how MUCH do I tighten the violin bow?”

Well, it depends.

When you are just beginning, you can learn to tighten the violin bow by sight. But as you become more comfortable playing, you will learn to tighten the violin bow based on feel.

When you are finished playing, you will want to loosen the hair on your violin bow to release the tension.

But first let’s talk about the mechanics of tightening and loosening a violin bow.

How to Tighten a Violin Bow

Hold the violin bow horizontally in front of you with the frog to the right. You’ll notice a silver screw at the very end of the frog. Turn the screw away from you and watch the middle of the bow. You’ll begin to see the bow hair moving away from the stick.

Also notice the frog. Do you see how the frog moves as well when tightening the violin bow? The more you tighten, the more space is created between the tip of the frog and the leather grip. This is the place where your thumb goes so if you find there’s not enough space for your thumb, tighten the bow a little more.

Notice how Tightening the bow changes the space between the frog and the leather grip

the looser the bow, the less space between the frog and the leather grip

The Rule for Tightening the Violin Bow

Eventually, you will tighten the bow based on sight and feel, but if you are a beginner here is a rule for tightening your violin bow by sight.

Notice the stick of the violin bow is curved with the stick dipping down towards the middle slightly.

To tell how much to tighten your bow, turn the screw until you can fit your pinky in between the violin stick and the hair at the middle of the bow.

Watch the middle of the bow as you tighten and continue turning the screw until you could fit your pinky in between the stick and the hair in the middle of the bow. You have to look at the middle of the bow because if you look at the ends, you will see the hair is further away from the stick. Use the middle as your gauge.

Now, the “pinky” rule is a good place to start. However, I notice that most people don’t tighten the bow enough when using this rule. So tighten the violin bow so that your pinky with a little bit of space on either side can fit in between the stick and the hair.

Tighten the bow until you can fit your pinky in between the hair and the stick in the middle of the bow

What Happens if You Tighten a Violin Bow Too Much?

Can you over tighten a violin bow? Yes! Over tightening a bow can damage the bow. When you over tighten the bow, the stick will be very straight without any of that natural curve. All that extra tension can warp or break the stick. You’ll also over stretch your hair which means you will have to continue over tightening your bow just to get to a “normal” tightness because the hair is too loose. You’ll have to get the bow rehaired sooner rather than later.

Over tightening the bow also makes it harder to play. The bow is too stiff when the hair is too tight resulting in unwanted bounces and scratches. The bow will be harder to control when the hair is too tight.

Can You Play if Your Violin Bow Hair is Too Loose?

When people learn that over tightening the violin bow can damage that expensive wooden stick, they tend to under tighten the bow.

While under tightening the bow will not damage it, it will make it harder to play. When the violin bow is too loose there is no resistance. You need a little give in the hair to be able to apply and release weight to get a good tone.

Just like Goldilocks, it’s all about getting it just right and that comes down to learning to tighten the violin bow based on feel.

How to Tighten the Violin Bow by Feel

Eventually, you will be able to feel if your violin bow is too tight or too loose as you play violin. The best way to learn to do this is to experiment. Try barely tightening your violin bow and then play something. You’ll notice there is no resistance or “give” in the violin bow. You can’t apply any weight into the string.

Now try slightly over tightening the violin bow (don’t worry, this will just be for a second). Play something now. Notice how the violin bow is too stiff and also looses some of its resistance and give. The bow is probably so stiff when it is overtightened that it is much easier to bounce the bow and get unwanted bounces.

Loosen the bow until you feel the correct amount of resistance.

How Much Do I Loosen the Violin Bow

When you are finished playing, you will want to loosen the hair on the violin bow. This will your hair to last longer and reduce the tension on the stick. But how much do you loosen the violin bow?

Most people tend to loosen the bow too much when they are finished playing. Simply loosen the screw until the hair is just touching the stick. That’s it! You can put your violin bow to bed now!

The correct amount to tighten the violin bow

The Correct amount to loosen the Violin Bow

Do I have to loosen the bow every time I finish playing?

If you’re just taking a short break, it’s fine to leave the violin bow hair tight. If you’re taking a longer break or if you are done for the day, it’s best to go ahead and loosen the bow hair.

What happens if you loosen the bow too much?

The hair will get very loose and floppy and eventually you will unscrew the screw completely. Don’t worry! You didn’t break your violin bow. Simply reinsert the screw and tighten it again. You may notice when you loosen your violin bow too much, the screw detaches and the frog detaches as well. Again, you didn’t break your bow. Reinsert the frog into the hole where it was attached, reinsert the screw and tighten.

if you loosen the bow too much, the screw may come out

and the frog may detach! don’t worry, reinsert the frog and the screw, retighten, and you’re good to go!

I forgot to loosen my bow hair! Is it okay?

That moment when you realize you forgot to loosen your bow hair last night

You close up your violin case and completely forget to loosen the bow hair. When you open up your case the next day, to your horror you see the violin bow is already tight! EEK! Is the bow damaged? Did you ruin that expensive stick?

Don’t worry, this happens to all of us at some time (sometimes multiple times…) Repeatedly forgetting to loosen the bow hair will not necessarily damage the bow, but you will have to rehair the bow sooner as the hair is getting stretched out more and more.

Can I replace the hair on my violin bow?

Yes, you can and you should! The bow hair wears out eventually and looses its “grippiness.” No matter how much rosin you apply, the bow will feel like it’s slipping across the strings. Simply take your bow to a local string shop or luthier and have them rehair the bow. This will cost anywhere from around $70 and up depending on your location.

You should rehair your bow at least once a year. Rehair your bow every 3-4 months if you play more regularly (2 hours a day and up).

Does weather and humidity affect violin bow hair?

Absolutely. Humid weather will make the violin bow hair stretch and lengthen, making it harder to get the correct amount of tension. You will tighten and tighten and tighten the screw and eventually the hair will have the correct amount of tension. The danger occurs if the humidity changes and turns drier, then the hair will constrict and your violin bow will be too tight.

This is particularly a problem when playing outside or going in between playing outside and inside. Keep an eye on the humidity and try to keep the humidity around 40%-60%.

Why won’t my violin bow tighten?

Hight humidity can make it harder to tighten the bow. If the bow hair is old, or if the bow hair has been overstretched, it will be hard to tighten the bow. Getting a bow rehair will fix this problem.

Sometimes there may be an issue with the screw. Cheap violins that come with cheap bows can often be difficult if not impossible to tighten due to the inferiority of the parts. If you’re playing a a very cheap bow (Under $50) and you’re violin bow won’t tighten, you may need to upgrade to a better bow.

I hope this helps you with all your questions when it comes to tightening and loosening the violin bow. If I didn’t cover something, let me know in the comments below.

Happy Practicing!

How to Tune a Violin (Without Breaking the Strings!) A Beginner's Ultimate Guide to Tuning

It’s vitally important to tune your violin every time before you start playing. But learning how to tune your violin as a beginner may seem intimidating. Once you understand a few things about tuning, you’ll see that tuning your violin is not as hard as it may seem.

Let’s talk about how to tune your violin and common tuning problems you may encounter (like the dreaded broken string!) Spoiler Alert: don’t worry, broken strings happen to everyone, but keeping a few things in mind will help you avoid breaking any strings!

Okay let’s get started by talking about a few music theory basics before we jump into learning how to tune the violin.

Important Musical Concepts for Better Violin Tuning

The musical alphabet consists of the notes A through G. If you started with an A and went up to a G and then kept going after that, the next note would be an A. It’s the same pitch as the first A you started on, just 8 steps higher. We call that an octave.

You can have lots of different As, they’re all the same note, just occurring at different frequencies or octaves. On your tuner, the octave in which that pitch occurs is notated by a little number next to the pitch.

So you see, if I play my open A, that tells me I’m playing an A4, if I play the A that’s an octave lower, that’s known as A3.

The names of your strings and the octaves that correspond with those pitches are:

How Tuners and Tuning Apps Work


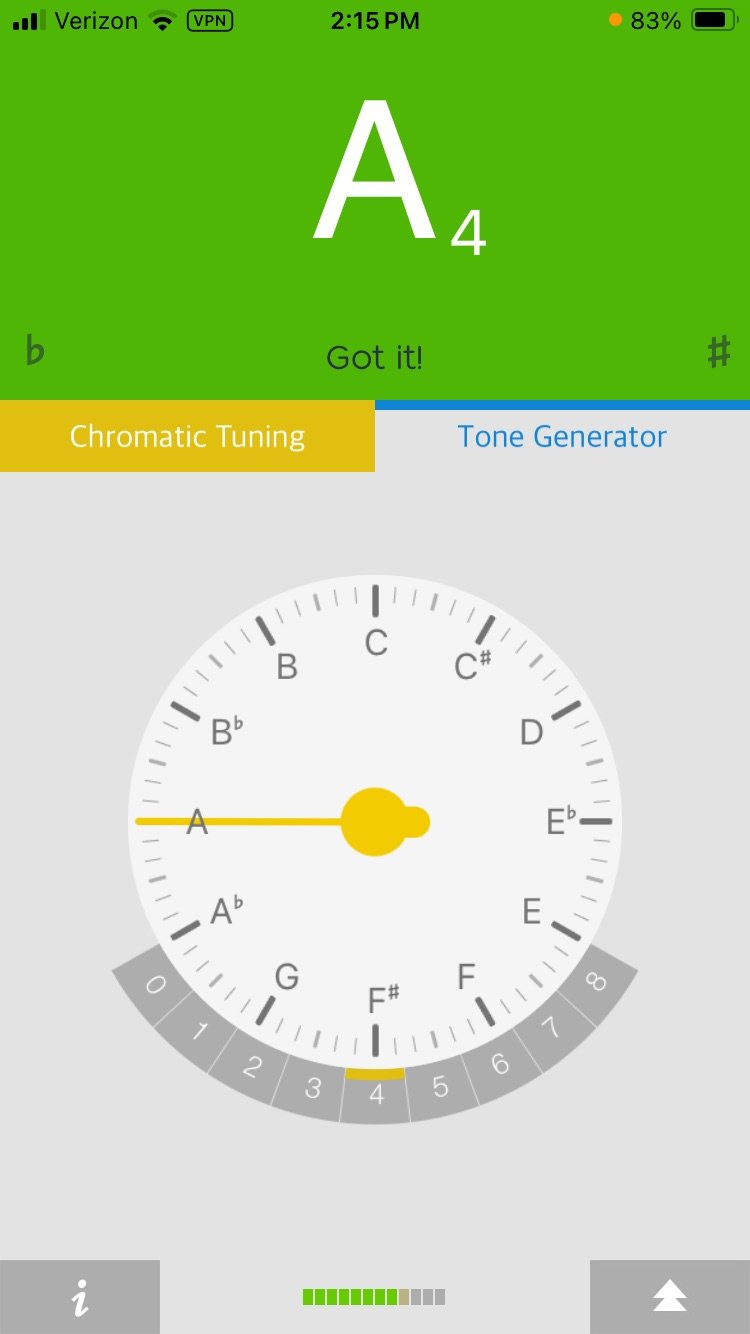
Now let’s talk about how a tuner or a free tuning app works. I like to use the INS tuning app but most tuning apps work in a similar fashion. When you play a note, the name of the note and its octave number register on your screen. You’ll get a pitch and a number next to it. If the note is in tune, you’ll get a green light. You’ll notice there’s a bar that moves across the screen. In some tuners, this bar is depicted as a dial or a light on the left and the right of the pitch. If the note is too high or too sharp, the bar will be to the right on the sharp side. If the note is too low or too flat, the bar will be on the left side. The bar moves closer to the center as you get closer to being in tune.

How to Tune Your Violin Using the Fine Tuners

The fine tuners are the little screws on your violin tailpiece. They make small adjustments to the string.

(Why do some violin only have one fine tuner?)

A violin with 4 fine tuners on the tailpiece

You can hold your violin different ways when you’re first learning to tune, but I recommend starting off with the violin against your stomach. Pluck a string and then adjust the fine tuner. The fine tuner works just like a screw. Righty tighty, lefty loosey. So if you want the string to be more taught or higher in pitch, turn the fine tuner to the right or clockwise. If you’re too high or too sharp and you need to go lower, loosen the fine tuner by turning it left or counter clockwise.

Now tuners can be finicky because the microphone is picking up on other noises, so as long as it’s flashing green pretty regularly, that’s good. Now move on to the next string and repeat the process until you’re finished tuning.

You can also progress to tuning with the violin on your shoulder if you like. Pluck the strings with the left hand and tune with the right hand like this…

Tuning the violin using the fine tuners while playing pizzicato

Tuning the violin using the fine tuners and the bow

Now if your strings are close to being in tune, maybe a half step away or less. Use the fine tuners. If it’s really out of tune, for instance if your A string is registering as a G, then you’re going to have to use the pegs.

How to Tune the Violin Using Pegs

There’s a few tricks when it comes to learning how to tune the violin using the pegs. Let’s say my A string is registering as a G. The string is too low for the fine tuners to do anything so I’m going to have to tune the violin using the pegs. Trace the string up to its peg. The A string’s peg is the top peg on the right. Hold the violin neck firmly with the left hand and pinch the peg in between your fingers with the right hand. I always like to release the tension on the peg first by slightly turning it back or towards me. Keep a firm hold on the peg because you don’t want it to loosen completely. As the tension releases, you’ll feel a little click. Now if you let your hand go of the peg, that peg could possibly loosen completely so keep the pressure on it. Now turn the peg away from you as you apply a little bit of pressure towards the peg box to help that peg get wedged into the hole.

Once you’re relatively close, use the fine tuners to get the string perfectly in tune.
Now that’s the basics of how to tune the violin for beginners using pegs or fine tuners, but it’s not always that simple so lets talk about some issues you might run into when it comes to tuning the violin.

Possible Tuning Problems When Learning to Tune the Violin

We talked about the musical alphabet consisting of the notes A through G. Well, in between each of those notes (well in between almost all of the notes) there’s a half way point. So in between each note there’s a sharp or a flat note. In between A and B there’s an A#, It’s a half step higher than an A. Now sharps and flats are really 2 sides of the same coin. So a B flat is the same note as an A#. It’s a half step lower than a B which is the same as an A sharp. You’re just thinking about it in different ways.

So in between G and A, there’s a G sharp or an A flat.

Occasionally, your string may be so flat, the tuner will actually show an A with a a little flat sign next to it. Or if the A were too high, it might even register as a B flat which is the same thing as an A sharp.

It’s important to pay attention to see if there is a flat or sharp symbol next to the note name because you could accidentally tune your A to an A flat. I’ve had some students occasionally show up to lessons with their violin perfectly tuned to an A flat.  So as you’re tuning, make sure you’re not tuning to a sharp note or a flat note.

How to Tune the Violin Without Breaking A String

Why is the violin so hard to tune? a question of the ages

Every beginner’s nightmare is the possibility of breaking a string while tuning. We all accidentally breaks a string at some point, but I’m going to try to help you avoid that!

The easiest string to break on the violin is the E string since it is very thin. Because of its thin diameter, it’s easy to over tighten the string. At some point, the string will snap if you continue to tighten it too much. Anytime you are tuning the E string, especially if you are tuning using the peg, make very small adjustments and stop to check the pitch with the tuner very often.

We’ve all broken E strings so it’s a good idea to have some extras on hand. Here are my recommendations for the best violin strings!

To prevent breaking strings while tuning the violin on any of the other strings, always make small adjustments and avoid over tightening the string.

Why won’t my violin strings stay tight?

Sometimes you tune your violin and the strings continue to loosen. There are a couple of reasons why violin strings don’t stay tight.

  • New Strings: new strings take time to stretch out. It may take a few days of frequent tuning before the strings settle out and stay tight.

  • The pegs aren’t wedged in the peg hole. Remember when I said to apply a little pressure towards the peg box while tuning the violin using the pegs? This is to help wedge the peg into the whole to prevent the peg from slipping. Slipping pegs equal loose violin strings.

  • Low Humidity. Dry air will make the wooden pegs shrink and slip. Try to maintain the ideal humidity level in between 40-60% humidity to prevent your violins strings from loosening.

  • Low Quality Violins. If you are using a violin on the cheaper side, poor quality workmanship will contribute to pegs that continue to slip and strings that never stay tight.

    (Get my top 10 Recommendations for Good Quality Beginner and Intermediate Violins)

How often does a violin need to be tuned?

Tune your violin every time before you start playing. Be very precise with tuning and don't settle for “almost” in tune.

People have struggled with tuning for centuries

Getting a violin perfectly in tune is very important since we don’t have frets, keys, or stickers. Muscle memory is how you learn to always place your fingers in the right place. If the violin strings are always slightly different in pitch every time you play, you will never develop the correct muscle memory to be able to play in tune.

Another reason to tune your violin every time before you start playing has to do with sympathetic vibrations of the strings. When you play one string, the other strings are sympathetically vibrating. So make sure those vibrations are in tune!

Why do some violins only have one fine tuner?

More expensive, higher quality violins often only have one fine tuner on the E string. Fine tuners can affect the sound or be the source of buzzes and unwanted noises. If you are comfortable tuning using the pegs, there’s no need for that potential effect on the sound.

A violin with only one fine tuner

The advent of steel strings also plays a part in the use of fine tuners. Before steel strings, when all strings were gut, fine tuners weren’t necessary. Gut is stretchier than steel. However, it’s very hard to make small adjustments with steel strings, especially on the E string. When steel strings were introduced in 1919, fine tuners became a necessity and continued to be used for E strings up until today.

Learn more about why some violin have only one fine tuner here.

Do Professional Violinists Use Fine Tuners?

If more expensive violins usually come with only one fine tuner, you may be wondering if professionals use fine tuners? Many professional violinists don’t use fine tuners (except on the E string). This has to do with aesthetics and sound as more fine tuners may negatively affect the tone production.

However, I’ve seen several famous violinists and fiddlers with more than one fine tuner on their violin. So there is no judgment or shame when it comes to using fine tuners!

Why is tuning a violin so hard?

Tuning a violin is definitely harder than tuning a guitar or a mandolin. Why is tuning a violin so hard? Guitars have geared pegs whereas most violins use traditional pegs. A traditional peg is just a wooden peg inside of a hole. That means humidity and weather can make tuning a violin harder as the wooden peg swells or shrinks. Wood that hasn’t been properly dried will also contribute to difficulties tuning the violin. Poor workmanship and cheap violins is yet another contributor that makes it hard to tune the violin.

Geared pegs look the exact same as traditional ebony pegs

The nature of wooden pegs also makes it hard to tune the violin because it’s difficult to make small adjustments. This is especially frustrating for violins with only one fine tuner.

You can skip a lot of the tuning frustrations by installing geared pegs onto your violin. Geared pegs look just like traditional pegs, but they are geared much like guitar pegs making tuning much easier. Geared pegs have many names and brands like Perfection Pegs or Planetary Pegs. You can get geared pegs installed at your local luthier or violin shop. I have geared pegs and I will never go back to traditional pegs!

Learning to Tune Your Violin is an Art Form!

Tuning is definitely a skill and an art form in an of itself so if. And there’s more to it than just using a little machine and a flashing green light. You should be working on making progress in your tuning abilities the same way you work on getting better intonation or a better tone. Using a tuner is a great way to learn to tune the violin for beginners, but there are better ways to tune and learning more advanced tuning techniques will actually strengthen your ear, help your understanding of tone and sound production, and improve your playing overall.

If you’re ready to learn how to tune the violin by ear or how to tune the violin using double stops, check out my Art of Tuning Course which is included when you sign up for the Meadowlark Violin Online Studio. Happy Tuning!


4 Common Mistakes Adult Beginners Make When Learning to Play the Violin

If you’re an adult beginner and you feel like you are always struggling with the violin, then understanding these common mistakes adult beginners make when learning the violin might be the key to help you unlock your problems and start enjoying the violin.

I’ve been teaching violin for over a decade to all ages and I’ve learned that there are certain common mistakes and problems that adult violinists always seem to deal with. Now these mistakes aren’t technical mistakes. I’m not going to be talking about things like crooked wrist or bad posture (although I do have a free course that does talk about those common technical bad habits).

What I am going to be talking about is mistakes adults make in their approach to learning the violin. I think these mistakes are some of the main reasons people start learning the violin but then give up later, or maybe why people feel like they are always practicing but never making any progress.

So let’s get started.

Adult Beginner Mistake #1: Trying to Learn Everything All at Once

We’re adults, we can multi-task, right? Well multi-tasking while learning the violin is not a good idea. The left hand is doing something completely different than the right hand. You’re trying to not make scratchy sounds with your bow while placing your left hand fingers on a fingerboard that has no markings or frets, and let’s throw in some music reading while we’re at it.

Learning those three skills at the same time is hard. Period.

Even if you play other instruments or you are used to reading music, I still suggest you separate learning the violin into three separate skills when you’re just starting. Focus just on the left hand. Play pizzicato so you can focus on left hand position and intonation. Then focus on just on the right hand so you can think about tone production and relaxing your bow hold. Learn songs and scales without even looking at sheet music. Then work on combining the left and right hands. And then, start adding in reading music.


Adult Beginner Mistake #2 Having Too Many Violin Books

You just bought your new violin, you’re on Amazon looking at books, and you get all these recommendations for some amazing violin books. Scale books, method books, Irish fiddling, oh Gypsy music for violin, classical music, French fiddling, Ashokan Farewell, gotta have all of those!

I’m of the mindset that there is no such thing as too many books, so maybe buying all of those books isn’t a mistake, but trying to go through all of them at once, is.

I know how this goes. It’s like starting your first garden. You get so excited looking at the seed catalogues that you buy fifty varieties of seeds. And you end up planting a little bit of this a little bit of that and none of the seeds actually produce anything because you’re trying to learn how to grow fifty different types of plants all at once.

It’s the same thing with violin. It can be really tempting to just jump from one song to the next and never stay on any one song for any length of time. This might be one of the reasons you feel like you’re never making any progress, because…you’re not making any progress.

Too many violin books!

My rule is that you should stay on a song until you are absolutely sick of it and then move on. That way you move beyond just learning notes. When you stay with a song until you’re sick of it, you’re converting all of those new skills that you’ve learned into muscle memory which means when you do move on to a new and harder song, you can focus on those more advanced skills because those easier skills have already been converted to muscle memory.

That also gives you the mental space to go beyond just reading music, and start actually making music. You can memorize songs, you can add in dynamics and phrasing, and start to add your own personal stamp to any song you learn.

So my recommendation is that you should stick with one scale or one etude or warm-up exercise, or song for several weeks. You should only be learning one or two new songs at a time, but you should also always save time for revisiting old songs as well.

Adult Beginner Mistake #3 Having Too High of Expectations

My motto for life is “keep your expectations low and you won’t be disappointed.”

There’s a difference between setting goals and having unrealistic expectations. If you have unrealistic expectations, you’re setting yourself up for disappointment and frustration.

You have to learn to enjoy small victories when it comes to learning the violin. Not to be cliche, but it’s all about the journey.

The violin is not something you can conquer which brings me to my next common mistake.

Adult Beginner Mistake #4 Thinking of the Violin As Something To Conquer or a Box to Check

I’ve learned that people who want to learn the violin are pretty cool people with different hobbies and interests. As adults we tend to think of things we want to accomplish. I want to learn how to bake my own bread—check! I want to raise my own chickens—check! I want to get my pilot’s license—check!

I want to learn to play the violin—che….no. The violin is not something you can ever check off. It’s not something you can conquer, so don’t even try to conquer it. You will never master the violin. I’m not saying that to discourage you. The fact that you will never master this instrument, is part of its allure.

If you find joy in little victories and understanding little secrets of the violin,  then you’ll see the violin as part of your life’s journey and not something you have to conquer or check off. And when you approach learning the violin that way, you’ll make more progress and you’ll have fun doing it.

So I hope these tips help you as an adult learning to play the violin. Let me know in the comments below if you feel like you make these mistakes or if there are other mistakes you’ve made and what you’ve done to overcome those problems.

Happy Practicing!

The Ultimate Guide to Adult Fiddle and Violin Camps

Attending an adult fiddle camp is one of the best ways to motivate your playing. Adult camps for fiddle or violin usually offer workshops, classes, jam sessions, performances, dances, and ensemble playing over a few days or weekends.

You don’t have to be an expert player to attend these adult camps. Unless otherwise noted, all of these adult music camps are great for people of all ages and skill levels, from beginner to advanced players!

However, while some camps do offer courses for brand new beginners, you probably do want to show up with some basic skills. And by basic skills I mean being able to bow and produce a decent sound and being familiar with left hand notes and basic finger patterns. The more fundamentals you know beforehand, the more you will get out of the camp. But don’t worry, if you’re not ready, I can help!

Whether you love fiddle, Celtic, gypsy jazz, classical, Scandinavian, Cajun, or any other style of playing, there’s a camp for you!

In this directory, you’ll find a list of adult fiddle camps and adult classical violin camps, their locations, the style of playing they focus on, and the general time period in which they occur.

Locations vary wildly, but most adult music camps occur in idyllic locations, like the redwood forests of California, beautiful Nova Scotia, or even fiddling sailing trips around the coast of Scotland.

Start packing your bags, get your violin ready, and enjoy browsing my ultimate guide to adult fiddle and violin camps!

Or skip ahead!

Adult Fiddle and Violin Camps in Canada

Adult Fiddle Camps in the United Kingdom

Adult Fiddle and Violin Camps in Europe

Virtual Adult Fiddle Camps

Adult Fiddle Camps by Famous Fiddlers


Adult Fiddle and Violin Camps By State


Alabama


Alabama Folk School

About: Various workshops and retreats focusing on old-time music and crafts.

Date Range: Varies

Style: Old Time

Location: Nauvoo, Alabama

https://campmcdowell.org/dates-rates


California


California Bluegrass Association Summer Music Camps

About: Jams, classes, concerts, and dances.

Date Range: Summer

Style: Bluegrass

Location: Grass Valley, California

https://californiabluegrass.org/summer_music_camp/smc-home/


Julian Family Fiddle Camp

About: Acoustic music camp for people of all ages and musical abilities. Located at a rural retreat near a historic mining town.

Date Range: May

Style: Appalachian and Bluegrass

Location: Julian, California

https://californiabluegrass.org/cbaevent/julian-family-fiddle-camp/


Lark Camp

About: Learn traditional styles from all over the world.

Date Range: Summer

Style: Traditional

Location: Mendocino Woodlands, California

https://www.larkcamp.org


SoCal Chamber Music Workshops

About: One week workshop for adult amateur chamber musicians. Great for intermediate or advanced players.

Date Range: Summer

Style: Classical chamber music

Location: Claremont, California

https://www.socalchambermusic.com


Valley of the Moon Scottish Fiddling School

About: Alasdair Fraser’s Scottish fiddle camp in the redwood forests of Northern California.

Date Range: August

Style: Scottish fiddling

Location: Boulder Creek, California

http://www.valleyofthemoon.org


Colorado


Colorado Roots Music Camp

About: Multiple camps with small class sizes featuring a wide variety of styles.

Date Range: Summer

Style: Varies but include bluegrass, folk, blues, swing, Irish, and more.

Location: Divide, Colorado

https://www.rmmc.org/roots/


Rocky Mountain Fiddle Camp

About: Daily fiddle classes, contra and square dances, jam sessions, concerts, and opportunities to hike and swim.

Date Range: Summer

Style: Varies but includes Old Time fiddle, Cape Breton, Klezmer and many other styles

Location: Golden Bell Camp, Colorado

https://www.rmfiddle.com


Florida


Florida Fiddlers Convention

About: Workshops, jams, concerts, string band contest, and a homemade pie contest!

Date Range: October

Style: Fiddle

Location: Keystone Heights, Florida

https://flafiddlers.wordpress.com


Kansas


Sunflower Ragtime Orchestra

About: Rehearse and perform popular orchestral music of the early 1900s with other adult amateur musicians.

Date Range: Summer (2 Sessions)

Style: Ragtime, Orchestra

Location: Olathe, Kansas

https://www.musicsmiths.net/sro


Medieval Music Sumer Camp

About: Explore the music of the 12th and 13th centuries on period instruments.

Date Range: Summer

Style: Medieval

Location: Metropolitan Conservatory, Overland Park, Kansas

https://www.metropolitanconservatorykc.com/medievalmusiccamp


Heartland Chamber Adult Workshop

About: A four-day workshop where you are coached on chamber music by members of the Kansas City Symphony.

Date Range: Summer

Style: Classical chamber music

Location: Prairie Village, Kansas

https://www.heartlandchambermusic.org/adultworkshop


Kentucky


Cowan Creek Mountain Music Festival

About: Classes, jam sessions, and dancing for adults and kids in the beautiful Appalachian mountains of eastern Kentucky.

Date Range: Last week in June

Style: Kentucky mountain music

Location: Whitesburg, Kentucky

http://cowancreekmusic.org


Louisiana


Dewey Balfa Cajun and Creole Heritage Week

About: Immersive, multi-day lessons, workshops, and dances including instruction on Louisiana music, crafts, and cooking.

Date Range: March

Style: Cajun and Creole

Location: Eunice, Louisiana

https://lafolkroots.org


Maine


Maine Fiddle Camp

About: Workshops, dances, jam sessions for all ages and levels. Several sessions offered.

Date Range: Summer

Style: Traditional

Location: Camp NEOFA, Montville, Maine

https://www.mainefiddlecamp.org


Massachusetts


Country Dance and Song Society

About: Connecting people through the traditions of English Country Dance, contra, and square dance and the music that is an integral part of those traditions.

Date Range: Varies, but mostly Summer

Style: Varies

Location: Virtual and Various Locations in Massachusetts, Maine, and Michigan

https://cdss.org


Minnesota


Bluff Country Gathering

About: Fiddle workshops (and other instruments), concerts, and dances.

Date Range: May

Style: Traditional American Music

Location: Spring Grove, MN

http://www.boveeheil.com/bluff-country-gathering.htm


Adult Chamber Music Retreat

About: A six-day retreat for classical music enthusiasts. For intermediate players or community orchestra members.

Date Range: June

Style: Classical chamber music

Location: Grand Rapids, Minnesota

https://www.thirdcoastchambercollective.com/projects/chamber-camp


Montana


Montana Fiddle Camp

About: Multiple camps on the old-time music tradition in the Little Belt mountains of Montana.

Date Range: May/June

Style: Varies by camp, but includes fiddle and Western swing and more

Location: Monarch, Montana

https://www.montanafiddlecamp.org


New Hampshire


Fiddleheads Jam Camp

About: Jam Camp offers guided jams with focus on jamming essentials and techniques - hearing chords, backup, playing in different styles, soloing and having fun!

Date Range: September

Style: From blues to bluegrass, jigs to jazz, cajun to country and more!

Location: Coontoocook, New Hampshire

https://www.fiddleheadscamp.com


New York


The Ashokan Center Music and Dance Camps

About: Jay Unger and Molly Mason’s famous fiddle camp. Various styles of camps held in the serene setting of the Catskill Mountains.

Date Range: Varies

Style: Camps vary but include such styles as bluegrass, Western Swing, Scottish, and Zydeco just to name a few.

Location:

https://ashokancenter.org/camps/


Catskills Irish Arts Week

About: Classes, workshops, dances, and concerts featuring a variety of Irish instruments.

Date Range: Summer

Style: Irish Fiddling

Location: East Durham, New York

https://www.catskillsirishartsweek.com


Scor! String Experiences for Adults

About: Various camps with a focus on ensemble-playing.

Date Range: Varies

Style: Varies: classical and fiddle.

Location: Canandaigua, New York (Finger Lakes Region), and various other places around the U.S.

https://www.scorstrings.com/pages/in-person-events


North Carolina


Blue Ridge Music Week

About: Daily classes for fiddle (and other old time instruments), jam sessions, and concerts.

Date Range: Summer

Style: Old Time Fiddle

Location: Mars Hill, NC

https://www.brotmw.org


John C. Campbell Folk School

About: Year-round weeklong and weekend classes for adults in craft, art, music, dance, and more. Small-sized campus on a scenic 270-acre campus.

Date Range: Varies

Style: Varies

Location: Brasstown, North Carolina

https://www.folkschool.org


Jink and Diddle School of Scottish Fiddling

About: Multiple sessions on Scottish fiddling in the mountains of North Carolina.

Date Range: Summer

Style: Scottish fiddling

Location: Banner Elk, North Carolina

http://www.fiddletree-music.com


The Swannanoa Gathering

About: Various week-long programs in various forms of folk music and dance.

Date Range: Summer

Style: Varies by camp

Location: Swannanoa Valley, near Asheville, North Carolina

https://swangathering.com


North Dakota


International Music Camp/ Adult Community Camps

About: A four-day camp for string orchestra.

Date Range: Summer

Style: Classical Orchestra

Location: International Peace Garden, North Dakota/Manitoba

https://internationalmusiccamp.com/programs-and-sessions/music/adult-community-camps/


Ohio


Ohio Scottish Arts School

About: Classes in Scottish Arts of fiddle, harp, highland dance, pipes, and drums

Date Range: Summer

Style: Scottish Fiddle

Location: Berea, Ohio

https://ohioscottishartsschool.com


Oklahoma


Jana Jae Fiddle Camp and Music Festival

About: Individual and group sessions for all ages and levels.

Date Range: Labor Day Weekend

Style: Fiddle

Location: Grove, Oklahoma

https://www.grandlakefestivals.com/fiddle_camp.htm


Pennsylvania


Folk College

About: A weekend of folk music workshops and concerts.

Date Range: May

Style: Folk

Location: Huntingdon, Pennsylvania

https://folkcollege.com


Tennessee


Nashville Acoustic Camps

About: Small size fiddle camps by Megan Lynch Chowning.

Date Range: Varies

Style: Old Time Fiddle

Location: Nashville, Tennessee

https://www.nashvilleacousticcamps.com


Texas


Acoustic Music Camp

About: Learn banjo, mandolin, guitar, & bass with the The Tennessee Bluegrass Band. Learn to pick, jam, and have fun.

Date Range: April (in Conjunction with the Bluegrass Heritage Festival)

Style: Bluegrass

Location: Dallas, TX

https://acousticmusiccamp.com


Live Oak Fiddle Camp

About: Advanced fiddle and guitar instruction on a working cattle ranch.

Date Range: May

Style: Various Fiddle styles

Location: Hallettesville, Texas

https://liveoakfiddlecamp.com


Camp Bluegrass

About: A six-day camp with a focus on individual skills and slow jams.

Date Range: July

Style: Bluegrass

Location: Levelland, Texas

https://campmcdowell.org/dates-rates


Vermont


Northeast Heritage Music Camp

About: A welcoming camp community in the hills of Vermont for a week of traditional music immersion open to all instruments.

Date Range: Summer

Style: Music traditions of New England and eastern Canada along with related traditions from around the world.

Location: Starksboro, Vermont

http://www.northeastheritagemusiccamp.com


Washington


Cascadia Irish Music Week

About: A yearly gathering of learners and teachers of Irish traditional music and culture.

Date Range: Summer

Style: Irish

Location: Olympia, WA

https://www.cascadiairish.org/home


Fiddle Tunes

About: It’s a week-long, total-immersion workshop with a hallmark of presenting an expansive array of fiddle styles from specific geographic regions of the world.

Date Range: Summer

Style: Varied styles with a focus on fiddle

Location: Port Townsend, Washington

https://centrum.org/program/fiddle-tunes/


West Virgina


Allegheny Echoes

About: Celebration of Appalachian culture and heritage through old time music classes and outdoor activities in the heart of the mountains.

Date Range: Summer

Style: Bluegrass

Location: Marlinton, WV

http://www.alleghenyechoes.com/location


Wisconsin


Hardanger Fiddle Music and Dance Summer Workshops

About:  Intensive Hardanger fiddle and Norwegian dance classes, concerts, culture sessions, and evening parties.

Date Range: July

Style: Hardanger fiddle

Location: Dodgeville, Wisconsin

https://www.hfaa.org


Haugaard’s West Denmark Fiddle School

About: Classes, singing, and dancing.

Date Range: June

Style: Scandinavian and Anglo/Celtic music

Location: West Denmark, Wisconsin

https://www.wdfiddleschool.org


Adult Fiddle and Violin Camps in Canada


Northern Lights Bluegrass and Old Time Music Camp

About: An all-ages music camp prior to the annual Northern Lights Music Festival.

Date Range: August

Style: Bluegrass and Old Time

Location: Ness Creek, Saskatchewan

https://northernlightsbluegrass.com/music-camp/


SOAR: String Orchestra for Adults Retreat

About: An orchestra camp for adult beginners and intermediate players.

Date Range: August

Style: Classical string orchestra

Location: New Denver, British Columbia

https://www.valhallafinearts.org/site/adult-string-orchestra/


The Gaelic College

About: Year-round programming in the culture, music, language, crafts, customs, and traditions of the immigrants from the Highlands of Scotland. Offers students of all ages and skill levels instruction in Gaelic culture and music.

Date Range: Varies

Style: Cape Breton

Location: St. Ann’s Nova Scotia

https://gaeliccollege.edu


International Music Camp/ Adult Community Camps

About: A four-day camp for string orchestra.

Date Range: Summer

Style: Classical Orchestra

Location: International Peace Garden, North Dakota/Manitoba

https://internationalmusiccamp.com/programs-and-sessions/music/adult-community-camps/


Adult Fiddle and Violin Camps in the United Kingdom


Sessions and Sail

About: Scottish sailing trips aboard a tall ship that feature traditional music workshops, sessions, and ceilidhs along the way.

Date Range: Varies

Style: Varies by sailing trip but includes Scottish fiddling, song writing, and bluegrass sailing trips.

Location: Most voyages start from Oban, Scotland

https://sessionsandsail.com/home

Fèis Glenn Albainn

About: A long weekend on the shores of Loch Ness to develop skills in song, dance, and traditional music.

Date Range: February

Style: Scottish

Location: Fort Augustus, Scotland

http://www.feisgleannalbainn.co.uk

Fèis Rois Adult Féis

About: A three day retreat catering to all abilities, from beginner to advanced. No previous knowledge of traditional music required. Violins are even provided for beginning classes!

Date Range: May

Style: Scottish

Location: Ullapool, Scotland

https://feisrois.org/residential-feisan/adult-feis/

Blazin in Beauly

About: A workshop run by Blazin Fiddle with various class options from “Gently Paced” to “Super Advanced”

Date Range: October

Style: Scottish

Location: Beauly, Scotland

https://blazininbeauly.com

Sabhal Mòr Ostaig

About: Various camps and short courses held at the National Centre for Gaelic Language and Culture

Date Range: Varies

Style: Scottish

Location: Isle of Skye, Scotland

https://www.smo.uhi.ac.uk/short-courses/?lang=en

Adult Fiddle and Violin Camps in Europe

Scandia Camp Mendocino

About: Dance, music, and more!

Date Range: Summer

Style: Scandinavian

Location: Norway and Sweden

http://www.scandiacampmendocino.org


Sore Fingers Summer School

About: Europe’s leading organization for Bluegrass and Old Time Music Camps.

Date Range: October and Easter

Style: Bluegrass

Location: Kingham, Oxfordshire, United Kingdom

https://www.sorefingers.co.uk


Grappelli Django Summer Camp

About: A long weekend of workshops and jam sessions hosted by some of the world’s most famous Gypsy jazz musicians.

Date Range: August/September

Style: Gypsy jazz

Location: The Netherlands

https://www.grappellidjangocamp.com


Virtual Adult Fiddle and Violin Camps


Fiddle Hell

About: Online workshops, concerts, and jams.

Date Range: April

Style: Bluegrass, Blues, Cajun, Cape Breton, East European, Electric, Irish, Jazz, Jazz Manouche, Klezmer, Latin, Mexican, New Acoustic, New England, Old-Time Southern, Québécois, Scandinavian, Scottish, and Swing styles. 

Location: Online

https://www.fiddlehell.org


Adult Camps By Famous Fiddlers

These camps and workshops are led by well-known performing fiddlers and violinists. Locations and dates vary as many musicians hold workshops around the world. Check the musician’s webpage for more information.


Alasdair Fraser Camps and Workshops

Date Range: Varies

Style: Scottish Fiddle

Location: Varies

https://alasdairfraser.com/camps-workshops/


O’Connor Method String Camp

About: Mark O’Connor’s music instruction camp based on the O’Connor Method.

Date Range: Summer

Style: American traditional music

Location: Charlotte, North Carolina

https://oconnormethodstringcamp.com


Overcoming the Struggle of Learning to Play Violin

People always say violin is the hardest instrument to learn. Or they say it has a steep learning curve. I disagree with both of those statements. Personally, I believe that every instrument is equally hard to master.

One of the reasons people give up on the violin is that they never realize where the real struggle is. I'm about to tell you.

Violin isn't necessarily harder than other instruments. The thing about violin is that it has a low threshold for frustration.

Think about it. You make some scratchy noises with your bow and you start questioning your whole purpose in life. You get filled with self-doubt and wonder if you're wasting your time. How do I know? ​I've been there!​

I played guitar for 3 years before I ever picked up the violin and I never recall having a soul-searching, doubt-filled, tear-brimming moment after strumming some guitar chords that didn't sound great.

Violin is different. It's easy to get frustrated. The real struggle with the violin is not learning where to place your left hand fingers or how to get a good tone. The biggest struggle with playing violin is overcoming the mental frustrations you impose on yourself.

Once you realize this, you'll understand your greatest obstacle in achieving your dreams is your own mind.

Now let’s talk about WHY people get frustrated so easily and how to fix it.

First, you need to think about the negative cycle of...not practicing!

It's important to practice the violin often, even if it's just for a few minutes. I do recommend taking off at least one day a week to refresh. Make it a goal to practice at least 5-6 days a week.

There's more to it than just not practicing. Not practicing the right way can yield the same results as not practicing at all.

When I first started playing violin, I would practice for 4 and 5 hours a day with okay results. When I finally figured out how to practice as a college student, I could get more accomplished in less time with little or no frustration.

If you would like to get more accomplished in less time, watch the video lesson here on my ultimate practice routine.​

Basically you want to do stretches, warm-ups, scales, etudes or exercises, a solo piece, something fun you do well, and also take some time to experiment.

Whoa! That sounds like a lot! I thought you just said practice every day, even if just for a few minutes? How do I fit all of this in?

Well, each one of those items doesn't have to take 15 minutes. For instance, here's how you could break it down for someone that's been playing for a few months.

  • Stretches: 1 minute

  • Warm-ups: Playing open strings (no left hand). 2 minutes

  • Scales: 3-5 minutes

  • Exercises/Etudes: 5-10 minutes

  • Solo Piece: 10-15 minutes

  • Something Fun You Do Well: 2 minutes

  • Time to Experiment: There are no rules when you experiment. Do it for 3 seconds or 3 hours

So you see, that routine could easily fit into half an hour, or maybe two twenty-minute sessions. As you progress, you can scale it up if you want to spend more time on each item.

Now I know life gets in the way. Here's what I want you to do if you don't have time to do your full routine. Only do open strings. Yep, that's it. If all you do is open strings every day, I guarantee, you'll make progress!

There's one more reason people get frustrated with the violin and quit. They think learning violin is a continual upward slope. It’s more like stairs with a combination of progress and plateaus.

You’re going to reach plateaus with certain skills. That’s expected. Don’t get frustrated. Realize you’ve reached a plateau and focus on another skill. Give yourself some time and pretty soon you’ll be making progress again.

People also don't rejoice in small victories. The road to being the musician you want to be is comprised of lots of tiny steps. Find joy in each of those steps and you will always love playing the violin.

One of my favorite quotes is: "Make the most of all that comes and the least of all the goes."

Rejoice when you do something well. And when you don't do something well, learn from it and let it go.

To sum it up, here's what you want to take away.

  1. Practice every day even if it's just open strings

  2. Develop a practice routine and stick with it as much as you can

  3. Rejoice in small victories

Those three items are the keys to making progress on the violin and squashing frustration in its tracks.

For more practicing tips, join me in my ​members-only 30 Day Practice Challenge​ and find a new way to get more enjoyment out of your practice routine every day.

Steps for Sticking with the Violin

So is violin worth it? I think so! There's a reason I stopped playing all those other instruments to focus on the violin. Sometimes the things in life that involve the most struggle also have the greatest rewards.

Those frustrations you're dealing with? I've dealt with all of them and overcame them all! Here's my tips to help you master the mental aspect of playing violin.

  • Tell someone you're playing the violin. Whether that's in person or on social media. Accountability helps you stick with something. When you start sharing with people that you play the violin you'll probably hear these two statements, "I always wanted to learn violin" or "I used to play violin..." and then you'll realize how special you are for plugging away at this tantlyzing instrument.

  • Listen. Listen. Listen. Listen to music all the time. Fiddle, classical, gypsy, whatever. Mix it up. Stay surprised. Attend live events as much as you can. Listening is the number one thing you can do to stay motivated. Need some ideas? Here's my ​ultimate playlist.​

  • Don't set unrealistic goals or expectations. That's just setting yourself up for failure. Learn to enjoy the journey of small accomplishments.

  • Play for people. I'm super introverted but playing for people is a great source of joy. Make yourself do it and you'll be happy you did!

  • Join a jam session, ​my members-only community forum​, or local orchestra. Playing with others is a great way to stay motivated. Sometimes you just have to jump in feet first and do it.

  • Make progress videos. Record yourself. You don't have to listen to it if you don't want to (although it's a great help). In a few weeks, record yourself again. Get a good collection and then see all the progress you've made.

  • ​Submit videos and get my feedback on your playing​ through my Online Studio Membership

If you're just starting to play violin, or thinking about starting, don't let this scare you away. Yes, violin is a challenge but if you have the right mindset and a good foundation of the basics, you can learn to play the music you've always wanted to play. If you are brand new, check out my ​"Getting Started"​ articles and videos.

Happy Practicing!

~Lora

Master the Basics: Easy Violin Scales and Arpeggios for Beginners

Hello, fellow violin enthusiasts! I'm Lora from Meadowlark Violin, and today I'm excited to share with you the secrets of mastering three super easy scales and arpeggios tailored for beginners. Scales are the backbone of every violinist's practice routine, serving as the essential building blocks for honing your technique. Whether you've just started playing or have a few weeks or months of playing under your belt, these scales and arpeggios will set you on the right track.

I’ll be teaching you all of these scales by ear, no sheet music required! Learning scales and songs by ear is great for intonation, even if you already read music.

The Magic of Finger Patterns

What makes these scales super easy, you ask? Well, they all share the same finger pattern. That means learning one pattern opens the door to playing three different scales. Understanding finger patterns can simplify the learning process, and repetitive finger patterns don’t just stop with easy scales. As you progress on the violin, you’ll notice advanced scales spanning several octaves can share the exact same finger pattern as another scale in a completely different key. (Learn more about universal scales and violin finger patterns here.)

Dive into D Major

Let's kick off our exploration with the D major scale. With two sharps (F# and C#), we delve into the world of half step pairs. Half steps occur where two fingers are touching on the violin.(Learn more about half step pairs and how scales work here.) F# and G, and C# and D, form our two half step pairs for D major. As we start on the open D string, I'll guide you through the notes, creating a musical journey akin to the first two notes of "Happy Birthday."

On the D string, play the open D string followed by the first finger, second, and third finger. All of the notes will be a whole step apart except for the second and third fingers. These notes are F# and G and that’s one of our half step pairs, so those fingers will be touching. Repeat that exact pattern on the A string for a complete D major scale.

Transition to A Major

Next on our musical adventure is the A major scale. With three sharps (F#, C#, and G#), we adjust our half step pairs. Our new half step pairs are between G# and A, and C# and D. The finger pattern remains consistent, allowing a smooth transition from D major. Simply play the exact same finger pattern, but on the A and E strings. Tada! An A major scale.

Venture into G Major

Our final destination is the G major scale. Utilizing the same finger pattern, we seamlessly navigate between the G and D strings. The magic lies in the continuity of patterns – one pattern, three scales. The consistent approach makes G major as accessible as the previous ones, empowering you to expand your repertoire. Can you determine what the half step pairs are for G major based on the finger patterns? The half step pairs are B and C and F# and G.

Arpeggios Unveiled

Now that we've mastered the scales, it's time to delve into arpeggios – a sequence of individual notes forming a chord. Let’s start with the D major arpeggio, which consists of the notes D F# and A. On the D string, play the open D followed by the second finger. Then move over to the A string. Play the open A followed by the third finger. That’s a basic arpeggio pattern! The same pattern is applied to A major and G major arpeggios, simply start on the A string for an A arpeggio and start on the G string for a G arpeggio.

Conclusion: Embrace the Patterns

In conclusion, mastering the basics of violin scales and arpeggios is akin to unlocking a musical treasure chest. By discerning and embracing these patterns, you pave the way for easier and more enjoyable learning experiences. Remember, the violin might seem intricate, but patterns are your allies.

Left-Handed Violinist? Here's What You Need to Know About Learning Violin

If you are left hand dominant, you might be wondering if you should learn to play violin on a left-handed violin? Unless you have a few special considerations (which I’ll discuss later), I would recommend you learn violin the “normal” way, with the right hand holding the bow and the left hand holding the violin fingerboard.

Now you might have seen people playing violin with those hands swapped, with the left hand holding the bow and the right hand playing the notes.

While this might look like you can just switch violin from one shoulder to the other, this isn’t quite the case. In “traditional” violin playing, the G string is “on top” or closest to your face while the E string is “on bottom.” If you simply put your violin on the right shoulder, all the strings are in reverse order, with the G string being closer to your feet and the E string being closer to your face. This is pretty counter-intuitive and backwards and will make reading music and finding a teacher very difficult.

Instead of simply switching shoulders, you would want to get a left-handed violin if you are set on playing violin with the violin on your right shoulder. But before you make up your mind and buy a left-handed violin, keep reading…

Why You Shouldn’t Learn Violin on a Left-Handed Violin

Just because you are left-handed doesn’t necessarily mean you should learn to play on a left hand violin. Here are some reasons for and against learning violin left-handed.

  • It’s not a matter of simply placing the violin on your right shoulder instead of your left shoulder. You’ll need to specifically purchase a left hand violin. With a left-handed violin, the chin rest will be on the opposite side and the strings will be reversed so the lowest string is closer to your head (just like with a normal violin).

  • Left-handed violins are not as common. That means you will be more limited in your choices and if you want to resell your left-handed violin, you’ll have more difficulty finding a buyer.

  • You may have trouble finding a teacher to teach you left-handed.

  • If you ever want to play in an orchestra, you’ll need to learn violin the traditional way. In orchestra, everyone has their scrolls pointing the same direction. You also share stands in orchestra so if you’re playing on a left-handed violin, your violin will be going the wrong way! If you think, I don’t ever want to play in an orchestra, don’t back yourself into a corner so quickly. Community orchestras welcome amateur players of all ages and levels. Even if you just want to fiddle, you may later find you want to join an orchestra, which is one reason I suggest not learning on a left-handed violin. Just in case you do join an orchestra one day!

Why You Should Learn Violin on a Left-Handed Violin

If you have a physical deformity, disability, or missing fingers that prevent you form using your left hand to place fingers on the fingerboard, then you may want to switch hands and hold the bow with your left hand. Check out Moonic Productions if this applies to you…

If you just feel uncomfortable holding the violin the traditional way when you are just starting out, try to continue holding the violin the traditional way for a couple months before you fully decide to switch to a left-handed setup. Playing violin will feel unnatural and maybe uncomfortable for a few weeks or months no matter which hand is dominant!

Here are some common questions about learning violin left-handed.

Is Violin Harder to Play if You Are Left Handed?

No! The violin is a two-handed instrument. Both hands are doing challenging and drastically different tasks. One hand is not more important than the other. As a violin teacher, I’ve never noticed a difference in ability between left or right handed people. Right-handed people aren’t better at the bow and vice versa.

Do Violinists Play Left-Handed?

The traditional way to play violin is with the left hand holding the violin neck and the right hand holding the bow. So yes, violinists play left-handed. But right-handed violinists also play with the left hand. Thinking in terms of left or right hand dominant doesn’t really make sense when it comes to learning the violin!

Are left-handed violinists rare?

Many famous violinists are left handed. Nicola Benedetti is a left-handed violinist as was Joseph Silverstein. Many people also think Paganini was a left-handed. But all these people play or played violin the traditional way. So if you’re a left-handed violinist, you’re in good company.

Ready to start learning to play violin? Sign up for my free beginner’s course to get started!

What Makes Violin Hard to Learn?

If you are thinking about learning violin, you might be asking yourself, “How hard is it to learn violin?” You may have heard that violin is the hardest instrument to learn. Or maybe you’ve heard that it has a steep learning curve.

The violin has garnered a reputation as a beast of an instrument to learn. While the violin is challenging, I believe this reputation has partly been allowed to thrive due to several reasons that have nothing to do with the violin itself.

So my answer to the question, “Is violin hard to learn?” is very different than other violin teacher’s opinions. I feel like I have a unique perspective due to my background to be able to answer this question for prospective adult learners. Why? Because unlike most professional violinists, I started learning violin at age 15. I was essentially an adult. (Learn more about my journey to learning the violin here).

Starting violin as an adult means I understand the emotions and ups and downs of learning violin from an adult’s perspective.

Before I answer the question, “is violin difficult to learn,” first, let’s talk about the common reasons people think learning violin is so hard (or harder than learning other instruments). And then I’ll tell you why I think these factors are exacerbated!

What Makes the Violin Hard to Learn?

There are two reasons people think violin is hard to learn. First, because there are no frets and secondly because it can be difficult to produce a good tone. Let’s break each item down.

  1. No Frets

    You’ve probably heard over and over again that the violin is hard to learn because there’s nothing to show you where to put your fingers on the fingerboard! Let me ask you this, how can a visual cue help you with an auditory skill? I’m not sure either.

    Learning the violin is simply different then learning other instruments, not necessarily harder. Piano or guitar allows you to use your eyes to help you play the correct pitch. You can essentially “get by” for a long time without being forced to use your ears. With the violin, you are relying on your ears, or you should be. While that seems like it would be hard, it’s really not if you know what you’re listening for.

    In fact, I can teach you where to put every finger on the violin fingerboard using only your ears in about 10 minutes. Of course, if you use tapes or stickers you could know where to put your finger in a few seconds. But would it be perfectly in tune? Probably not!

    One reason people think the violin is hard to learn is because they aren’t taught correctly from the start. They’re taught to use their eyes to learn to play an instrument, which I equate with hiring a musician to do your taxes. It just doesn’t work.

    If you’re using finger tapes and visual cues to try to place your fingers on the violin, it may be easier at first, but you will struggle in the long-run. So, start learning the right way and teach your ear to be in control!

2. It’s Hard to Make a Good Sound

Sure, you can plop a finger down on a piano keyboard and immediately get an evenly produced tone. Producing an even tone on the violin is…not quite the same. We use the bow to draw horsehair across the string to get the string vibrating to produce a tone. That leaves a lot open to variation and potentially incorrect technique.

For instance, use too much bow weight (or pressure) or not enough and you might not get a good sound. Move the bow too fast or too slow with the incorrect amount of weight, and you’ll also get something undesirable.

There’s lots of variation. But it’s this variation that also allows for an infinite array of tonal colors, dynamics, moods, and emotions. Sure, a master pianist can bring out colors as well. However, I played piano for over 15 years and could never even begin to bring out the sounds and colors in music like I could after only a few years with the violin.

People who like to say the violin is difficult to learn often state this issue with producing tone is what makes the violin so hard. Once again, I want to chock this up to not approaching the technique correctly.

To learn the violin, you have to divide techniques into easy to manage sections. Try to conquer everything at once and you’ll easily get frustrated. With my method of teaching, I start by teaching small, easy to manage tasks, like just keeping the bow straight (without even using the violin). Once you get the basics of how it feels, we move on to just using a few inches of bow right at the middle. When you’re good with that, we move on to different parts of the bow. It’s a challenge, but it’s not impossible when you approach it the right way!

Does the Violin Have a Steep Learning Curve?

Violin is considered to have a steeper learning curve compared to other instruments because it can be difficult to produce a good tone. Producing a tone is essentially the basis of playing any instrument. With many other instruments, the tone produced is dependent on the instrument itself! If you have a decent piano that is in tune, your tone will be good.

This is not necessarily so with the violin. While a good violin and bow definitely affects the tone, so does the violinist’s technique and muscle control. This is why it may seem harder to learn violin at first, compared with other instruments.

But again, it’s this variability that I think lends to the violin’s allure. As a musician, you have much more control over the sound produced than you do with guitar or piano. Yes, it may be a challenge to produce that sound at first, but once you learn the basics of sound production, the violin opens up possibilities like no other instrument! Which brings me to my next point.

What Makes the Violin Hard is Also What Makes it Amazing

The two things that make the violin hard (no frets and sound production) also offer endless possibilities and variation. For many instruments, pitch placement and sound production are determined by the instrument itself. Clarinets come with certain keys, guitars come with frets, trumpets come with buttons. With violin, you have control over these aspects. You can bend the pitch, slide back and forth between notes, and add in slides and other left hand effects for ornamentation.

With sound production, the possibilities are even more endless. Using the variables of bow speed, bow weight (how much pressure you put into the string), and contact point (where the bow touches the string in relation to the bridge or fingerboard), you can get an endless array of tonal colors. Soft and sad? Yep, there’s a combination for that. How about soft and spooky? Luscious and overflowing? Romantic and passionate? Angry or militant? Yep, yep, yep. You can make all of those sounds and more just by changing a few variables. Trust me, you’ll never get bored with the bow once you realize its possibilities.

Equipment Affects How Hard or Easy the Violin is To Learn

Here’s a big one that is often overlooked when talking about how hard the violin is to learn. Equipment makes a huge difference! Buy a cheap VSO (violin-shaped-object) and you find violin very hard to learn. Tone production will be a struggle because the violin, bow, and strings are cheaply made. A violin’s sound is dependent on the quality of wood and the amount of time it has been dried. VSOs can often be impossible to tune due to cheaply made pegs or strings.

A well-made, quality violin can be the difference between loving and hating the violin. Check out my top 10 Violins for Beginners to avoid all the frustration of VSOs!

Is Violin Harder Than Piano? Is Violin Harder Than Guitar?

I played both of these instruments at a somewhat advanced level before I started playing violin so I think I can answer this question. I personally believe it is equally hard to master any instrument. Yes, producing a tone is harder on the violin but moving beyond the basics on guitar or piano is equally challenging. I played piano for over 15 years and could never get comfortable reading two lines of music at once. My brain just couldn’t handle it!

While piano and guitar may be considered the “easier” instruments to learn, after I picked up the violin, I barely ever touched the other instruments ever again. Not because I don’t love piano and guitar, but because the violin lured me in and wouldn’t let me go.

If you’re someone who has played multiple instruments, I definitely suggest learning the violin. There is something different about learning violin that makes it a challenge, but also incredibly rewarding and alluring.

Is the Violin Hard to Learn?

Let’s get back to the original question. How hard is the violin to learn? In my opinion, the violin is not harder to learn than any other instrument. The thing that is different about the violin is that the violin has a low threshold for frustration.

There is so much going on with the violin, that it can be easy to get frustrated if you don’t have a plan to overcome that frustration. I don’t ever recall having a soul-searching moment after strumming some bad chords on the guitar. But I definitely recall some soul-searching after some frustrating practice sessions on the violin!

What makes the violin hard to learn? You! The biggest struggle with playing violin is overcoming the mental frustrations you impose on yourself.

Once you realize this, you'll understand your greatest obstacle in achieving your dreams is your own mind.

Yes, learning the violin can be hard. But learning anything worth learning is also hard. Of course, you’ll never know if you don’t try!

If you are interested in learning to play the violin, check out these helpful resources below. Happy Practicing!

When you’re ready to start learning the violin, sign up for my free beginner’s course to help you get started! Sign-up here!


Learn to Play Violin in 20 Steps

If you are thinking you want to learn to play violin, get ready for a journey that will literally change your life. I dabbled in many instruments growing up: piano, harmonica, trumpet, guitar, but nothing grabbed me and wouldn't let go like the violin.

Learning to play the violin is not a just a hobby, it’s a way of life. You don’t have to have a degree in music to be a violinist, you just have to play violin!

My journey in learning to play the violin was not standard, but through it all I learned how to love this amazing instrument. While I had many teachers while I was learning, the majority of the time I spent alone in a practice room, teaching myself to play violin. Whether you have a teacher or not, if you want to learn to play violin, you have to learn to teach yourself how to play violin. The best learners are the ones who can teach themselves.

You may also be wondering if you’re too late to learn to play violin. I have a strong opinion about learning to play violin as an adult and I think I have authority (due to my circumstances) to answer this question. Check out my advice for adult beginners here and put this question to rest once and for all.

While learning the violin takes dedication and time, it’s incredibly rewarding. After teaching violin for over 15 years, I’ve developed 20 steps to help you learn to play violin by yourself and become the violinist you’ve always dreamed of being.

Download Your Free “Learn to Play Violin” Checklist

Click here to download your checklist.

  1. Buy a Violin (Not a VSO)

Your first step in learning violin on your own is to purchase or rent a violin. This may seem like an easy first step but it can be deceptively overwhelming. Where do you buy a violin? How much should you spend on a violin? How do you know if it’s a good violin?

Unfortunately there are a lot of VSO’s (violin-shaped-objects) out there masquerading as real violins. I know because for years almost every new violin student would come to their first violin lesson with a VSO. VSO’s are cheaply made, sometimes impossible to tune, have inferior strings and inferior bows, and usually sound scratchy no matter how well you play.

I watched so many of my students get frustrated with the money and time they wasted on VSO’s that I wrote my very first blog post. Helping people find good quality instruments was the first mission of Meadowlark Violin and it still is a priority!

You may watch videos of professional violinists playing these $60 violins, but don’t be deceived. We’re working hard to make those violins sound decent. As a beginner learning violin yourself, you shouldn’t have to fight to get a good sound.

I wrote a detailed guide to help you find a real violin. Real violins aren’t that expensive. You can find a decent one with a bow and a case for as low as $250ish.

Read my recommendations for the 10 Best Violins for Beginners, plus get all the information you need about violin sizing, renting vs. buying, and more.

2. Buy a Shoulder Rest (And Any Other Equipment)

Repeat this step until you find a comfortable shoulder rest! A shoulder rest helps you keep the violin on your shoulder. (The back of the violin is curved and smooth, not ideal for staying right over your collar bone). Your violin probably comes with a bow and a case. It may even come with a shoulder rest.

Adjusting your shoulder rest correctly is one of the best things you can do for tension-free playing. Everyone has a unique body type, so finding a shoulder rest that is perfect for you may take some trial and error. Here are my top picks for shoulder rests that usually work with most body types.

If your violin outfit comes with a case, bow, and rosin (it should), you really don’t need any other equipment to get started.

I teach all of my students how to play violin without looking at sheet music (even if you know how to read music). That way you can focus entirely on the various different tasks that each hand is doing in addition to focusing on what your ear is telling you. If you are teaching yourself violin, don’t get caught up or distracted with what your eyes are telling you. So you won’t need a music stand to start off, but eventually when you start reading music, you’ll want a good, sturdy one so you don’t develop bad posture.

Eventually, you might want to upgrade to better rosin. The rosin that comes with your violin (if it’s a real violin and not a VSO) will probably be good enough for beginner violinists.

3. Start Listening to Music Voraciously

Do you notice I place this step before you even touch a violin? Listening to violin and fiddle music is literally the best, cheapest, and easiest step to learning violin yourself! Playing violin is all about developing ear training and there’s no better way to do that than to listen to music. If you are learning to play violin yourself, you’ve probably noticed there are dozens of styles of violin playing: classical, fiddle, Irish, gypsy….the list goes on. Listening to music will help you stay motivated as you learn to play violin.

Check out my playlist of Music I Can’t Live Without to get some ideas.

4. Sign Up for a Self-Taught Beginner’s Violin Course

It may be tempting to piece together a lot of Youtube videos to teach yourself violin, but this is a recipe for disaster and frustration. You’ll learn violin by random tidbits and never get a complete picture. If you’re learning violin by yourself, you’re likely to skip over important concepts that you will need later on. It’s frustrating to have to backtrack, so start out learning violin basics the right way.

My free beginner’s violin course has all the information you need to get started learning violin. From purchasing a violin, to tuning the violin, you’ll also learn the left hand notes, how to hold the bow, how to bow on the violin, plus and easy song. All of that in a little over an hour of instruction!

It’s totally free because it’s my mission to help as many people as possible learn to play violin! Sign up here.

5. Learn to Tune

Once you get your violin, the first task will be tuning the strings. Tuning is an art in itself. If you purchased a real violin and not a VSO, this step will be so much easier. In my free “Learn to Play Violin” course, I’ll show you the basics. You’ll also need a free tuning app.

6. Put on Your Shoulder Rest and Get it Adjusted

Learning to play violin yourself means constantly evaluating your playing and your body comfort level. Getting the shoulder rest adjusted comfortably is a big part of playing violin without tension. I’ll show you how you can easily put your shoulder rest on and adjust your shoulder rest in my free beginner’s course.

7. Separate the Left and Right Hands

Violin can be hard because the left and right hands are doing totally different things. If you are teaching yourself violin, one of the biggest mistakes you can make is trying to do everything at once. I always teach the left hand by itself (with pizzicato or plucking the strings) then I teach the bow hand by itself. As you get comfortable with each hand you can combine them. Learn to play violin in easy to master steps as opposed to trying to conquer everything at once. You’ll be less likely to get frustrated and make faster progress.

8. Focus on Ear Training Not Sight Training

If you are learning to play violin, you’ve probably noticed that there are no frets on a violin fingerboard! How do you know where to place your fingers? By ear! This may seem hard, but I can teach you how to place your first finger correctly without finger tapes in about a minute.
Finger decals may seem like an easy fix if you are teaching yourself violin, but they can actually harm your progress in the long run.

Finger tapes force you to rely on your eye sight. That means finger tapes cause you to use your eyes for a completely auditory skill! Why would you let your eyes tell your ears if you are in tune? It’s kind of like hiring a musician to do your taxes. It just doesn’t make sense.

One reason people who learn violin on their own get frustrated as they progress to the higher levels is because their ear is not up to par with the rest of their playing, because they never asked their ear to do anything! Then you have to start all over and teach your ear the basics.

With my method, I start teaching your ear to be in control from the very beginning. Don’t rely on visual cues for auditory skills. You’ll be happier with the results.

9. Practice Every Day (or Most Days)

If you want to learn violin yourself, it’s important to practice regularly. I do suggest taking one day off a week to refresh, but you should make it a goal to practice all the other days. It’s better to practice 30 minutes every day rather than two hours once a week.

10. Set Up a Practice Routine (And Stick With It)

If you are going to teach yourself violin, you have to be your own teacher, which means you need to hold your practice routine to a high standard! This is the ultimate key to success in my opinion. People who are learning to play violin get easily frustrated and feel like they never make progress if they don’t have a practice routine. That’s because they play a little of this and a little of that. When they hear a new song they want to learn they drop everything else and do that for a while until something else catches their ear. It’s impossible to make progress like that.

Getting a practice routine will help you make small steps of progression and it will be easy for you to see the progression, which will make you want to practice more!

I’ve got a great guide to practicing violin for beginners. Check it out here.

11. Avoid the Common Bad Habits

While everyone is different, every violin student usually deals with the same set of issues. Crooked left wrist, locked right thumb…I could go on.

In my Complete Violin Beginner’s course, I cover all of the bad habits I’ve seen from teaching violin for 15+ years. Learn the bad habits you need to avoid before they even become an issue!

11. Get Feedback

If you want to teach yourself violin, you can! With today’s technology it’s totally possible to learn violin completely on your own. However, it’s also important to get feedback. Sure, you can post videos on the internet and let the whole wide world offer you suggestions, or you can get feedback from a real, live, violin teacher. Even if you are learning violin on your own, getting your questions answered in a timely manner is important to making progress. With my Online Studio, you can post questions, videos, and pictures and get immediate feedback from me, a real-live-violin teacher. Easy peasy!

12. Go Slow

This is literally the best piece of advice I could give to someone wanting to learn violin. There is no timeline. Take it easy and go slow. You should go slow mentally but also physically. You should play slowly. How slow? Think if you were trying to annoy someone playing really, really, really, slowly. Yes, that slow. I still practice that slowly. I would be a better player now if my 15-year-old-self had practiced that slowly.

13. Know that the Bow is Everything

It’s easy to focus on the left hand, but as you teach yourself violin, you’ll soon realize that the bow is everything! It’s how you make things louder and softer, how you add phrasing and dynamics. It’s your tone, the very heart and soul of your playing. Most teach-yourself violin courses don’t focus nearly enough on the bow, but I start out from the beginning teaching you the fundamentals you need to be successful with the bow.

14. Find Community

Successfully learning violin yourself means you need to stay motivated. Learning violin can be frustrating so it’s very important to have a community of people like you to help you through the struggles. When you join the Meadowlark Violin Online Studio, you get an exclusive community filled with people just like you!

15. Learn to be a Detective

Teaching yourself violin is possible especially if you can learn to be a detective. What does that mean? Don’t just play a tricky measure a million times until it starts to sound good. Stop. Think through a problem. What exactly is making it hard? Is it a left or right hand issue? Separate the hands (remember step #7? It’s still important). Learn to find the very kernel of the thing that is causing the issue. Fix the issues instead of fixing the symptoms and you’ll be able to move on quickly to the next thing.

This is what I do when I teach myself violin and when I teach others! Be a detective!

16. Simplify

When learning music, always simplify it as much as possible, especially if you are dealing with a tricky measure. Take away the difficult bowing, simplify the rhythm. Get it down to its bare bones and then you’ll be able to see what the real issue is.

17. Start Playing with Others

Joining a jam session, a community orchestra, a church group, or just playing along with friends is essential to staying motived if you are learning to play violin yourself. It might seem intimidating but you’ll find people just like you, people who love the violin!

18. Learning Violin is a Cycle

Learning to play violin, even if you are doing all of these steps, does not mean you’ll progress without ever hitting any snags. This is the cycle of learning to play violin.

You’ll make progress and then all of the sudden it will seem like you can’t do anything right. Everything will sound horrible. This plateau is not a bad thing! In fact, it’s a good thing. It usually means that your ear is progressing. Little inadequacies with your intonation (how well you play in tune) or your tone will start to bother you. That’s great! It doesn’t mean that all of the sudden you are having those issues. You probably always played like that, but now you are hearing and picking up on more things than you did before. Give your ear a pat on its proverbially back. It’s doing its job.

When you realize learning violin is a cycle, you’ll reach those plateaus, understand what’s going on, learn to fix the issues, and then continue to make progress.

19. Have a Clear Path for Progression

Okay, so you’ve taught yourself the basics of the violin. What next? If you are learning violin on your own, you are in charge of your next steps, and that can be overwhelming. You might find you are just swimming around in a whirlpool doing the same things and never getting better and learning “the next thing.”

Having a clear path for progression is vital if you want to teach yourself violin. My online membership makes that path clear for you so you don’t have to continuously think, “What do I do next?”

Here’s some of the courses for beginners in my online membership

-Complete Beginner’s Course. Over 6 hours of instruction to take you from knowing nothing to understanding advanced concepts like “low 2” and how to bow in the upper and lower half of the bow. I’ll teach you this all by ear so you can teach your ear to be in control.

-Music Theory for Violinists. This course will teach you how to read music, how to understand rhythm and key signatures, plus anything else you ever wanted to know about music theory. It’s your go-to guide if you have questions about anything music theory related. No more googling, “what’s that squiggly line above that note?” I’ve got the answers.

-Suzuki Book I and Book II tutorials. The Suzuki books are not just for kids, nor are they for people that just want to learn classical music. Suzuki is great for fiddlers too. I don’t teach the Suzuki method, I teach the Lora method. These books have beautiful little songs to help you progress from beginner to advanced player. I’ll teach you all of the songs. It’s like having a private lesson with me because I teach you everything you need to know. There’s play-along tracks and duets to make playing fun. Talk about clear progression.

-Creative Scales for the Experimental Violinist. My scales course will take you through at least a year of guided scale practice. You’ll learn every scale beginner and intermediate violinist use as well as new bow techniques with every scale.

-Song Tutorials. Spice up your playing with fiddle tutorials, like Ashokan Farewell, hymn lessons, and tutorials for classical music pieces.

-Sheet Music library. No more looking up free sheet music online. My sheet music library has over 125 songs categorized by skill level, ready for you to print and download.

-Intermediate Courses. When you’re ready, learn third position and vibrato. It’s all here for you.

In addition there’s live lessons, community forum, and so much more. Learn more here!

20. Don’t Give Up

My last piece of advice may seem obvious, but if you want to play violin, you have to play violin. Violin can be hard, but anything worth having in this world usually takes some effort. The more effort it takes, the more it’s worth it. When you learn to play violin and start telling others that you play, you’ll usually hear one of two responses. Either, “I’ve always wanted to play violin.” Or “I used to play violin…” Don’t be either of those two people. If this is what you want to do, you can do it. You can teach yourself violin and play the music you love. You just have to pick up the violin and start playing.

Comment below and let me know what you think. Are you ready to learn violin?!

Happy Practicing!

~Lora

Download Your Free “Learn to Play Violin” Checklist

Click here to download your checklist.


Can You Teach Yourself to Play Violin? Yes, Here's 3 Reasons Why!

If you want to learn to play violin, you may be asking yourself, “Can I teach myself to play violin?” “Do I need a private teacher to play violin?” I’ve been a violin teacher for over 15 years and my opinion on this subject has drastically changed in that amount of time.

If you had asked me 15 years ago if you can teach yourself violin, I would have said an immediate no. But the technology (and my mindset) has changed so much over the last decade that I now firmly believe you can teach yourself to play violin and be successful at it!

Fifteen years ago I would also have said that you must have IN-PERSON violin lessons to be successful. Well, that was before I started teaching exclusively online violin lessons. I learned very quickly that a good violin teacher can see, hear, understand, and teach a student just as well in an online setting as in an in-person lesson.Then I began to realize a couple things that made me understand how students could teach themselves the violin with the resources available online.

But perhaps the biggest reason I changed my mind on this subject was the realization of how I truly learned to play the violin…read on to find out more!

Download Your Free “Learn to Play Violin” Checklist! Click here to download your checklist.

3 Reasons You Can Teach Yourself Violin

  1. Everyone is unique, but everyone also deals with the same common problems.

As I taught more and more students I began to see the same problems and bad habits arising with every student, whether they were 8 or 80. I realized I could record a few lessons about these common bad habits that all violin students face, send them out to my students, and then have more time to spend on other topics in their private violin lessons. (Here’s an example)

This worked tremendously well. First off, I was spending less time teaching the same thing over and over again. Secondly, students were able to realize what bad habits might creep up BEFORE those bad habits even developed. Win win for everyone.

2. Technology Makes it Possible to Teach Yourself Violin

This is a pretty obvious statement, but with my experience recording lessons for students to watch on their own time, I realized the possibilities technology offered in violin instruction.

In private violin lessons, there is never enough time to teach a student absolutely everything they need to know about a subject. Learning violin involves not only learning how to place the fingers and bow, but understanding music theory, ear training, relaxation, posture, motivation, practicing, and so many other topics.

There was never enough time to teach students all the required information. I finished every 30 minute lesson trying to cram as much information in as possible, always feeling like I had never explained everything to the degree it needed to be explained.

Here’s where technology came in again and made learning violin by yourself possible.

With private violin lessons, I often spent the first lesson talking about the same things: how to tune the violin, how to put on the shoulder rest, what the names of the violin strings were, the parts of the violin ,etc. That usually took up an entire 30 minutes (and $40 of the students’ money). These lessons were usually pretty one-sided, with me doing most of the explaining and the students occasionally asking questions.

What if I could record all of those topics, send them to my students, and have them show up for the first lesson with their violin tuned, their shoulder rest on the violin, and ready to learn their first song? I would save them $40 and I would get to spend more time teaching them new things and saving more time for their questions. Another win for everyone around!

I began recording song tutorials with this same method and I realized I could take as much time as I needed to explain every aspect, every measure, every rhythm, every intonation problem, every “gotcha,” ever slur, every dynamic, everything a student would need to be successful learning that song.

Suddenly, private violin lessons didn’t seem that necessary when my collection of recordings covered every topic a beginner violin student would deal with, and in much more detail than any private lesson could provide.

Okay, time to rethink my staunch opinion on whether or not you can teach yourself to play violin. But there was one other reason that made me see it all in a new light.

#3 The Best Learners Are Their Own Teachers

What made some of my private students more successful at learning the violin than others? It wasn’t natural ability or talent. It wasn’t even dedication or a solid practice routine (although those things definitely helped). The reason some students progressed faster than others was that some students were simply better at teaching themselves.

Think about it, even if you take a private lesson every week, for every other day, every other minute your practice, you are your own teacher! Even if you are a brand new beginner, you are constantly evaluating what you are doing and coming up with ways to do it better!

That’s exactly what I do as a violin teacher.

It made me think of my first week after finishing graduate school. For the first time in over a decade, I no longer had formal violin lessons. It was a strange feeling, at one point incredibly freeing and on the other hand, very confusing.

What should I practice? How would I continue to make progress now that I was learning violin on my own? I soon discovered that when I became my own teacher, I began to analyze and understand my playing in ways I hadn’t been able to when I took private lessons. Being my own teacher and teaching myself the violin made me a better player and a better teacher!

So yes, you can teach yourself to play violin. Not only can you teach yourself the basics, I think you can teach yourself intermediate and advanced skills. Maybe there should be some caveats with that. Learning violin on your own is not for everyone and there’s definitely right ways and wrong ways to teach yourself violin.

Learning violin on your own might work for you if you…

  • Are self-motivated (Most adults are even if you don’t think you are. How do you know you’re self-motivated? Do you need cheap toys from Dollar General to bribe you to practice? No? Okay, you’re more motivated than 90% of children. Congratulations. You probably have the motivation to learn violin yourself.)

  • Have personal discipline (Teaching yourself violin means practicing every day (or at least most days)

  • Have the time to analyze problems on your own (this can be better although sometimes more time-consuming than someone telling you your problems)

  • Can organize your time

  • Enjoy moderate challenges

  • Don’t have time for private lessons or don’t live near any violin teachers

Learning violin on your own is not for you if you…

  • Don’t like to push yourself

  • Have trouble focusing

  • Don’t like practicing by yourself

  • Have trouble sticking with a routine

  • Want to play at Carnegie Hall

How to Teach Yourself Violin (The Dos and Don’ts of Learning Violin on Your Own)

Okay, you’ve decided you can teach yourself violin. Great! There’s a couple things you should watch out for and a couple things you should do to make learning the violin on your own easier.

  1. Don’t Piece Together Lessons on Youtube. Find a Self-Taught Course with Meaningful Progression.

Probably the biggest issues students face when trying to teach themselves to play violin is dabbling in this and that and never learning anything in a meaningful progression. That’s a recipe for frustration. You’re also going to miss out on valuable lessons that you need to understand for advanced concepts and you may develop bad habits along the way. This is where teaching yourself to play violin can be disastrous.

How to avoid that frustration? Find a self-taught violin course that will show you all the fundamentals in an easy to follow progression.

Ahem. Um, yes you know what I’m about to say. I have some options for you when it comes to “teach yourself violin” courses. And yes, they happen to be my courses. What a coincidence!

My “Learn Violin in One Hour” course is over an of instruction on literally everything you need to know to get started. I’ll cover topics like how to choose a good violin, how to tune your violin, how to put on the shoulder rest, how to adjust the shoulder rest, how to hold the bow, how to play the left hand fingers, how to play violin easily without finger tapes, and an easy song. Yes, all in an hour.

Best of all, it’s totally free! Why? Because it’s my mission to make it easier for people to teach themselves violin. As a violin teacher I’ve also struggled for years helping students who didn't get a good start with the fundamentals. Having to relearn the basics can be frustrating so I want you to have the best possible start. Trust me, if there are fewer students out there with stiff bow holds, I’ll be a happier person. Sign up for the free course here.

2. Get a Practice Routine and Stick With It!!

Setting up a good practice routine is probably the next best thing you can do to be successful at teaching yourself violin. I’ve got lots of advice on how to set up a good practice routine.

Click here to read and watch my ultimate practice guide for violin beginners (and intermediate and advanced players and anyone else who practices anything!)

3. Commit to Practicing Every Day (or at Least Most Days)

If you can practice every day, even for a small amount of time, you’ll make progress and be able to learn violin on your own. Regular practice is essential to learning this instrument. It’s better to practice ten minutes a day every day rather than two hours once a week.

Regular practice will help you continue to make progress which means you’ll want to practice more. This cycle is so important to staying motivated.

4. Learn to Be a Detective

To be your own violin teacher, you have to get down in the nitty-gritty of violin playing. If something doesn't sound right. Act like a detective. Don’t just play it again and again and again hoping for different outcomes (that’s the definition of a crazy person, right?)

Stop. Get out your proverbial magnifying glass. Is it a rhythm problem? A problem with note reading? A left hand problem? A right hand problem? Once you figure out what the issue is, you’ll be able to come up with a solution to fix it!

Common Questions About Teaching Yourself Violin

I don’t know how to read music. Can I teach myself violin?

Yep! In fact, I teach who to play violin basics without ever picking up a piece of sheet music. You’ll learn better, have better muscle memory and ear training if you learn the basics without looking at music. Trust me, there will be plenty of time to learn to read music and I’ll help you through it.

I used to play piano (or guitar, or any other instrument). Will it be easier to learn violin?

Any musical background will help you when it comes to learning violin on your own. But it’s definitely not a prerequisite. I have students that have never been involved with any sort of music making other than listening to the radio and they are phenomenal players.

Am I too old to learn violin?

Oh brother, do I have an opinion on this one. I believe my personal journey with learning violin gives me the authority to answer this question. I’ve got a whole blog on that topic! Read it here.

How Long Will it Take to Learn Violin?

The beautiful thing about the violin is that it is a journey that is never complete. That should be encouraging. No matter how much I progress, no matter how well I play, there’s always something else to learn, a new song to master, a new style of playing to discover.

But to answer your question, learning the basics totally depends on how much time you have to spend. (And whether or not you are spending that time the right way). An average player spending an average of 30 minutes a day practicing will be playing at an advanced beginner/intermediate level in around a year. What’s an advanced beginner/intermediate level? That means playing those songs you really like, like Swallowtail Jig, Ashokan Farewell, Irish Washerwoman, etc.

Summary

Teaching yourself to play violin is totally doable if you have the right mindset and the right resources.

What do you think? Are you ready to teach yourself violin? Read Learn to Play Violin in 20 Steps next.

Let me know in the comments below!

Happy Practicing

~Lora

Download Your Free “Learn to Play Violin” Checklist

Click here to download your checklist.