

How (Not) to Hold the Violin Bow: 5 Steps to Form a Natural, Relaxed Bow Hold
/The way you hold the violin bow is directly correlated to the sound you are producing. A relaxed bow hold will help you produce a good tone, allow for smoother string crossings, and eventually give you the tools to play fast sections and do advanced bow strokes.
Whether you are learning a beginner bow hold, of if you’ve been playing violin a while, it’s a great idea to rethink how to hold the violin bow properly for the best control and relaxation. So if you’re not completely happy with that tone you’re producing it might be time to reevaluate your bow hold.
Let’s talk about how to hold the violin bow for beginners and the common mistakes I see with bow holds and how those mistakes can negatively affect your sound.
Also visit, How Much to Tighten Your Bow: The Ultimate Guide to Tightening and Loosening Your Bow
Is it a Bow Hold or a Bow Grip?
When learning how to hold the bow, you will hear both terms: bow hold and bow grip. I dislike the term bow grip because “grip” implies force and tension. You want to avoid tension at all costs when it comes to the bow, so I avoid calling it a bow grip. The term bow hold is better but even that has its negative connotations.
You really aren’t even holding the bow. Once you learn to form a relaxed bow hold, you will realize you’re just balancing the bow between the thumb and the fingers. So instead of a bow hold, it should be called a bow balance. But I’ll keep calling it a bow hold for traditions sake!
Is There a Correct Way to Hold a Violin Bow?
While there are many variations on the violin bow hold, there are many common mistakes people have when it comes to learning to hold the violin bow. Holding the bow incorrectly will negatively affect your sound. The way you were originally taught to hold your violin bow can have a lasting affect on your bow hold, even if you’ve matured beyond those beginning stages.
So before we get into how to hold your violin bow correctly, let’s talk about some approaches to holding the bow that don’t yield good results.
A lot of methods use what I call the “one finger at a time approach.” You put this finger here and this finger here and the pinky on top and curve your thumb underneath… And then you usually end up with something unnatural.
The one finger at a time approach doesn’t work because each finger in the bow hold has to work together as one cohesive unit.
Another method I’m not a huge fan of is the “bow hold bunny.” This method involves the middle two fingers touching the thumb like the bunny’s teeth and the pinky and index finger sticking up in the air like the ears. When you do this on the bow it’s like the bunny is eating the stick and then you flop the ears down on the stick. In my opinion this approach to holding the violin bow has a lot of different problems. For one, it’s going to make the middle two fingers be unnatural close to each other. It also tends to make people pinch the bow with the middle fingers. And then the pinky and the index finger are unnaturally spaced.

Avoid the dreaded, unnatural, bow hold bunny monster
This approach might be fine for very young children. But I think mature children and adults benefit from a different approach when it comes to beginner bow holds and learning how to hold the violin bow properly.
How to Hold the Violin Bow
This is how I teach students to hold the violin bow. And even if you’ve been playing for a long time, I think it’s always a good idea to revisit the basics of bow hold and see if there’s anything you could do differently to relax more and get a better tone.
Bow Hold Step 1: Get the Fingers Relaxed
The first step to learning to hold the violin bow is to put down the bow! We’ll get to that later.

Get your fingers relaxed
Next I like to have students hang their right hand by their side and relax the hand. Shake the hand if you want to get rid of any tension. Don’t think about anything. Overthinking how to hold the bow usually results in bad bow holds.
Now, bring the hand up until the arm is horizontal. Continue to let the fingers dangle. That’s usually a perfect beginner bow hold. The fingers are naturally spaced with a gentle curve. They’re not abnormally straight, nor are they abnormally curved. The thumb is gently curved as well. For the standard bow hold, you also want the elbow to be even with the wrist and the knuckles. You don’t ever want the knuckles or the fingers to be above the wrist for a standard, beginner, middle of the bow bow hold.
Now we just have to figure out where will the bow touch the fingers?
Bow Hold Step 2: Learning Where the Fingers Touch the Violin Bow
When learning how to hold the violin bow for beginners, always start with a pencil. I use a pencil to demonstrate where the fingers are placed in a perfect violin bow hold.
If I keep my hand relaxed with the knuckles, wrist, and elbow even, all I have to do is bring my pencil up until the pinky can rest on the pencil.

Bring the pencil up to your pinky

make sure you have part of your fingers on top of the pencil
I bring my pencil up until the pinky comfortably rests on the stick and the middle knuckles or the area right below the middle knuckles are also resting on top of the stick.
Having fingers on top of the stick is very important because that’s how weight is going to be transferred into the stick and that’s how you produce and good tone.
Bow Hold Step 3: Place the Thumb
One of the most common questions I see when it comes to forming a beginner violin bow hold is where do I place the thumb?

Place the thumb underneath the pencil where ever it naturally falls, usually between the 1st and 2nd fingers. The important thing is to not overthink where the thumb is placed. Where does your thumb go to naturally balance the fingers that are on top of the stick?
One very important thing to remember when it comes to forming the bow hold is to gently curve the thumb. You never want a “hitchhiker’s thumb” that is unnatural bent backwards and locked.

Avoid the stiff, bent hitchhiker’s thumb

avoid bending your thumb back like this
Bow Hold Step 4: Slant the Fingers
You want to have a slight slant with the fingers so that everything is leaning just slightly towards the index finger.

Bow hold with no slant

bow hold with slight slant towards index finger
And that’s your beginner’s bow hold! Do you see how forming everything as one cohesive unit makes for a more natural and relaxed bow hold? Continue practicing your violin bow hold on a pencil wherever you are. But now let’s move on to forming the violin bow hold on the violin bow!
Violin Bow Hold Step 5: Forming the Violin Bow Hold With the Bow
When it comes to forming the violin bow hold on the bow, people tend to fall back into a “this finger goes here, this finger goes here approach.” Avoid this approach at all costs and try to always form the bow hold as one cohesive unit.
Start off by holding the bow horizontal with your left hand holding the bow at the tip.
Now, get your right hand relaxed again and place it on top of the stick right in the middle of the bow. That area is just like a pencil. Place your thumb, gently curved underneath the stick, wherever it naturally falls.
Then with your left hand, pull the bow and let your hand slide down to the frog until your thumb hits the tip of the frog. Your thumb will rest right at the tip of the frog, not inside that tempting little space inside the frog.

Form the bow hold in the middle of the bow
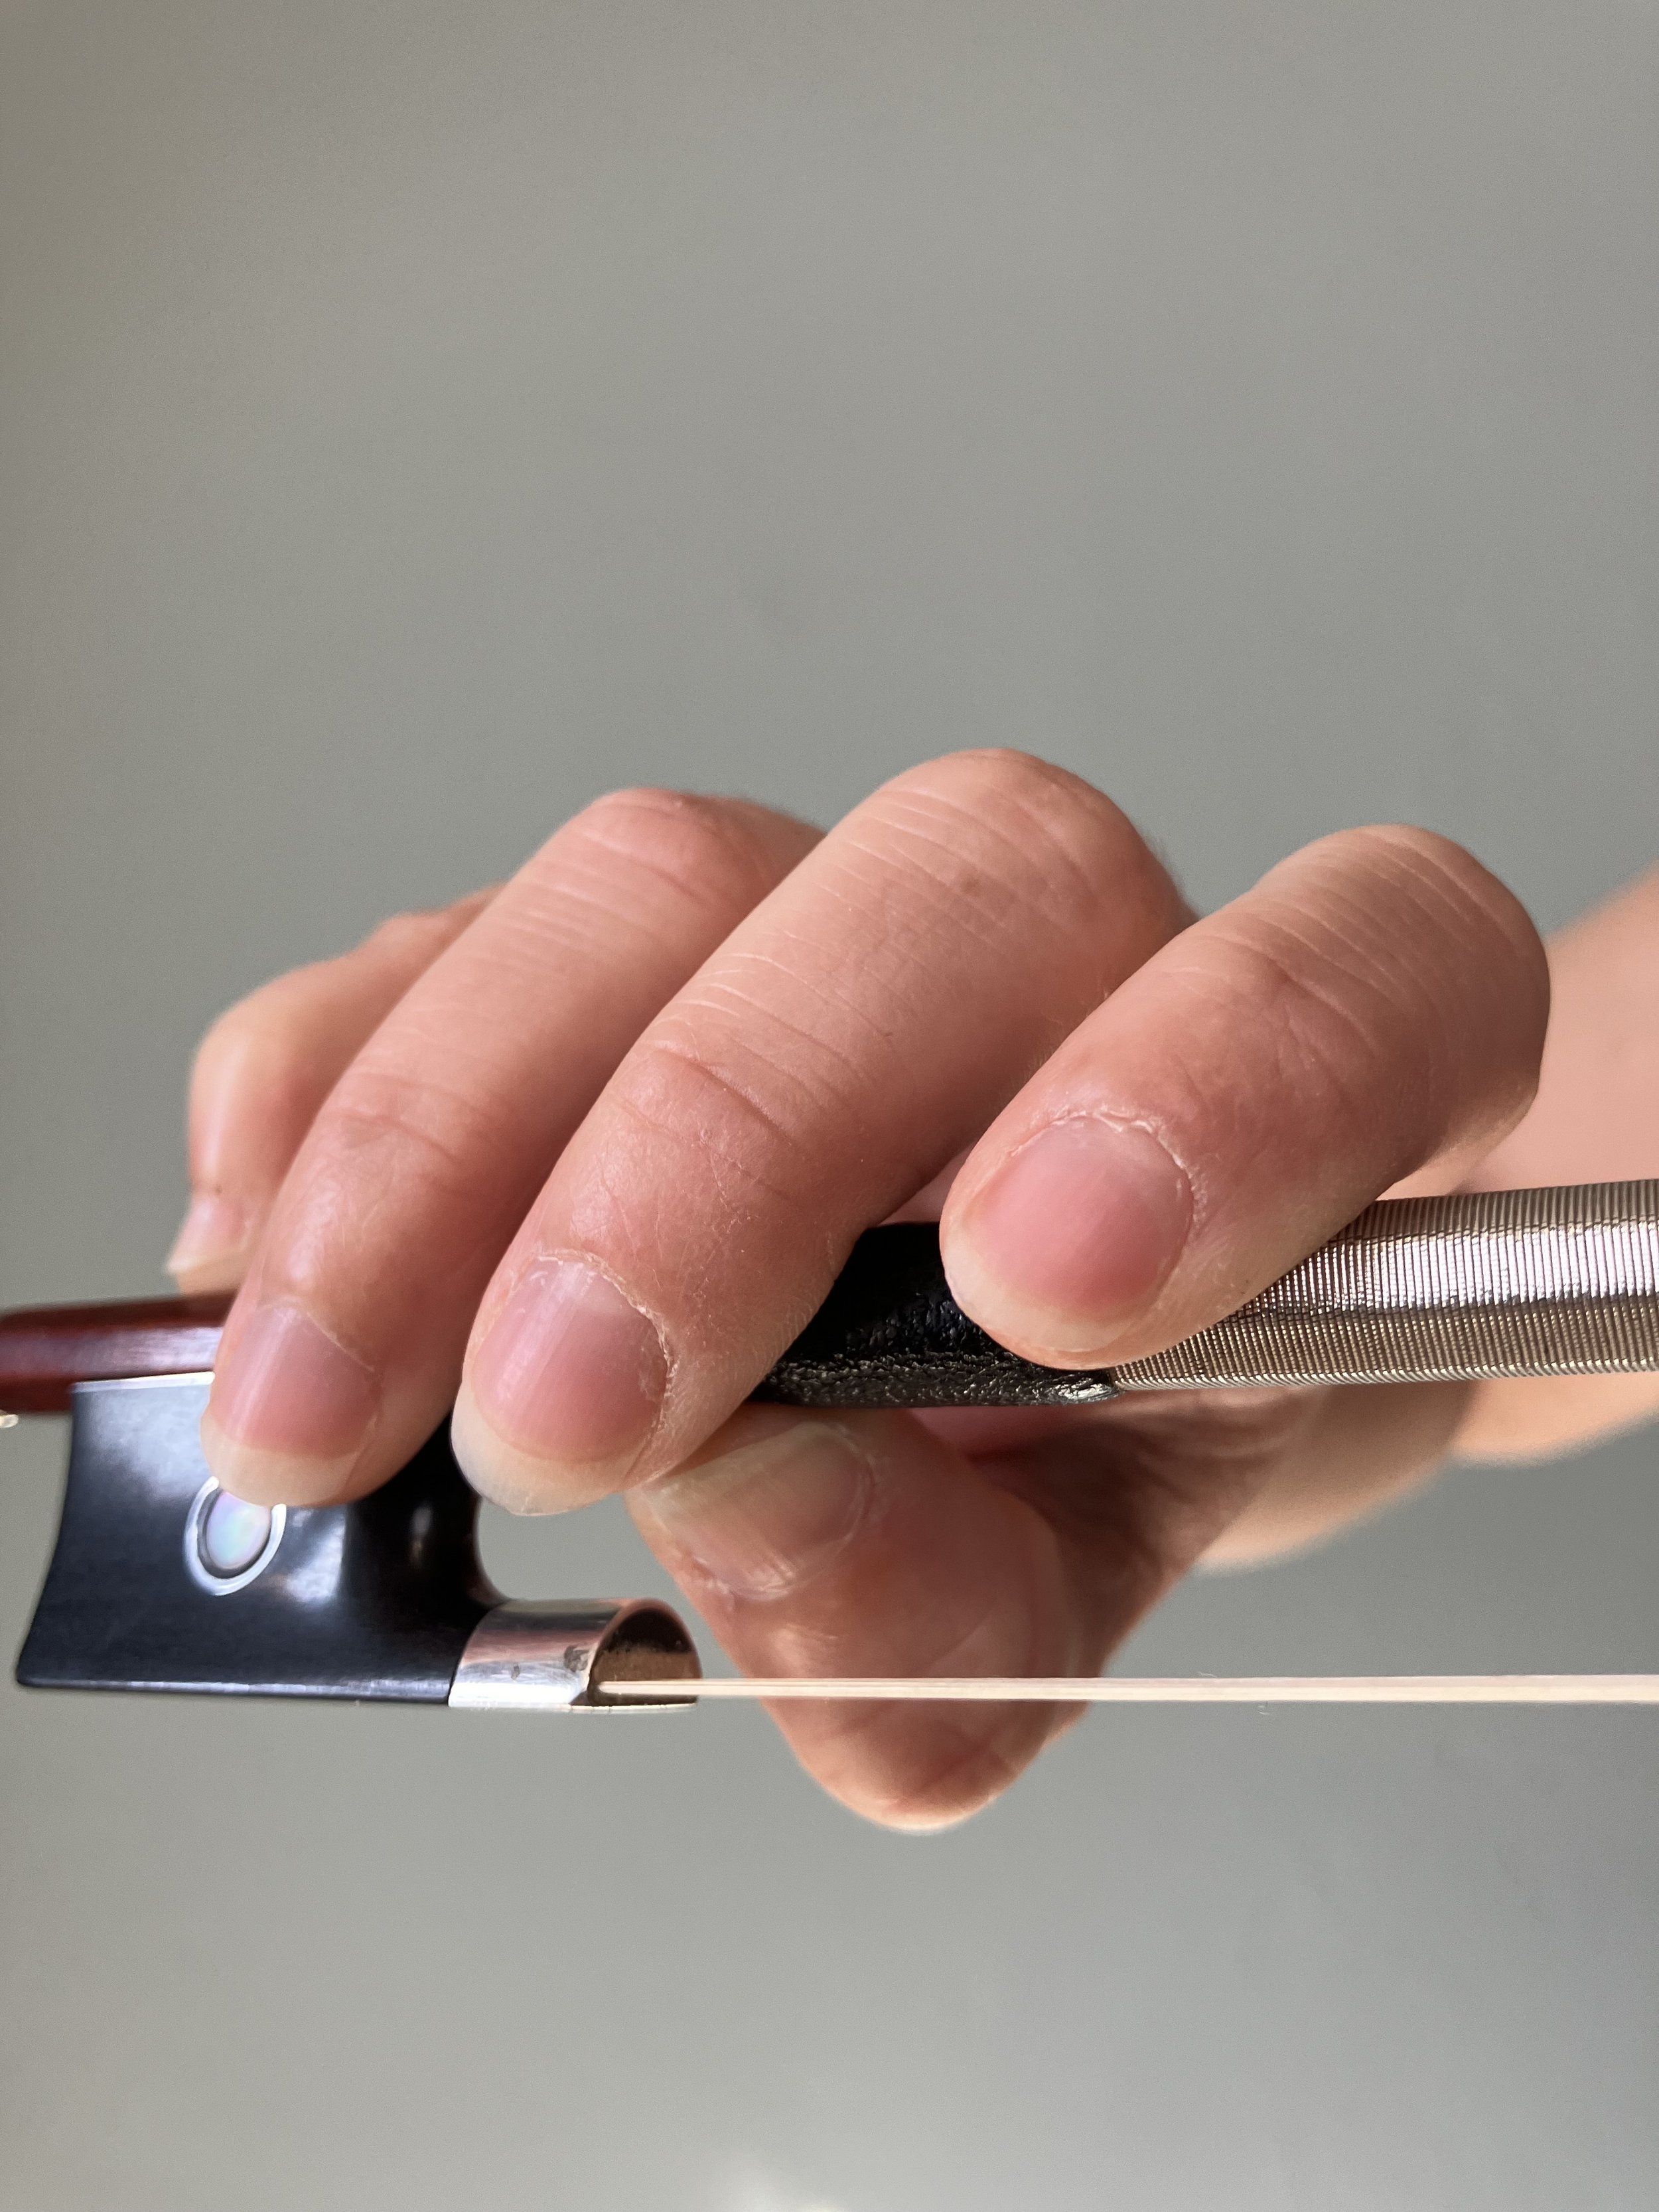
slide the bow hold down until your thumb hits the top of the frog
And that’s how you form a natural, relaxed bow hold.
Common Beginner Bow Hold Mistakes
When it comes to learning how to hold the violin bow, there are many mistakes beginners make that can negatively impact the sound and your joy of playing! Let’s talk through some common bow hold mistakes.
Bow Hold Mistake #1: Bending the Thumb Back
This locks the thumb and makes it unmovable and inflexible. You need that thumb to be relaxed to produce a lovely sound! So relax the thumb and let it naturally curve.
Bad thumb

good thumb
Bow Hold Mistake #2: Pinching the Stick with the Fingers

Don’t try to pinch the stick to hold the violin bow.
Let the fingers dangle over the stick. Remember, you aren’t really holding the bow and you’re definitely not gripping the bow! You’re really just balancing the bow between the fingers and the thumb.
Most people try to pinch the bow because they feel very uncomfortable balancing the bow on the thumb.
This is very understandable. Practice balancing the bow hold over a soft pillow or mattress if you are afraid of dropping the bow.
As you can see by the picture, pinching the bow with the tips of the fingers leads to a very straight pinky, and a bent back thumb.
All of the fingers are locked and inflexible which will contribute to a stiff sound. You need those fingers to move like little shock absorbers or springs, so loosen up and let those fingers drape over the stick!
Bow Hold Mistake #3: Not Curving the Pinky

Avoid locking the pinky straight
You also don’t want the pinky to be straight and locked (unless, you are playing in the upper half of the bow). Keep that pinky gently curved and on top of the stick.
Notice when your pinky is straight and locked how immovable it is. We need that pinky to flex just like all of the other fingers.
When the pinky locks on the violin bow, there’s a good chance it’s forcing the thumb to bend back and lock as well.
So relax all of the fingers. Practice holding your bow over something soft if you are afraid of dropping it.
And we’ve all dropped violin bows. It still happens to me sometimes and I’ll wonder what in the world just happened.
It’s not a bad idea to practice in a room with carpet, or place a rug in your practice area.
Bow Hold Mistake #4 Placing the Thumb Inside the Frog
It might be tempting to place your thumb inside that little dip in the frog, like the picture below. But don’t do it! Place your thumb at the tip of the frog, in between the tip of the frog and the leather grip.

Avoid placing the thumb inside the frog
place the thumb at the tip of the for and in between the frog and the leather grip
Do Fiddlers Hold the Violin Bow Differently?

A fiddler’s bow hold at the balance point
Is there a different way to hold the fiddle bow? While there is no difference between a violin bow and a fiddle bow, some fiddlers do hold the bow higher up on the stick. This facilities fast string crossings and easier double stops and compliments the style of playing.
If you are a beginner just starting to learn to play, I recommend holding the violin bow at the frog, even if you only want to fiddle. If you can hold the bow at the frog, you can hold it at the middle. But it’s harder to hold the bow in the middle and then transition to holding it at the frog.
Conclusion: Holding the Bow the Right Way
The bow hold is absolutely crucial to good tone production and advanced bow strokes. Having a natural, relaxed bow hold is not something you’ll be able to master in one day. It takes time to teach the muscles to relax and be in control of the stick. So give yourself time but reevaluate your bow hold often. Since the violin bow hold is so crucial to your sound, it’s a topic I talk a lot about in my online studio. I’ve got lots of lessons and workshops on the bow hold, so if you’re interested in seeing what my online studio has to offer, learn more here!
Happy Practicing!
Once you learn to hold the bow correctly, learn the secret to better bow control and relaxation!


![10 Best Violins for Beginners [2024] A Violin Teacher’s Ultimate Guide](https://images.squarespace-cdn.com/content/v1/554545e3e4b0325625f33fa6/1600433065588-JQV56M1W9LNI833AVGEE/10+best+violins+for+beginners+2020.jpg)