Perfect Intervals on the Violin

Perfect intervals on the violin.jpg

You might hear the term “interval” a lot in music. Knowing intervals can really help your violin playing since certain intervals always have the same fingerings. If you know how these intervals sound and what finger patterns go with them, you can cut out a lot of heartache and make learning the violin much, much easier. Are you convinced? Okay, let’s dig into music intervals for the violin.

Intervals are the differences between pitches. I like to think of them as the way we measure distances between pitches.

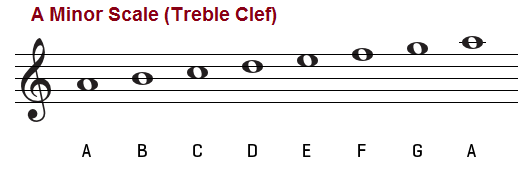
 Let’s look at our C major scale again. 

Screenshot-2017-11-7+scale+with+scale+degrees+-+Google+Search.png

Don’t worry too much about all those fancy names for notes in a scale. Think about the numbers. What if you skipped the second scale degree (or second note) and went straight from C to E? That would be the interval of a third. To determine the size of the interval, count the note you are starting on then count all the notes in between your two notes including the note you want to stop on. C to E is a third (C=1 D=2 E=3). What is the interval from C to B? A seventh. (CDEFGAB= 7 notes= interval of seventh).

We’ve already talked about half steps and whole steps. C to D is a whole step but it’s also known as a major second—a second equals two notes apart. (C=1 D=2). Major seconds sound happy. But what if you had C# to D? That’s also a second but it’s obviously a smaller interval than C to D. C# to D is a half step. Half steps are the smallest intervals but they are also known as minor seconds. Minor intervals tend to sound sad or angry.

This is the basic way to count intervals but it gets a little more complicated than that. What is the interval between the low C and the high C of our major scale? There are 8 steps. We call that an octave. Octaves are the same notes but the second octave occurs at a higher frequency therefore it sounds at a higher pitch. 

We can play intervals one after the other or we can play them at the same time. On the violin, try playing your open D string while playing the third finger D on the A string. These two Ds are an octave apart. Do you hear how they have a very open sound? We call octaves perfect intervals. If you divided the string perfectly in half, you would get an octave—a perfect interval. It’s neither major nor minor. There are four perfect intervals in a scale: unisons, perfect fourths, perfect fifths, and octaves. What’s a unison? It’s the same pitch played at the same time. 

It’s a little hard to do this on violin but try playing a fourth finger A on your D string while playing your open A string. These two pitches are the same (or should be if they’re in tune!). Now try playing a perfect fourth on your violin. Play your open D string and now jump to 3rd finger G on your D string. Playing an open string and then playing 3rd finger in first positions always results in a perfect fourth.

 These notes are 4 steps apart (D E F G=4). Do you hear how it has a very open sound? It also sounds like the first two notes in the song, “Here Comes the Bride.”

Now try playing a perfect fifth. These are easy because we tune our violin in perfect fifths so all of your strings are perfect fifths apart. Try playing two open strings at the same time. Do you hear that open, clear, perfect quality? If you don’t quite yet, wait until we start talking about dissonances and that perfect quality will sound more obvious.

The great thing about intervals is that we can use them to help our intonation. We can associate the beginnings of certain songs with certain intervals to help us hear the interval. For instance, a perfect fifth is the beginning interval for the Star Wars theme song. Next time you are playing a note and the note following it is a fifth away, you don’t have to guess what the second note sounds like. If you can hum the Star Wars theme, you know what the second pitch will sound like. Knowing what something sounds like before you play it is one of the keys to playing in tune! I love this handy chart for picking out songs to associate with intervals. 

Practice playing these perfect intervals on your violin. Practice singing them. Try to identify them as you are listening to music. 

Next, we’ll discuss those imperfect intervals. 

Major Scales and Key Signatures for the Violin

Major Scales.jpg

It would be pretty boring we played all music in the same key. But we can rearrange where the half steps are in a scale and get 12 different major keys. (Do you know how many half steps there are in a scale? That’s right, 12!) A major key can be built off of every half step in a scale.

C   D♭  D   E♭  E   F   F#   G   A♭  A   B♭  B  

You might be wondering why I sharped some notes and made others flat. That’s because you will play something in B♭ a lot more than you will play something in the key of A#. Look at the piano, B♭ and A# are the same note. That means they are enharmonic equivalents: the same note written two different ways.

Major Scales

How do major scales work? Well it all depends on the arrangement of whole and half steps. Start with C major. Can you write half or whole in between each note? Remember “Buy Chocolate” and “Eat Fudge". Half steps are going to be between those two pairs of white keys that touch on the piano keyboard.

Screenshot-2017-11-7 c major scale whole and half steps at DuckDuckGo.png

This is the order you get. Whole Whole Half Whole Whole Whole Half. I sum it up like this: WWHWWWH.

That’s the order of half and whole steps for all major scales which is why major scales sound the same. They have the same relationship between the notes. Try this exercise. Print out some blank sheet music. Notate an E (the first line on the treble staff). Without looking at a scale book and without thinking about your key signature for E, begin writing the scale just by the order of whole and half steps. Now compare your scale to an E major scale in your scale book. If you really  want to give yourself a workout, try doing this for the more complicated scales like A#.

So if you’ve ever wondered why the Key of G major has one sharp—F#, this is why. Start on a G, follow your half step whole step pattern for the major scale and you will end up with F#.

All scales have two sets of half steps. Think of the Key of C as your vanilla scale with your basic BC and EF half steps. Every time you add one sharp, you are changing these two sets of half steps. In the key of G, you haven’t changed anything with B or C so they are still half steps. But E and F are no longer half steps because you had to sharp that F. Now F# and G are half steps.

Screenshot-2017-11-7 what is a key signature - Google Search.png

What’s up with all those sharps and flats? They look like they are completely random but they always occur in a certain order. If you have one sharp, it will always be F#. If you have two sharps they will always be F# and C#. The order goes like this:

F# C# G# D# A# E# B#

Use the mnemonic “Fat Cats Go Down Allies Eating Birds” to help you remember the order.

For flats, the order is the reverse of what it is for sharps.

B♭ E♭ A♭ D♭ G♭ C♭ F♭

Remember “Bead Go Catch Fish” for flats.

You can number each note in your scale. We call these scale degrees. The numbers above the notes are the scale degrees.  Each note in a scale also has a name which are written below the note in the following picture.

Screenshot-2017-11-7 scale with scale degrees - Google Search.png

Don't worry about remembering the name for each scale degree. The most important ones are tonic, dominant, and the leading tone. Scale degrees and scale names are the same for major and minor keys.

Why do we call the seventh scale degree a leading tone? Because it wants to lead to tonic again. Try playing a scale and stop on the leading tone. You’ll be itching to play the tonic to feel complete. (Legend has it Mozart’s father would play scales in the morning ending on the leading tone. Young Mozart would jump out of bed, run down stairs, and play the tonic. Brilliant idea to get a prodigy up in the morning.)

You know what key you are playing in based on the key signature at the beginning of the music. Here’s a list of all the major (and their relative minor scales). Don’t worry about the minor scales for now. Try to memorize each key signature up through 5 sharps and 5 flats. In the violin, you will spend most of your time playing in the key signatures with 0-5 sharps or flats so focus on those.

key_signatures_chart.gif

Next we'll talk about minor scales!

Happy Practicing!


Easiest Violin Songs EVER (Free Violin Tab Music)

Easiest Violin Songs Ever Long.jpg

Are you looking for easy violin songs? So easy you don’t have to spend twenty minutes just trying to figure out what the notes are? Do you just want to play an easy song without feeling like you need to take a course in music theory? Then I’ve got the songs for you! Not just any songs, the easiest violin songs ever, with no note reading required!

Why Play Easy Violin Songs Without Note Reading?

Some teachers might snub their noses at playing songs without actually reading the notes. Is that cheating? Absolutely not. In fact, when I start students, no matter their age, I spend several weeks doing songs just like these easy violin songs. Why? Because with violin there is so much going on! Keep your left wrist straight! Higher on those 2nd fingers! Bow pinky curved! Straight bow! It’s frustrating enough as it is. So why make it more complicated with note reading? Spend some time on easy violin songs. Focus on the basics of playing. And when you want to add in note reading, it won’t totally rock your world.

Even if you have been playing for a while and you are comfortable with note reading, these easy violin songs look hard when you look at the sheet music. But once you simplify it into violin tab, you’ll find it’s not that tricky.

How Does This Tab for Violin Work?

Musical tablature indicates fingerings, not notes. So the numbers in these easy violin tablature songs indicate the finger number. The letters indicate which string to play on. For instance: A: 10 D: 312321 means you would play 1st finger then open string all on the A string, then play all the other finger numbers on the D string.

All numbers are using the “normal” finger pattern in which the 2nd finger is next to three. If the finger needs to be lower or higher it will be indicated with an “L” for lower and an “H” for higher. Low 2s will be right next to 1st finger. High 3s will be right above where 3rd finger normally is.

How Does the Rhythm Work in Violin Tab?

Well…it doesn’t. That’s the one drawback to this easy violin tab. There’s really no way to indicate rhythm. It’s best if you know the song. I’ve tried to space out numbers that are longer notes. Some numbers have a dash afterward to indicate a longer note. Other than that, listen to these easy violin songs to know how slow or fast to play the notes on violin!

Also check out my easy violin Christmas songs using this this type of music notation.

Easiest Violin Songs EVER

I try to start with the easiest songs and work my way down to more challenging ones. Try them all!

Dashes after notes mean to hold that note longer (usually hold that note for the same number of dashes)

Hot Cross Buns Violin Music

 Any String:      2 1 0                2 1 0                0 0 0 0             1 1 1 1             2 1 0

Mary Had A Little Lamb for Violin

Any String: 2 1 0 1      2 2 2--     1 1 1--        2 2 2--      2 1 0 1       2 2 2 2 1 1 2 1 0--

Boil Them Cabbage Down

A:  2222 3--3--    2222    1--1--    2222    3--3--     2211    0--0--

 Ending: E: 3230130  A: 320120.  E: 3

Chicken on A Fencepost

Parentheses means play those notes faster.

A: (3333) 33       E: 10103          A: (3333) 33       4310    (3333) 33           E: 1013 4310               A: 333

D: (3333) 33       A: 10103          D: (3333) 33       4310    (3333) 33           A: 1013 4310               D: 333

Frère Jacques

The last “AEA” is open A string, open E string, open A string.

A: 0120 0120 234-- 234--        E: 010   A: 320            E: 010  A: 320             AEA     AEA

Au Clair De La Lune

A: 0001 2--1-- 02110----

A: 0001 2--1-- 02110----

Old MacDonald for Violin

D: 3330 110-- A: 1100 D: 3---0 3330 110-- A: 1100 D: 3---0

D: 3330 3330 3030 3310

D: 3330 110-- A: 1100 D: 3----

Happy Birthday for Violin

L2 means low 2nd finger. Place the 2nd finger right next to the 3rd finger.

 D: 001032--       001043--           00        A: 31    D: 321--  A: L2 L2 1        D: 343--

London Bridge

A: 010 D: 3234-- D: 123-- 234--

A: 010 D: 3234-- 1--4-- 2 0---

Jingle Bells

 Any string: 222--  222--  24012----   3333  3222  21121   4

                   222--  222--  24012----   3333  3222  4431     0----

Can-Can

D: 0 0 1321 A: 0 0 01 D:23 1 1 1321 0 A: 3210 D: 321

D: 0 0 1321 A: 0 0 01 D:23 1 1 1321 0 A: 0 D: 12 0 0

French Folk Song

Hold the notes with dashes for three beats

A: 333 222 123 0---

D: 333 222 111 0---

D:012 012 012 3---

D: 123 123 123 4---

A: 321 0

D: 3210 1 0---


Ode To Joy

Parentheses means play those notes faster.

D: 2234 4321 0012 211-- 2234 4321 0012 100--

D: 1120 1 (23) 20 1 (23) 21 01 G: 1--

D: 2234 4321 0012 100--

Three Blind Mice

I’d like to thank my student, Marae, who helped me figure out a lot of the following songs and gave me some great ideas for new violin songs. Thanks Marae!

A: 2 1 0 2 1 0 

A: 4 33 2 4 33 2

E: 0 3 3 212  3 00 

E: 0 3 3 212  3 00 

A: 3  2  1 0 2 10 

Star Wars Easy Violin Music

H3 means high 3rd finger

D: 111 A: 0- -4--321       E: 3-- 0--A: 321 E: 3-- 0--A: 323 1----

D: 111 A: 0- -4--321       E: 3-- 0--A: 321 E: 3-- 0--A: 323 1----       

D: 112-- 2         A: 3210 0121 D: 2 H3

D: 112-- 2         A: 3210 4-- 1--

D: 112-- 2         A: 3210 0121 D: 2 H3

D: 11 4 3 L2 1 0          G: 3 H21        D: 1

D: 111 A: 0- 4-321       E: 3- 0-A: 321 E: 3- 0-A: 323 1-
D: 22  A:3 1 0

Hey Diddle Diddle

Listen to Hey Diddle Diddle here (you can play along with this version)

A: L2 E: 0 2 0 (do this 2 times)

E: 00 A: 3 L2 3

E: 00 A: 3 L2 3

A: 3 E: 00 L2 L1 0  A:3

E: 0 1111- 01-2 3-

E: 3 4 4+(stretch) 2 1 0 1 A: 3 2

Do You Want to Build A Snowman Easy Violin Music

D: 3 3 3 0 3 A: 1 0 1

D: 3 3 3 0 3 A: 1 0

D: 3 3 3 0 3 A: 1  L2 1 D: 3

A: 1  L2 1 D: 3

D: 3 3 0 3 A: 1 3

A: 33 L2 1 L2 3 D: 3

D: 3 A: 0 1  3

A: 0 1 0 D: 3 A: 0 1 4

D: 3 3 3 0 3 A: 1 0 1

D: 3 2 3-

Toreador Song

A: 3 43 11 101 L2 1-  L2 0 3 1   D: 3 1 4 0 0         A: 0- 4 3 L2 1 0 1 L2 1-  D: 2      A: 1 1 L1 H2     E: 1 

A: 4 H3 4 0 1 L2           1          D: 3      A: 4 3   D: 3 0   A: 2 1 0            D: 3

I’ll be adding more easy violin songs with tab so check back frequently. Let me know which ones you would like to see!

Happy Practicing!

Best (and Worst) Violin Strings for Beginners: A Violin Teacher's Honest Review

Best and Worst Violin Strings.jpg

I’m going to cut the fluff and get right to the heart of the matter. If you are looking for the best violin strings for beginners, then don’t buy something cheap. Don’t buy violin strings that come in packs of 16, don’t buy violin string sets that are cheaper than a family meal at a fast food restaurant.

Good quality violin strings make an immense difference in tone and ease of playability, as I will show you. The best violin strings can make playing much easier. Even if you have a great violin, having a cheap set of strings can make playing difficult especially for a beginner. If you are playing on a cheap set of strings, you know that ugly, scratchy sound you’re getting? Yep, that might not be your fault. The strings may be the culprit.

If you want an honest review of the best and worst violin string sets for beginners, intermediate, and advanced players, then read on!

What Violin Strings to NOT Buy

Be wary of any violin string set under $20. If you are going to take the time to change the strings on your violin, you want something that will at least sound good when you are finished. So avoid these brands!

  • Red Label—Far from the best violin strings! The king of cheap strings.

  • Cecilio—get 16 strings for the low price of $15.00…Don’t fall for it!

  • Vizcaya Universal—an even better scam. 16 strings for $12! How does that even pay for the paper to wrap them in?


How to Buy Violin Strings for Beginners

Ball End versus Loop End Violin String

You can buy violin strings separately, but it is better to buy them as a set which will include each of the four strings. Make sure the string set matches the size of your violin. Next look at the tailpiece of your violin where the strings are attached to the fine tuners. Are the ends a metal loop? Or are they balls hooked into the holes on the tailpiece? When purchasing the set of violin strings, choose ball-end or loop-end to match what you have.

Tension on violin strings vary from light, to medium, to heavy. But the vast majority of beginner and intermediate violin string sets come as medium tension.

Best Violin String Sets for Beginners

I’ve played all of the violin string sets I’m going to tell you about. I put them on the same violin, let them stretch out for about a two week period, and then made recordings of the same excerpts of songs so you can hear the differences. Okay, here’s my picks for the best violin string sets for beginners!


Ascente Violin Strings Review

My #3 Choice for Beginner Violin Strings

These are the cheapest violin strings for beginners I would purchase. I’m recommending them with a caveat!

When I first put these on my violin, I wasn’t expecting much. However, I was extremely surprised at the resonance of these strings. I’m telling you, they RING! They are bright and lively with a clear, focused tone. While the Ascente violin strings sounded great, I found I had to be on top of my game to make them sound cleanly. If you listen to the sound samples, notice how many times it took me to play an open G string with a clean start. It’s not that hard, but these strings made it more difficult. I put these strings on an EXPENSIVE violin and still had issues, so keep that in mind if you are putting them on a cheaper violin.

 Buy the Ascente violin strings if you are…

  • Buying for a very young child that sounds scratchy anyways…

  • On a budget

  • Want a decent set of backup strings

 Don’t buy the Ascentes if you are…

  • Buying for an older child or adult

  • If you can afford to pay a little more

 Pros

  • Clear, bright, resonant sound

Cons

  • Difficult to make clean starts

  • Not as responsive as other strings

Helicore Violin Strings Review

My #2 Choice for Beginner Violin Strings


Helicores are a good string set for beginner or intermediate players. I put these on my violin after the Ascentes and I found them to be quite a contrast. The Helicores had a warmer sound, not quite as loud and bright as the Ascentes. They were also easier to play on, a little bit more responsive, and didn’t produce as many extraneous noises. The strings were fairly even sounding, although the G string leaves something to be desired. It lacks a richness of tone and doesn’t quite project the way I feel it should. While the tone on all strings was warm and even, I did find myself missing the complexity and brightness of the Ascentes. Helicores are a good middle of the road kind of string. Responsiveness isn’t bad…but there are more responsive strings out there. Tone isn’t bad, but it’s not phenomenal. Keep in mind, I’m comparing these to my usual strings (keep reading to find out my favorites). 

Even though Helicores fell short of what I would call a perfect sounding violin string, they will suit beginners and intermediate players just fine.

Buy Helicore Violin Strings if you are

  • Buying for a child or for adult or teenage beginners

  • If you want a decent set of strings without a big price tag

Don’t buy Helicore Violin Strings if you

  • Want a richer sound

  • Are a little more advanced

  • Have a more discerning ear

  • If you don’t mind spending a little more for a really nice set of strings

 Pros

  • Warm Tone

  • Stable, easy to tune

  • Easy to play on

Cons

  • Dull sound compared to more expensive violin strings

  • Not as responsive as they could be 

Dominant Violin Strings Review

My #1 Choice For Beginner Violin Strings

Dominants have a name for themselves as the standard in beginner violin strings. I was interested to see if these violin strings held up to their name—and they do! It did take a few days for Dominants to settle out. For the first few days, they sounded like a tin can. But after that, these strings mellowed into a warm sound with a clear, projecting tone.

Dominant violin strings are responsive, even sounding, and pretty resonant for a beginner-level string. They produced a good, solid tone for those students starting to really focus on producing a clear, rich sound. When doing advanced bow strokes, like colle at the frog, these strings made it more difficult than a more expensive set of strings (like Evah Pirazzis). Quick notes in the middle, like in Swallowtail Jig, produced a little background noise that I don’t notice in nicer strings. I felt that the A lacked a little brightness and resonance compared to the other strings. And the G string, alas, still doesn’t quite meet my standards for something that is truly remarkable. Those are my only reservations. For a beginner or intermediate violin student, these strings fit the bill perfectly!

I would recommend Dominant Violin Strings for ALL beginners, not matter your age! As long as you can afford it, skip Helicores or Ascentes and buy these strings!

*I purchased these violin strings as a set with a Pirastro Gold Label E and found the combination quite enjoyable.

Buy Dominant violin strings if you are

  • Any beginner or intermediate level violin student

  • Own a violin under $500

Don’t buy Dominant Violin Strings if you are

  • Starting to experiment with more advanced bow strokes

  • Looking for an even richer, more projecting tone

  • Have any violin over $500—if you are paying that much for a violin, spend $30 more dollars and get a great set of strings to match your violin’s potential.

Pros

  • Easy to play

  • Warm sound with projection and resonance

  • Responsive strings

Cons

  • Takes a few days to settle in

  • Not great for advanced bow strokes

So...what’s my absolute favorite set of violin strings?

Evah Pirazzi. Hands down. I’ve tried even more expensive violin string sets and I always come back to these gems. In fact, I never realized just how easy they made violin playing until I started trying beginner violin strings! Evah Pirazzis, and other violin strings of similar quality, are so much more forgiving than cheaper strings. Not only do they make advanced bow strokes easier to execute, you don’t have to work as hard for a good tone. The sound is beautiful, sweet, yet clear and projecting.

The only downside? They are a little more pricey (but only around $30 more than Dominants). And they tend to lose their brilliance after a couple months. However, I have been known to keep a set on for over a year and still found them enjoyable.

You might not think of a $75-$80 set of strings to be beginner level. BUT if you have the money and are serious about the violin, why not? No one says a beginner can only purchase beginner quality equipment. Nor do you have to play at a certain level before you are “worthy” of more expensive strings. If everyone started on Evah PIrazzi violin strings, you would know very quickly what a good tone sounds like and how enjoyable it is to just play open strings!

Buy Evah Pirazzi Violin Strings if

  • You want the best sound you can get

  • You want violin playing to be as easy as it can be

  • You are playing on a violin over $500

Don’t Buy Evah Pirazzi Violin Strings if

Pros

  • Beautiful, clear, sweet sound with brilliance and projection and resonance. Need I go on?

  • Easy to play

  • Forgiving of imperfect technique (cheap strings aren’t!)

Cons

  • A little more expensive (around $70-$90 depending on where you buy them)

  • Start to lose their brilliance after a couple months

Strings can make such a difference in your playing. They can make the difference between looking forward to practicing, and avoiding practicing all together. So pick out violin strings that are worthy of the time you spend practicing. You want regret it!

Understanding Minor Scales for the Violin

Minor Scales for violin.jpg

For every major key signature, there is a minor scale that shares that same key signature. We call these minor scales relative minor scales, since they are related to the major key signature. Relative minor scales will have a different starting pitch than their relative major scales. For instance, C major and A minor are relative scales since they both share a key signature (zero sharps or flats).

Minor scales are a little more complex than major scales because minor comes in three flavors: natural, harmonic, and melodic. Before we get to that, let’s figure out the half steps and whole steps in a minor scale.

We’ll start with the A minor scale. Can you determine the order of half steps and whole steps between each note?

a-minor-scale-treble-clef.png


Your answer is: Whole Half Whole Whole Half Whole Whole. Sum it up by remembering WHWWHWW

This is a natural minor scale. It’s in it’s “natural” state. Nothing has been changed or altered. Try playing it. It sounds a little strange doesn’t it? Remember how the seventh scale degree or leading tone should lead to tonic? When you have a whole step between the leading tone and tonic (scale degrees 7 and 8) it doesn’t really sound like the leading tone is leading anywhere. What if we raised that seventh scale degree to a G# so that it’s a half step between 7 and 8.

Our scale would look like this.

a-harmonic-minor-scale-on-treble-clef.png


This sounds a lot more “right” doesn’t it? That’s because the G# really leads to the A. When you raise the seventh scale degree in a minor key you get a harmonic minor scale. Most music written in minor keys has the seventh scale degree raised like in this scale.

The only problem with the harmonic minor scale is that it creates an awkward leap between the sixth and seventh scales degrees. Now, F and G# are three half steps away from each other! Since we are raising scale degrees, let’s just go ahead and raise that sixth scale degree too. That makes the big leap a little less big.

Now we have this:

a-melodic-minor-scale-on-treble-clef.png


That’s our melodic minor scale. Well, it’s half of our melodic minor scale. Natural and harmonic minor scales are the same ascending and descending but with melodic minor scales, we change things up on the way down. In a melodic minor scale you raise the sixth and seventh scale degrees on the way up and you naturalize them on the way down.

You might think that rule was created to torture music students but it does make sense. Why did we raise the seventh scale degree to begin with? Because we wanted it to “lead” to tonic. If we are descending and going away from tonic, there’s no need to have it raised. We practice melodic minor scales because that’s what we’ll see in most music written in minor. If we are ascending towards the tonic, the sixth and seventh scale degrees will be raised. If we’re descending, they will be natural. Here’s your complete melodic minor scale.

A_Minor_Scale_Melodic complete.PNG


Now that you know about scales we’ll move onto intervals how they can make a big difference in your violin playing!

Happy (scale) Practicing!

Music I Can't Live Without: A Violin Teacher's Playlist

Guide To Classical Music-2.jpg

If you are just discovering the joys of classical music, you might be wondering where to start. There are literally centuries worth of wonderful music. Symphonies, concerti, sonatas. It can be quite overwhelming. 

For a while now, I’ve been compiling my list of music I could never live without out. My guide to the classical music world. It’s a project that never ends because I keep discovering more music I can’t live without. It’s not exhaustive, by any means. And don’t think that just because I wrote down the second movement of one symphony, that the whole symphony is not worth listening to. It definitely is! Scroll down for my favorite pieces (classical and otherwise).

Music I Can’t Live Without

MVT=Movement (Symphonies have 4 movements, concertos have 3, for the most part)

Bold= fun and exciting, easy to listen to for young people

Underlined= quiet and relaxing

Bold, underlined, and italicized- breathtakingly gorgeous!

* Stars for my extra, extra favorites.

Bach

Violin Partita in E major, Preludio, Loure, Gavotte

Violin Sonata in A minor, Andante

Violin Double Concerto (All movements are great but especially mvt 2 and 3)

Brandenburg Concerti 1-6

Barber

*Violin Concerto mvt 1 and 2*

Beethoven

Egmont Overture

Violin Concerto, mvt 2

Piano Concerto No. 1, mvt 2

Piano Concerto No. 4, mvt. 1

Piano Concerto No. 5 mvt 3 “Emperor”

*Symphony 5, mvt 2*

Symphony 3 “Eroica”

Symphony 8 mvt 4

Symphony 7-this whole symphony is wonderful. My favorites are the 2nd, 3rd, and 4th movements.

Symphony 6-especially the mvt 3 and mvt 4

Symphony 9

Choral Fantasy—Just wait for the end.

String Quartet Opus 130 Finale: Allegro

Violin Romance No. 2

Bizet

L'arlesienne Suite No. 1 and No. 2

Brahms

*B minor Piano Trio in B major, mvt 1 and 2*

Violin Concerto (especially mvt 3)

Symphony No. 4 (all the symphonies are great)

Copeland

Fanfare for A Common Man

Billy the Kid Suite

Danish String Quartet

This is a chamber group, but their arrangements of Danish folk songs are amazing.

Woodworks

Last Leaf (especially Shine You No More)

Dvorak

*American String Quartet (No. 12)*

New World Symphony No. 9 *(especially Mvt. 4)* (watch Dudamel conducting) All movements of this symphony are great!

Elgar

Enigma Variations, Nimrod

Symphony 2, (esp. mvt 2)

Hansen

*Symphony No. 2*

Holst

*Planets: Mars, Jupiter, Neptune (all movements are great)*

Gershwin

Rhapsody in Blue

Golijov

Tenebrae

Korngold

Violin Concerto

Mendelssohn

Hebrides Overture

Mozart

Requeim

Symphony 25 

Great Mass in C minor

Violin Concerto No. 5

Violin Concerto No. 4 (especially MVT. 2)

*Sinfonia Concertante (perhaps one of my absolute favorites)*

Piano Concerto No. 22, mvt 3

Piano Concerto No. 20, mvt 2

Serenade for Winds No. 10, Adagio

Ah Tutti Contenti (from Marriage of Figaro)

Clarinet Concerto in A major, mvt. 2 (yes, with a Gypsy Moth!)

Prokofiev

Violin Concerto No. 2

Montagues and Capulets

Ravel

*Piano Concerto, mvt 2*

Pavane for a Dead Princess

Violin No. 2 Sonata, MVT 1 and MVT 2 “The Blues” starts at 8:03

String Quartet in F major

Saint-Saens

Introduction and Rondo Capriccioso

Havanaise

Organ Symphony, MVT 2, MVT. 4

Shubert

Death and the Maiden

Sibelius

*Symphony 5, Finale*

*Symphony 2, Mvt 1 and Mvt 3*

*Violin Concerto*

Tchaikovsky

Serenade for Strings

*Souvenir de Florence, Mvt 3 and Mvt 4*-The 3rd movement begins at 21:00. I melt every time I hear that double cello solo...

Vaughan Williams

The Lark Ascending

Ysaye

Sonata No. 5 “L’Aurore”

Check back often as this list will get update frequently! What are your favorite pieces from classical music? Let me know in the comments below!

Happy…listening!

Best Hymn Books for Violinists: A Violin Teacher's Guide

Best hymn books.jpg

I’ve been playing violin solos for church services since just about the first day I started learning violin. Okay, I might be exaggerating there, but I have played violin hymns for church more times than I can count. Wherever I’ve moved across the country, churches have welcomed me in. I’ve met some wonderful people, made music with some great musicians, and worshipped God in the best way I know how—playing violin! I’ve been on the constant lookout for hymn arrangements for violin and piano. Whether you are just starting or you’re ready for some advanced violin hymn arrangements, I’ve got something here for you.

Don’t forget to check out my free arrangements of some easy hymns and fiddle songs as well as my top picks for beginner violin books, scale books, and fiddle books!


For even more easy hymns along with intermediate third position parts, join my online studio to download my hymn book, Favorite Hymns for Violin. It has over 50 of my favorite hymns transposed into easy to read key signatures for violin. You’ll get Favorite Hymns for Violin in addition to several other downloadable violin books and over 200+ songs and sheet music for violin.

Violin Hymns for the Beginner

Level: Beginner—Advanced Beginner

This hymn book offers 24 classic hymns that are easily accessible to beginner violinists. This is one of the few beginner level violin hymn books that I’ve been able to find. Some of the choices include Amazing Grace, Come Ye Sinners, and This is My Father’s World. For the advancing beginner, there are also slurs, accidentals, and fermatas to add more of a challenge.


Favorite Hymns Instrumental Solos for Strings

Level: Advanced Beginner—Intermediate Player

This collection features several timeless hymn arrangements for violin and piano. This book offers more advanced rhythms and key changes for those advancing players wanting more of a solo-like arrangement of hymns. I love that it comes with a CD so you can play along with an accompaniment, even if you don’t know a pianist!


100 Gospel Songs and Hymns for Violin and Guitar

Level: Advanced Beginner—Intermediate Player

For those violinist regularly performing in church, it’s nice to have a large selection of hymns in case you are asked to play a special on Sunday—on short notice! I’ve been there and having a large collection of classic hymn arrangements has helped me out. This book offers 100 songs so you have lots of options to choose from. Most selections have a key change so one hymn selection doesn’t sound the exact same for each verse.

It’s rare that you love every single song in a book, but I absolutely love every song in this fantastic book. In addition to some of the most treasured hymns like Be Thou My Vision, and There is a Fountain, there are also some exciting arrangements of Holy Mana, and Shall We Gather at the River. There also a Spiritual with some fun syncopations!

These arrangements offer a lot of unique elements you don’t hear in many other violin hymn arrangements. There’s double stops, pizzicato sections, along with some interesting counter melodies. Many passages go up into the higher positions, but beginners can always play the first verse of each arrangement which often stay down in first position.

Old English Hymns for Violin Solo by Linda M. Ellis Cummings

Level: Intermediate Player

This was one of the first violin hymn books my mother purchased for me when I first started playing violin, and it’s continued to be a favorite throughout the years. This edition features some of the most beautiful traditional hymns including Come Thou Fount of Every Blessing, Glorious Things of Thee are Spoken, and This is My Father’s World.

Many of the hymns have passages that go up into third position and sometimes higher for a few measures, making this book a good challenge for intermediate players who want hymn arrangements that showcase the violin’s beauty.

The book comes with a solo booklet and a piano accompaniment.


And my favorite…Hymn Tunes for Unaccompanied Violin by Marilyn Carlson

Level: Advanced Beginner-Advanced Player

You don’t always have a pianist to accompany you when playing violin in church, and playing arrangements that have piano accompaniment without a piano, well, you can obviously tell something is missing.

For years, I’d been on the prowl searching for good unaccompanied violin hymn arrangements and I finally found the jewel I was looking for. Out of all my favorite violin hymn arrangements, this one is my absolute favorite. I often pull it out to play through the songs just for my own enjoyment.

There’s a beautiful version of Come Thou Fount, a breathtaking arrangement of Come Ye Sinners Poor and Needy, a version of Jesus Paid it All chocked full of delicious double stops, and probably the most interesting, most delightful arrangement of Amazing Grace I’ve ever found.

There are quadruple stops, grace notes, lovely runs, and lots of what I call “noodling.” You know, when you go back and forth between two strings really quickly. There are double stops galore, but don’t worry if you aren’t great at intentionally playing two strings at once. These double stops are generally pretty easy (playing one open string while you place fingers on another string). If you are beginning, you can leave out the double stops and just play the top note. It’s great for advanced players who want something different when it comes to hymn arrangements for violin, but beginner violinists will also be able to find many playable passages.

Enjoy these great hymn arrangements for violin and when you’re ready to add some fiddling to your repertoire, I have the perfect recommendations!

The Painful But Unavoidable Task of Charging for Missed Lessons

One day before my guitar lesson as a teenager, my mother realized she had misplaced her car keys. We searched frantically with no luck. In those days, you had to drive to your lessons and no keys meant no lesson. We called my guitar teacher and told him of our woes and that we wouldn’t be making it to lessons today.

I remember being shocked, and a little mad that he charged us for that lesson. After all, it wasn’t our fault that we lost the keys. He didn’t have to do anything for that hour, so why would he make us pay?

As a teacher, I see the other part of the story.

It wasn’t my teacher’s fault that we misplaced the keys. Now I see that making him pay (through his time) for our mistake makes no sense.

Teaching lessons is like selling seats on an airplane. There are only so many seats you can sell. For teachers, there are only so many time slots you can offer. And those time slots are very precious because everyone wants the same times! If you reserve a seat on an airplane and don’t show up, well, no one else gets to sit in that seat either.

Rescheduling missed lessons for a student is like giving a student two seats for the price of one while kicking off the passengers who would have paid full price for both seats.

A business simply can’t survive on that logic. And I tried….for many years.

On average, two to three students every week cancel or don’t show up for various reasons within the 24 hour period before a lesson. Sometimes they simply forget, sometimes they’re sick, sometimes it’s other issues like technical or internet problems.

While I love teaching violin and I consider it my true passion and calling, it’s also how I support my family. When a student misses a lesson, someone bears the burden of that missed lesson. Either the student bears the burden by paying the cost of the lesson, or the teacher pays by giving up their time for free.

A few years ago I realized that I was bearing the burden every time a student couldn’t make the time slot they reserved. I came to a crossroads. I could either ask students to bear the burden when they miss a lesson, or get another job and stop teaching violin so I could pay the bills.

This is no easy decision for me every time I explain this to a student. Keep in mind that the time a teacher spends during a missed lesson is not enjoyable “free time.” I check and recheck my connection, end the call, join again, continuously check my email and messages, then write the student to see what’s going on. I usually spend the majority of the lesson time doing something for the student. Trust me, I would much rather teach! If I were to reschedule the lesson, I would not get paid for all the time I already spent trying to resolve the missed lesson.

I hope this helps you understand why teachers must charge when students miss a lesson or tries to cancel within 24 hours of the lesson. Teaching is our passion and in order to help as many students as possible and do what we love doing, charging for missed lessons is an unavoidable part of our job!

Thank you for understanding!

How To Fix Common Problems On The Violin

There are many common problems that can cause frustration on the violin. But many of these violin maintenance issues don’t need a specialized luthier to fix. I’ve complied a list of the most common violin maintenance problems I see on a regular basis with my students and found the most helpful videos explaining how to fix them.

Some items are better left to luthiers like adjustments to the soundpost, fixing a fallen soundpost, or repairing cracks.

If you are dealing with tight or slipping pegs, a leaning bridge, or maybe you want to know how to change your strings, here’s your quick and easy guide on how to keep your violin in top condition.

How To Fix Tight or Stuck Pegs on a Violin

How To Fix Slipping Pegs on the Violin

How To Stop a Buzzing Sound on Violin


How To Straighten A Violin Bridge


How To Clean Your Violin


How to Change Your Violin Strings

Gliga GEMS 2 Violin Review

Gliga violin review.jpg

A few years ago, one of my new students brought a Gliga violin to their lesson. I had never played a Gliga before, but as soon as I took the violin to tune it, I fell in love. The sound projection was strong and clear, the tone was bright, the quality and craftsmanship seemed top-notch. I found the violin comparable in many aspects to my much more expensive personal violin. I’m always on the lookout for good quality student violins (since there are definitely a lot of poor quality VSOs out there), so I decided to learn more about this violin brand. I purchased a Gliga Gems 2, a mid-range student violin. Overall, I’m extremely pleased. But before we get into the violin review, let’s talk a little bit about Gliga.

Gliga GEMS 2 case

Gliga violins are made in Romania and shipped to U.S. customers from their shop in Nevada. One of my favorite things about this company are the options! It’s not just beginner, intermediate, and advanced violins. There are many different options for any budget. They also have every size of violin, even the harder to find sizes. I have small hands for an adult and I’ve been on the lookout for a 7/8 size violin for a while. Gliga is the only violin maker I know of that has many options in this size. You can also choose from a variety of varnishes and styles, which is a far cry from your typical, mass-produced, student violin. And if you’re in to hand-painted violins, there’s some interesting options. (I’m not a huge fan of the peacock violins, but to each his own!)

My violin is a Gems 2. I paid a total of $317 for a violin, case, bow, and shipping. When picking your violin, you can choose to upgrade your case, bow, and strings but I went with the standard option on everything.

Customer service

Gliga was easy to work with. Their website looks a bit dated, but ordering the violin was easy. My violin arrived in a timely manner and it was well-packaged. Gliga also offers a 10-day trial period with a 10-day money back guarantee.

*2024 Update: In the last four years I have seen a significant drop in Gliga’s customer service. They still ship violins in a timely manner, but they do not always respond to questions or phone calls. They still offer a good product at a good price, but their lack of communication may be something worth considering when deciding between violin dealers.

Case

The case was fine. Nothing to write home about (few student cases are), but it was clean, sturdy, and lightweight.

Violin Appearance

Gliga violin front

The violin has a very beautiful finish, especially compared to other violins at similar prices. Most student violins look and feel like student violins, but the Gliga is visually appealing with a warm-red stain and an attractive back. 

Tuning

The pegs on my violin fit very, very well. There’s definitely no slipping going on here. They are tight! To fix this, unwind the pegs a little and pull them out slightly. Not a lot, you just don’t want them pushed all the way to the end of the hole. I would definitely recommend purchasing your violin with fine tuners since the pegs on their own can make it difficult to get the string perfectly in tune. Student violins come with four fine tuners but as you go up in quality, it’s standard practice to only have one fine tuner on the E string. However, if you are just starting out and you are interested in the higher level violins, definitely spend the extra and get fine tuners on all four strings. Choosing the Wittner Space Age Tailpiece would be a worthy upgrade. If you’re wondering, it looks like a normal tailpiece, but the fine tuners are built into the tailpiece. It will also make changing strings much easier. I went with the standard tailpiece and trying to install new strings into the fine tuners was difficult.

You can also get perfection pegs installed. Perfection pegs are geared pegs that work like guitar pegs but look like traditional violin pegs. I have them on my professional violins and I’m planning to put perfection pegs on the Gliga. Right now, there is no option on Gliga’s website to upgrade to perfection pegs, but it wouldn’t hurt to call and ask them to install the pegs before shipping it to you. It would definitely be worth the extra money. If Gliga included the option for perfection pegs, this violin would be the absolute perfect beginner violin. 

Chin rest

I have to mention the chin rest because this one is REAL wood. Most beginner chin rests are cheap plastic that feel uncomfortable. The Gliga chin rest is a good height and contour.

Bow

I opted for the standard Student Brazilwood Octagonal Violin Bow. Most wooden student bows are generally poor quality (it’s better to go carbon fiber at that price point) but I was pleasantly surprised by this bow. It looks and feels much nicer than typical student bows. When looking straight down the bow, it is ever so slightly warped, but I’m not able to tell an adverse effect while playing. It’s fairly lightweight and pretty responsive for a student bow. I’m able to use quite a bit of weight without getting a scratchy sound. It is a little more unforgiving at the frog and with string crossings.  I think a beginner violinist would do fine with this bow, but I would be interested in trying the upgraded Rosewood or Carbon Fiber bow. Although I haven’t tried either of the upgraded options, if you can afford it, I would suggest going for the Carbon Fiber option. 

IMG_2148.JPG

Strings

I went with the standard Romanian steel strings and these left a lot to be desired. The E string is fine, and the A string is okay. But the D string is very metallic sounding (even after playing a few weeks) and the G string is muffled. The differences in sound qualities make the strings sound uneven. It’s especially bothersome when trying to play double stops. Definitely pay the extra for some better strings during the checkout options as this is a relatively cheap upgrade that can make your violin sound a hundred times better. After a couple weeks, I removed the Romanian strings and I put on Evah Pirazzi strings. It made this violin a completely different instrument. I enjoyed playing this violin with the better strings. I use Evah Pirazzis on all my violins. They are expensive, but so worth it. At the very least, upgrade to the Dominant violin strings (the standard in beginner-intermediate violin strings).

Tone

Cheap strings make the tone hard to judge. This is another reason to spring for the better quality strings. Once I put Evah Pirazzi strings on, this violin’s tone completely changed. The sound quality is even across the strings. It has a warm quality in the lower ranges and projects in the higher ranges without being shrill. The quality of tone for the price range is outstanding and outplays any other beginner-level violin I’ve played.

Set-up

This violin is ready to go out of the box. It needed tuning, of course, but the strings are the correct tension and the bridge is the appropriate height with the right amount of curvature. You would be surprised at how many beginner violins lack this basic set-up!

Rosin

This outfit does come with rosin. It looks fine but to me, but I just used my own rosin. It’s worth spending a little more for some good rosin. A cake of superior rosin can last you for years (as long as you don’t drop it).

Summary

All in all, this is a great violin for a beginner player. The price point is superb for the quality of the violin. I’ve seen lots of violins that are a little cheaper but vastly inferior. The Gems 2 could take a student all the way through the beginning levels into the early intermediate stage.

Pros

Gliga gems 2 back
  • Easy to order

  • Lots of options on size, appearance, and quality

  • Good craftsmanship, beautiful appearance

  • Correctly set-up and ready to play

  • Standard Options allow for a great violin with a budget price tag.

Cons

  • Pegs can be difficult to turn at first

  • Romanian strings don’t have the best sound

  • Standard tailpiece with fine tuners made changing strings difficult

My recommendations

  • Make sure you have four fine tuners. Choose the upgraded Wittner tailpiece.

  • Definitely upgrade to better strings. I recommend the Evah PIrazzis or Dominants.

  • Go for the carbon fiber bow, or at least the rosewood bow. 

Find Gliga online here! Gliga also offers a coupon code with the following discounts. Use the discount code VL1003 in the “Comments” section during checkout. Don’t put the code in the coupon section, make sure you enter it in the COMMENTS and your discount will be manually subtracted after your order processes.

Gliga Violin Discount Code.jpg

$5 off any Genial 2-Nitro, Genial 1-Oil, Gloria 2, Gems 2, Gloria 1.

$10 off or Gems 1, Genova 3.

$15 off for Genova 2, Gama, Ceruti Concert.

$25 off for Gliga, Genova 1, Gliga 1, Ceruti Maestro, Gliolin.

Happy Practicing!

13 Best Intermediate Violin Books: A Violin Teacher's Guide

best intermediate violin books-2.jpg

As soon as you learn the basics of note reading, bow control, and left-hand muscle memory, a whole new world of violin books opens up to you. Whatever your style, whatever skill you’re wanting to learn, the realm for intermediate violin books is endless. Here are my top picks for the best intermediate violin books, from fiddle tunes to double stops!

Also check out my guide to the Best Beginner Violin Books, scale books, hymn books, and fiddle books!


Best Violin Technique Books for the Intermediate Player

These books focus on technique, including etudes, double stops, and higher positions.

  1. I Used to Play the Violin

If you studied violin in school and haven’t picked it up in a few years, this a great book for you. There’s beginning and advanced scales, etudes, refreshers on major vs. minor, and great exercises for bow technique and more advanced bow strokes. There’s also a nice collection of songs that adults will find very appealing. 

2. Open String Bow Workouts

Many advancing violin students tend to focus on the left hand and forget the bow. But mastering the bow is crucial to violin technique. Start early with this easy-to-use bow workout featuring all open strings. Each page introduces you to a new technique to master with your bow. 

3. Superstudies for Violin

These short songs or etudes are easy to read for the advanced beginner, but they offer some advanced rhythms and bowings to get students ready for “real” etudes. My favorite part? All the harmonics! Who says you have to wait several years before playing something as fun as harmonics on the violin.

4. First Etude Album

A great collection of etudes that sound pretty! Each etude is half a page, very manageable for the advancing violinist. Each two pages focuses on one key signature so students can get a good understanding of finger patterns before moving on.

5. Finger Exercises for the Violin

If you really want to give your left hand a workout, this is a wonderful book. Build dexterity and finger flexibility with these great exercises. It’s a good pre-cursor to more advanced technique books. 

6. Third Position for the Violin

For students eager to get a taste of playing in a different position, this is a great introductory book with a good mix of exercises and songs. 


7. Introducing the Positions

If you want a more in-depth study on playing in higher positions, this book will deliver. There’s lots of exercises, mini-etudes, shifting studies, and note familiarization. The exercises focus on one key signature at a time so you can get familiar with the finger patterns. The first book covers third and fifth positions and the second volume covers second position, fourth position, and the higher positions.


8. Developing Double Stops

Playing two strings at once is not only extremely fun, it’s crucial for developing your left hand chops. Learning to keep your fingers down whether you are playing double stops or not, will help your playing and dexterity immensely. This book offers an easy introduction on how to play intervals on the violin. The first few pages are easy enough for an advanced beginner. This book will last you for years and take you through advanced triple and quadruple stops as well as double stops in higher positions.


Best Solo Pieces for the Intermediate Violinist

9. Suzuki Volume 2

Suzuki’s second volume offers several beautiful songs for developing tone, advanced bow strokes, and some third position.

10. Solo Pieces for the Intermediate Violinist

This book is a great alternative to Suzuki Volume 2. It includes a varied selection of classical pieces from Mozart to Handel to Vivaldi and more. Some songs are slow and beautiful, others are fast and exciting (like my favorite Espana Waltz). Once students complete this book, they are definitely ready for full-length concerti.


11. Mel bay’s Complete Irish Fiddler

For advancing fiddlers, this book will last you a while! It’s got lots of songs and information on Irish fiddling. The first song is The Irish Washerwoman to give you an idea of the starting level. It slowly introduces the various ornaments in fiddling by adding one more advanced element for almost every song. You’ll learn various bowing patterns, grace notes, mordents, short rolls, and more.

12. O. Rieding Concerto in B minor, Op. 35

This piece is the perfect introduction to playing concerti. There’s the typical three movements (fast, slow, fast), varied key signatures, sixteenth notes, and catchy melodies, all in first position.

13. Seitz Second Pupil’s Concerto in G, Op. 13

This concerto is a must for all advancing violinists. In fact, it was the first piece I ever performed in a recital. (My recital program is still tucked away inside the piano accompaniment). It’s all in first position but that doesn’t mean it’s easy. There’s fun cadenzas, double stops (real double stops!), grace notes, a luscious second movement, fast-paced sections, and grand finales.


I hope you enjoy my top picks for intermediate violin books. Also check out my guide to the Best Beginner Violin Books, scale books, hymn books, and fiddle books! Happy Practicing!


How to Play with a Straight Bow on the Violin

Straight Bow.jpg


Playing with a straight bow is essential to producing a great sound on the violin—but you already knew that. Getting your arm to move a three foot stick up and down in a perfectly straight line while simultaneously moving it horizontally to make string crossings, now there’s the trick. Add in slurs, dynamics, different bowings, rhythms, oh yeah, and whatever your left hand is doing, and you can see why violin is such a challenging instrument. 

If you’re just staring to learn violin, or maybe you’ve been playing for a while and you’re wondering why your bow sounds scratchy, crunchy, or any other nasty sounds, there’s a chance it’s because your bow isn’t straight. If you’re wondering how to keep the violin bow straight and get a good tone, you’re in the right place. Having a straight bow is hard, there’s no doubt about it. But if you approach it the right way, you can be playing with a straight bow, without having to devout 100% of your mind to it, pretty quickly. The key is developing muscle memory, but we’ll get to that in a second. First, let’s take care of a little housecleaning. There are a couple things you want to make sure you are doing correctly before beating yourself up about your crooked bow. 

Straight bow.jpg

A nice, straight bow.

1. Know what a straight bow is. A straight bow means your bow is always parallel to the bridge and your bow is contacting the string in the center between the fingerboard and the bridge. The place where the bow contacts the string in relation to the fingerboard and the bridge is called the contact point. It’s the whole reason this straight bow things is a big deal. If your bow is at an angle and part of it is close to the bridge and the tip is pointing in the direction of your scroll, your contact point is messed up and trust me, you’ll hear it.

2. Make sure you are holding the bow correctly. Check out my video on holding the bow correctly without any tension. You also want to make sure your wrist and elbow are level (while playing in the middle of the bow) and your fingers curve down below the wrist to let the bow hang from the fingers. You shouldn’t be playing with the bow hair flat, but slightly tilted so the bow hair is facing towards you a little.

3. Make sure you are holding your VIOLIN correctly. This is one many people overlook. What does holding the violin have to do with your bow? A lot actually. The violin should be pointing to your 9:00 position directly off your left shoulder. It should be level with the scroll neither pointing up or down. Many people hold their violin with the scroll pointing towards 10:00 or 11:00. This brings the fingerboard closer to your bow and makes it impossible to NOT play over the fingerboard. 

4. Keep your right upper arm still. If you are swinging your upper arm from the shoulder, you are moving your arm in a circular motion. Circles and straight lines do not mix. 

Daily Exercises for a Straight Bow

Muscle memory is the key here. To practice having a straight bow, you need to warm-up every day on just open strings. No left hand—that’s an order. Developing muscle memory means you need to devote all of your attention on keeping that bow straight. You don’t have to spend hours doing this. The more the better of course, but if you only spend a few minutes warming up with open strings you’re doing better than no open strings at all.

Notice how it’s impossible to tell if the bow is at an angle when you are looking from the side.

Notice how it’s impossible to tell if the bow is at an angle when you are looking from the side.

To ensure you aren’t wasting your time doing this, you MUST play open string exercises in front of a mirror. It’s almost impossible to use your peripheral vision to see if your bow is straight or not. You can’t trust what your eyes are telling you. Look in a mirror. Make sure you can only see the top line of the bridge, not the sides. Now see how easy it is to tell if your bow is parallel to the bridge? You must only see the top line of the bridge. Since the whole goal of having a straight bow is keeping it parallel to the bridge, it’s a waste of time to try and make something stay parallel to a curved line.

Make sure you adjust yourself so you can only see the top line of the bridge when practicing in front of a mirror. Now you can easily see if your bow is at an angle (like this picture!)

Make sure you adjust yourself so you can only see the top line of the bridge when practicing in front of a mirror. Now you can easily see if your bow is at an angle (like this picture!)

Don’t feel like you have to practice this entire list everyday. In fact, don’t. For several weeks, stay on numbers 1-2 and eventually add the next step.

1. Down up down up: start off playing 4 bows on each string in the middle of the bow. Watch yourself in the mirror. You’ll be able to tell immediately when your bow is crooked and be able to correct it. Yes, at first it is like trying to walk a cat on a leash, but eventually your muscles will start to understand what you want them to do. You could spend hours in a lesson with your teacher telling you “a little to the right, not too much, now back to the left.” But nothing compares to practicing in a mirror—this makes you your own teacher. 

2. Rhythms: Staying in the middle, now practicing moving your bow with different rhythms. This makes you move your bow at different speeds, giving your muscles something else to practice. Any short, repeatable rhythm works. Try my beginner rhythms.

3. Repeat steps 1-2 at the tip. This requires you to push out with your bow to keep it straight. Notice your fingers are also leaning into your bow and your pinky might even come off the stick. 

4. Repeat steps 1-2 at the frog. 

5. Repeat step 1 with the entire bow—starting at the frog and going all the way to the tip. Some of the rhythms might be difficult to play using the entire bow, so don’t give yourself a hard time. Once you get to full bows, concentrate on even, equal tones. Once you get to this stage, do this every single day! Work on getting smoother string crossings, connecting the bow changes, having equal tone whether you are playing at the tip or the frog. There are a million things to think about with open strings! In fact, if you only have a few minutes to practice, I would do this step and nothing else. You’ll make more progress doing this than trying to cram in everything you’re learning.

6. Add in slurs. Slur all 4 open strings in one down bow and then in one up bow. 

7. Add in dynamics. Play forte, then piano, then do decrescendos from from frog to tip and tip to frog, then crescendos from frog to tip and tip to frog.

This whole muscle memory thing can difficult to understand. When I was struggling with this, a teacher once told me it takes 10,000 open strings before your muscles really understand what to do. If you are at open string straight bow number 2,347 and getting frustrated, here are a couple other exercises to help you get the hang of it.

1.  Ring on top. When concentrating on straight bows, most students focus entirely on the bridge and the bow and forget about the tip entirely. Do the exercises watching your tip. Better yet, place a ring, cheerio, or lifesaver on the tip of the bow. Now try to play without the object falling off. You have to keep your bow straight. 

3. Hold your right upper arm. If your arm won’t stop swinging from the shoulder, take your left hand, reach over, and grab your bicep while playing. This will keep your arm from swinging. 

4. Buddy bowing. Hold your violin and bow as usual but have a friend hold the stick and make the bow stay straight while you concentrate on what your muscles are doing. Repeat ad nauseam. 

Keep in mind, having a straight bow 100% of the time is not something that will happen with one or two practice sessions. It takes time. Do a little bit every day and you’ll be well on your way!

I’ll show you exactly how to keep a straight bow and common problems that I see students make in my Complete Beginner’s Course (it’s not just for beginners—intermediate students love it too!) The course is part of my Online Studio Membership which includes over 20 courses and 800+ lessons, including more courses on bow control like The Secret to Better Bow Control. Learn more here.


Happy Practicing!

Best Violin Scale Books

Best Violin Scales Books.jpg

I suppose if you are reading this, you don’t need me to tell you how wonderful scales are. Scales are like vitamins: just a little every day can do wonders for the health of your violin technique. I’ve ranked all the scale books starting from beginner and working up to advanced levels. Each violin scale book in this list builds on the other, adding more complicated rhythms, higher octaves, double stops and more. Read on to see my top violin scale books.

Also check out my top picks for beginner violin books, hymn books, and fiddle books!

Scaley Monsters

Level: Young Beginner

This book is geared towards young violinists but it’s honestly great for any age beginner. For every scale, it gives the musical notation for the basic scale and arpeggio as well as a different rhythm you can try with each scale. It includes a fingering chart so you know where to put your fingers.

A bonus—every scale also has a song you can play with it. The songs can actually be pretty tricky, but they are pretty songs and provide a great challenge for those who advance quickly.


Scales in First Position for Violin

Level: Beginner

This is a classic scale book that goes through scales up to 3 sharps and 3 flats. I love that it also includes relative minor scales as well (a rarity for beginner scale books). There are two pages worth of slurring exercises and bow division exercises for each scale. The minor scales have some slightly more complicated rhythms (6/8, triplets, and dotted eighth notes) than the major scales. The exercises are the same for every major scale and the trickier exercises are the same for every minor scale. So you will definitely know the bowing patterns and rhythms. Each scale also has arpeggios with it.


First Position Scales Studies for Violin

Level: Advanced Beginner

If you have a little bit of music reading experience, this is a great book with something different on every page to keep scales interesting. The book starts off with a one octave G major scale and by the end cycles through all of the main, major key signatures for the violin. There are a couple pages for each key signature and each page focuses on a unique rhythm or skill to incorporate while playing the scale. My only complaint is that there are no arpeggios. Otherwise I love this book.


Essential Scales and Studies for Violin

Level: Advanced Beginner—Intermediate

This book encompasses two and three octave major scales as well as three octave minor scales and chromatic scales. Each key signature has it’s own page and starts out with long bows on each note followed by shorter and shorter durations. The page always ends with arpeggios and scales in broken thirds. The key signatures progress in a natural order making the first couple pages manageable for advanced beginners. Scales using third position is quickly introduced followed by higher positions. The three octave scales offer even more bowing and rhythmic variations and the minor sections include natural, melodic, and harmonic minor scales. This book has it all for the advancing violinists!


Hrimaly Scale Studies

Level: Intermediate—Advanced

Hrimaly starts off with various scales in different bowing patterns and slurs. Scales quickly get more challenging with a different scale and arpeggio for each line, allowing students to get used to changing key signatures and finger patterns rapidly. There are scales starting in every position up to 7th position and scales that transverse the positions for a wide variety of shifting practice. By the end of this book, students are definitely ready for the grandfather of all scale books: Flesch.


Carl Flesch Scale System

Level: Advanced—Professional

The Flesch scale system is perhaps the king of all scale books, used by advanced violin students and professional. My copy is well-used and worn. The scales go through the same pattern of exercises for each key signature. One string exercises on the first page followed by the actual three-octave scale. Then comes a long line of arpeggios. There’s also scales in octaves, thirds, and sixths as well chromatic scales and scales in broken thirds. Yep, you’ll have fun with this one for a long time!


Best Fiddle Books for Beginner to Intermediate Violinists

Best Fiddle Books.jpg

Do you want to learn to fiddle? If you are just beginning, do you wonder if it is hard to learn to fiddle? You don’t have to wait until you have been playing for months or years to start learning the fiddle. Whether you are just starting out or have been playing for some time, here are my top fiddle books for beginner and intermediate violinists.

Check out my favorite hymn books, scale books, free fiddle sheet music, and free fiddling warm-ups!

Learn to Play Irish Fiddle by Philip John Berthoud

Level: Very New Beginner—Intermediate Player

This fiddle book is great whether you are just starting or have been playing a while. In fact, you could use it as your first method book to teach you how to get started. The first section starts off with the basics of violin: tuning, where to put your fingers, bowing, and some simple fingering exercises. After some prep work, Section 2 kicks off with your first tune. A simple song using only open strings and first finger on D and A strings. There are several one-finger polkas and jigs which progress to two-finger songs and then finally three-finger songs.

What I love most about this book is that the easy one-finger songs you learn actually sound cool! With most method books, your first few songs sound like a simple children’s tune. But these jigs sound like jigs! You could stay on each song for several days or weeks, getting it faster and faster, learning to relax and get the classic fiddle sound.

As the book progress, it adds more advanced elements like slurs, ornaments, and grace notes with each song. By the middle of the book, the songs start reaching an advanced beginner or intermediate level. Learn to Play Irish Fiddle could be your go-to fiddle book to last a while!

Fiddlers Philharmonic By Andrew H. Dabczynski and Bob Philip

Level: Beginner—Intermediate Player

This is another fiddle book you could start using pretty soon after you learn the basics. It is a collection of songs, not a method book, so you will need another book (or a teacher) to show you the fingerings and notes.

The songs always have a solo version of the tune and then a trio so you could play it with friends. Sometimes the trio version is more difficult for more of a challenge. There’s a wide variety of styles, from American fiddling to Irish Jigs. You can also buy the series for every stringed instrument so your cello and viola friends can play with you.


Ashokan Farewell

Level: Advanced Beginner—Intermediate Player

This has to be my favorite fiddle tune of all times. I play it often, experimenting with various ornaments and double stops. This sheet music arrangement has lots of written-in ornaments like slides and grace notes, which can make this version tricky. However, if you leave out the grace notes and just play the tune, this could be easily accessible for a beginner. Developing a pure, sweet tone over long notes and adding vibrato make this song enjoyable for any level!

Devil Went Down to Georgia

Level: Advanced Beginner—Intermediate Player

What list of fiddle books would be complete without this iconic fiddle song. I guarantee you, if you are in the Southern part of the United States and you tell someone you play the violin, they will ask you, “Can you play Devil Went Down to Georgia?” Now, you can say yes! The beginning fiddle licks are manageable for advanced beginners. Some double stops and slides make this tune exciting for intermediate players.

The French Fiddler by Edward Huws Jones

Level: Advanced Beginner—Intermediate Player

If you want something a little different, this French fiddling book is a great option. Every song has two versions, an easy version of the song and a more challenging version.

While the notes aren’t difficult, it starts off with some rhythms that might be tricky for very early beginners. There are some 16th notes, 8th notes, quarter notes, and 8th rests along with some time signature changes. But once you get the rhythms down, the songs are easy and fun to play.

Mel Bay’s Complete Irish Fiddle Player By Pete Cooper

Level: Advanced Beginner—Advanced Player

If you have already been playing violin for a while, this book would be my suggestion for you. It’s a big book with lots of songs and information on Irish fiddling. The first song is The Irish Washerwoman to give you an idea of the starting level. Cooper slowly introduces the various ornaments in fiddling by adding one more advanced element for almost every song. You’ll learn various bowing patterns, grace notes, mordents, short rolls, and more.

If you want some fun and challenging duets to play with a friends, this is a great book for you. The songs aren’t ordered by difficulty, so you might have to flip through to find the easier ones. The rhythms can be tricky, but if you’re working through Learn to Play Irish Fiddle or the Complete Irish Fiddle Player, it shouldn’t be a problem.


The only thing that is more fun than playing fiddle, is playing fiddle with someone else!

Happy Fiddling!

How to Have the Best Online Violin Lesson

You can ensure that you get the most out of your online violin lesson by preparing just a little bit beforehand. After teaching online lessons for several years, I’ve discovered four areas that slow down lesson progress. Internet problems, software problems, camera set-up, and violin set-up. With today’s busy schedules sometimes just remembering you scheduled a lesson can be a challenge. I understand! I’ve got some tips to make sure you never forget a lesson.Here’s my checklist to make sure you’re violin lessons are good to go!

Remembering the Lesson

Since lessons can’t be canceled or changed within 24 hours of the lesson, it’s important to make sure your schedule hasn’t changed since you booked the lesson.

  • Lessonface will send you a reminder on your email 25 hours before every lesson. Make sure that you are receiving the Lessonface emails and that they aren’t going to your junk mail.

  • Set an alarm as soon as you book your lesson. This is especially helpful if you are booking lessons for a few weeks in the future or if you are rescheduling lessons from your normal time.

Internet Connections

First, check your internet speed. At the very least, you want 1 Mbps up and down. Of course, more is better. If you aren’t happy with your speeds, try these suggestions.

  • Use an ethernet cable. I know this might be a pain to set up but it really gives my speeds a boost!

  • Discourage other family members from streaming or downloading things during your lesson.

  • Turn off wifi on every other device except the one you are using for your lesson (if you are using wifi).

  • If using a hotspot, check out this video.

Software Set-Up

If you are just starting violin lessons, you will need to get your Zoom account set-up ahead of time. There's no additional fee for the software, and you do not need a separate Zoom account. It's all built into the Lessonface system. You can test your set up by registering for a free account, then, in your Lessonface dashboard, going to the right hand menu accessible by clicking your circular profile image and choosing "VIDEO TEST ROOM."

If you are accessing your lessons using a tablet, simply download the Zoom app.

If a box appears asking you to ‘Connect with audio and video’ or anything similar, give your consent.

Try to schedule your first class during Lessonface office hours (are these Monday - Friday 9am-5pm ET??)  If you run into problems and can’t communicate with your teacher, you’ll have these options: (1) Use the blue ‘Help’ at the bottom of any page on the Lessonface site during their live chat hours. (2) Call Lessonface toll-free within the US at 800-211-7058 or directly at 718-577-2100.  (3) Email jess@lessonface.com

Audio Settings

Zoom is not particularly fond of our violins’ E strings. It often likes to mute them as well as other sounds. For the best lesson experience, please follow the instructions on this page for your operating system.

Lessonface Zoom Audio Settings

Video Set-Up

Under the video settings in the Zoom settings menu, follow these steps.

1. Check “Mirror my video”

2. Uncheck “Turn off my video when joining a meeting”

Camera Set-Up

Your camera on your tablet or computer will work fine. Finding the right angle so that you can see me and your music and I can see you while you’re playing is a little trickier. In order for me to be able to give you the most advice, it’s best if I can see your entire violin. Try to position the camera so that your video looks like this. 

Straight bow.jpg


In your Lessonface dashboard, go to the right hand menu accessible by clicking your circular profile image and choose "VIDEO TEST ROOM." This will allow you to check out your image without joining a lesson.

I position my music stand so it’s to the left of my scroll. Sitting is fine, but make sure you have a chair without arms so they won’t interfere with your bow. Ensure the table or desk where your computer is won’t interfere with you bow either. 

Violin Set-up

What’s great about online violin lessons is that you can have your violin tuned and your bow hair tightened before the lesson. If you are new, we’ll go over tuning in the lesson, but you can get a head start by watching an introductory tuning video.

Have all your books ready to go and have your bow tightened and rosined. If you are new, don’t worry about this, we’ll go over everything!

Here’s a few other miscellaneous tips to give you an even better lesson.

1. If you can, warm-up before starting your lesson.

2. Join the lesson early to make sure everything is working properly. Computers generally like to restart/install updates exactly one minute before a lesson starts, so make sure you don’t have any surprises right before your lesson! Sometimes I am able to join the lesson 2 or 3 minutes before it starts so we can have more time in the lesson. Keep in mind, if you join before I do, a dialogue box will appear that says: "The Host Has Another Meeting in Progress.” Don’t worry, everything is working fine. Stay on the call and as soon as I join we will be connected. (This is a good time to make sure your audio settings are set like the ones above!)

3. Review the lesson notes during the week. 

Remember, the more you put into lessons, the more you get out of them. Practice regularly and have a great online violin lesson!

Happy Practicing!

The Importance of Tetrachords on the Violin

Tetrachords.jpg

Tetrachords: a fancy name for a four note scale. These simple little scales can do wonders for your violin technique. They are great warm-ups and if you find yourself strapped for time, I would skip the scales and focus on tetrachords. Tetrachords are particularly useful on the violin because you can use each left hand finger (1-4) to play a tetrachord without changing strings. Tetrachords aren’t terribly difficult, but they offer a great way to incorporate all the basic elements of violin technique. And you change them up for endless possibilities, different finger patterns, different bowings, but we’ll get to all that in a bit.

Why are tetrachords so important for the violin?

Tetrachords can greatly improve your intonation and finger dexterity. I once asked a veteran violin teacher what the best exercise for intonation was and she quickly responded, “TETRACHORDS!”

When playing a tetrachord I start on the open string and then place 1st finger, 2nd finger, 3rd finger, and 4th finger respectively. Then go back down, 4-3-2-1. This is actually framing your basic hand position for the violin. Everything you play on the violin generally happens in the confines of the tetrachord framework from 1st finger to 4th finger. Sure, occasionally you will have a “low 1st finger” or a “high 4th finger.” Both of those involve stretches outside of this basic tetrachord hand shape, but most of the time your hand stays in this standard distance from 1st finger to 4th finger (the interval of a perfect fourth).

Practicing tetrachords solidifies muscle memory and the more you practice them, the quicker your fingers will be able to move, which means better intonation!

How to Practice Tetrachords

Repetition. That’s the key to tetrachord practice. It’s the repletion that reinforces muscle memory and ear training—two of the most important components of playing in tune. While it’s great to play tetrachords and tetrachord exercises over and over again, don’t give in to mindless repetition. Here are the things you want to keep in mind as you are playing these exercises.

If you want the best warm-up exercises for better intonation, my course, Everyday Exercises will show teach you some great exercises based on tetrachords that will transform your left hand and help you get the intonation you’ve always wanted! The course is part of my Online Studio Membership. Learn more here.

What to Think About When Doing Tetrachords

Don’t try to think about all of these things at once when playing tetrachords. The beauty of tetrachord exercises is that they are short, so each time you repeat the tetrachord, you can either think of something different to work on, or you can focus on one aspect of your technique.

  1. Train your ear. Don’t just play through the notes. Listen carefully to each pitch. Try to determine if you placed your finger too high, too low, or just right. When you repeat the exercises, try to fix the problem you had in the pervious go.

  2. Straight wrist. Repetition gives you a chance to ensure your left hand wrist is straight. If your wrist is straight, you will be able to play quickly with great dexterity. If your wrist is flat like a pancake, forget about it and just accept that everything you play will be slow, sloppy, and probably painful.

  3. KFD: (Keep Fingers Down) As much as you can on the violin, you want to keep fingers down until you absolutely have to move them. When you put down 1st finger, keep it down and add 2nd finger, keep 1st finger and 2nd finger down as you add 3rd finger, etc. Then when you get to 4th finger and are about to go back down, all you have to worry about is peeling off each finger—the correct note is already there! Lifting up fingers creates unnecessary movements which will slow you down.

  4. Play on the tips of your fingers—for better clarity and dexterity.

  5. When you do lift fingers, don’t flick them up. Just lift them far enough so they aren’t touching the string. Let them hover over the string. The further they are from the fingerboard, the longer they are going to have to travel to get back to the fingerboard and more movement = slow and sloppy.

  6. Use light finger pressure. You really don’t have to press very hard to get a clean sound. Practice pressing down with only the bare amount of pressure. I can’t tell you how important this concept is. If you are playing with a death grip, your fingers will once again, never be able to move quickly. Tense fingers = slow and sloppy. Practice being relaxed as possible with your left hand and your left thumb, you’ll be happy you did once you start learning vibrato!

  7. Prepare for 4th finger. Before you even put 4th finger down, start stretching for it or adjust your thumb so your thumb is more across from the 4th finger. Make sure you aren’t tucking your 4th finger underneath the neck when you aren’t using it, this will slow you down.

Tetrachord Exercises

Here are my favorite tetrachord exercises. The first one is a basic tetrachord exercise. While everything is on the D string, you can practice these exercises on all strings using the same fingerings. Always use 4th finger for the top note instead of an open string. Repeat each grouping until it sounds clean and crisp.

Basic_Tetrachords-1.png

You can also practice tetrachord “arpeggios.” Now you are practicing skipping notes going from an open string to 2nd finger to 4th finger then back down. If you want an extra challenge, you can also practice this exercise with a “low” 2nd finger.

Tetrachord__Arpeggios_-1.jpg

Adding in bowings and rhythms allows you to perfect your bowing technique with an easy finger pattern. Like all tetrachord exercises, practice these in all parts of the bow: upper half, middle, and lower half.

Download the Basic Tetrachord exercise, Tetrachord “Arpeggios", or Tetrachords with Advanced Bowings and Rhythms.

Tetrachords_with_Advanced_Bowings_and_Rhythms-1.jpg

Now you’e ready for an advanced tetrachord exercise. It starts off with the traditional finger pattern where 2nd and 3rd fingers are half steps apart. Each line is a different string but the finger patterns are the same for every string. Notice the repeat signs? Repeat every two measures several times until you are comfortable and then move on to the next two measures.

Download the advanced tetrachord exercise here.

Tetrachords-1.png


Once you have the advanced tetrachord exercise under control, move on to different finger patterns. Next do “minor” tetrachords with a “low” 2 where the 1st and 2nd fingers are half steps apart. (If all those low 2s and high 2s are confusing you, you aren’t alone. It’s a quick way to describe a crucial music theory concept. If you want to know the real reason why we have “lows” and “highs,” read about the basics of key signatures and scales).

Download the Minor Tetrachord exercises here.

Tetrachords+Minor-1.jpg


As you progress in your technique, you’re going to start playing in different key signatures—that’s going to mean a lot of going back and forth between “low” 2s and “high” 2s. Generally, everyone tries to split the difference and play “narps,” something that is not quite a natural and not quite a sharp. So make sure when your 2s are high, they are right next to 3rd finger and when they are low they are right next to 1st finger. Use this tetrachord exercises to help you switch back and forth between high 2 and low 2 quickly. It’s the same exercise as before, now you are just combining the basic tetrachord exercise with the minor tetrachord exercise.

Download the low 2 vs. high 2 tetrachord exercise here.

Tetrachords Sharp Vs. Natural-1.png

Once you’re ready for more of a challenge, start adding in rhythms, slurs, and bowing variations. There’s really no limit to what you can learn from tetrachords!

Happy Practicing!

Step by Step Guide to Starting Violin Lessons

Step by step.jpg

Starting a new instrument can sometimes be a challenging endeavor. There’s the struggle of finding an affordable, good quality instrument. Then purchasing the accessories you might not have known you needed. Finding a teacher that suits you and then finding a time that works for both of you. And we haven’t even played a note yet! I’m here to help you streamline this process for violin lessons into step by step guide to getting started so you can focus on making beautiful music!

1. Find a Violin Teacher

This might not seem like the logical first step, but finding a good teacher from the start can help the rest of the process go smoothly. I don’t know any violin teacher who wouldn’t be eager to help a student get started. Feel free to reach out an ask questions.

2. Purchase or Rent a Violin

sebastian.jpg

This is the fun part! First you want to know what size violin you will need. I’ve got a handy sizing chart to make measuring easy. Next, decide if you want to purchase or rent. If you decide on purchasing a violin, learn how much to budget for a violin and the pros and cons of used versus new violins. Then check out my top picks for beginner violins. Most beginner violins come as an outfit including a violin, bow, and case, so you will need to purchase just a few other accessories.

3. Accessories

Once you have the violin on the way, the next step will be to purchase the goodies you will need to go with it. There are a lot of gadgets out there that supposedly make learning violin easier. Don’t bother with the majority of them. Only two accessories are necessary. A shoulder rest and rosin. Here are my top picks for shoulder rests. For rosin, I recommend Hidersine.

If you don’t have a music stand, it will make your life so much easier when it comes to posture. And lastly, it’s not necessary, but if you want a little extra help to show you where to place your left hand fingers, purchase a First Frets Decal, just make sure it matches the size of your violin.

You’ll want to purchase the music books your violin teacher recommends. Here are a list of books I use.

4. Tune Your Violin

When your violin arrives, you will find it’s pretty bad out of tune. No worries! Your teacher will be happy to help. I’ve also made a video to make tuning a breeze. Make sure you’re keeping your new violin safe and clean as well!

5. Learn to Play!

Now that your violin is in tune, you are almost ready to make music! Learn how to adjust your shoulder rest to play comfortably. Get your bow hold ready to go, and start playing! I’ve got lots of free sheet music for beginners and make sure to check out my lessons on music theory and technique tips!

Happy Practicing!


What Size Violin Should I Buy?

Short Answer: If you are an adult, purchase a full size or 4/4 size violin. (4/4 and full size are both the terms for a standard size violin).

If you are purchasing a violin for a child or if you have very small hands and arms, keep reading to determining the correct size violin for you.

Purchasing your first violin can be challenging. Determining the right size violin to buy is extremely important to ease of playing. If your violin is too small, it might be impossible to NOT play over the fingerboard, which means you are going to hit other strings no matter how hard you concentrate. Violins that are too large for a player make the left hand stretch beyond what is comfortable.

Violins come in a variety of sizes measured in fractions, ranging from a full size 4/4 violin all the way down to a tiny 1/16 violin. There’s also a 1/32 size, if your child’s arm length is below 14 inches. In my opinion, 1/32 size is a few steps away from a toy. If your child needs that size, my advice would be to save your money, buy your child some piano lessons, and then purchase a 1/16 in a few months. Your child will get much more benefit out of the piano lessons since they will show up to violin lessons already having a basic understanding of music and we can focus on learning the violin.

If you are an adult with average arm length and hand size, you will probably want a full size, 4/4 violin. However, if you are an adult with smaller than average hands and arms, or a younger child, you will definitely want to measure yourself to find the right size violin. There is a size in between 3/4 and 4/4. It’s called 7/8 and it’s somewhat rare. I have pretty small hands and I’ve always wanted to try a 7/8. I recently purchased one from Gliga violins. It’s a great size for teenagers who are still growing or adults with smaller hands and fingers.

Use this chart to determine the correct violin size for you. Measure from the neck all the way out to the middle of the left hand palm.

Screen+Shot+2020-03-25+at+2.45.54+PM.jpg

Irish Washerwoman Free Violin Sheet Music

Irish Washerwoman is a relatively easy fiddle tune that is well known around the world. I play through it almost daily, getting it faster and faster, adding ornaments, slides, and turns for a greater challenge. Enjoy this free sheet music for the classic Irish fiddle tune, Irish Washerwoman.

Download the sheet music for Irish Washerwoman here.

Irish_Washerwoman+-1.jpg

Fiddling Warm-Up

Whether you are playing jigs, reels, hornpipes, Celtic, or American fiddling, folk music has certain bowing patterns, accents, and rhythms that are similar across genres and styles. Use this fiddling warm-up to get used to the various bowing styles and left hand ornaments that you will be playing.

Each exercise is separated from the next by a double bar. Stay with each exercise until you are comfortable with it. Play it on all the strings or with your scales. Learn to relax your shoulders, your wrists, and your fingers.

Download the Fiddling Warm-Up free sheet music here.

Fiddling_Warm-Up-1.jpg