Best Violin Scale Books

Best Violin Scales Books.jpg

I suppose if you are reading this, you don’t need me to tell you how wonderful scales are. Scales are like vitamins: just a little every day can do wonders for the health of your violin technique. I’ve ranked all the scale books starting from beginner and working up to advanced levels. Each violin scale book in this list builds on the other, adding more complicated rhythms, higher octaves, double stops and more. Read on to see my top violin scale books.

Also check out my top picks for beginner violin books, hymn books, and fiddle books!

Scaley Monsters

Level: Young Beginner

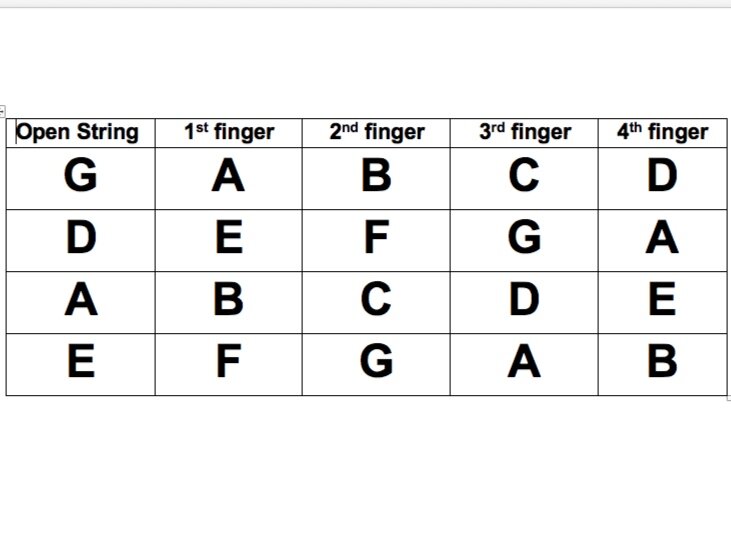
This book is geared towards young violinists but it’s honestly great for any age beginner. For every scale, it gives the musical notation for the basic scale and arpeggio as well as a different rhythm you can try with each scale. It includes a fingering chart so you know where to put your fingers.

A bonus—every scale also has a song you can play with it. The songs can actually be pretty tricky, but they are pretty songs and provide a great challenge for those who advance quickly.


Scales in First Position for Violin

Level: Beginner

This is a classic scale book that goes through scales up to 3 sharps and 3 flats. I love that it also includes relative minor scales as well (a rarity for beginner scale books). There are two pages worth of slurring exercises and bow division exercises for each scale. The minor scales have some slightly more complicated rhythms (6/8, triplets, and dotted eighth notes) than the major scales. The exercises are the same for every major scale and the trickier exercises are the same for every minor scale. So you will definitely know the bowing patterns and rhythms. Each scale also has arpeggios with it.


First Position Scales Studies for Violin

Level: Advanced Beginner

If you have a little bit of music reading experience, this is a great book with something different on every page to keep scales interesting. The book starts off with a one octave G major scale and by the end cycles through all of the main, major key signatures for the violin. There are a couple pages for each key signature and each page focuses on a unique rhythm or skill to incorporate while playing the scale. My only complaint is that there are no arpeggios. Otherwise I love this book.


Essential Scales and Studies for Violin

Level: Advanced Beginner—Intermediate

This book encompasses two and three octave major scales as well as three octave minor scales and chromatic scales. Each key signature has it’s own page and starts out with long bows on each note followed by shorter and shorter durations. The page always ends with arpeggios and scales in broken thirds. The key signatures progress in a natural order making the first couple pages manageable for advanced beginners. Scales using third position is quickly introduced followed by higher positions. The three octave scales offer even more bowing and rhythmic variations and the minor sections include natural, melodic, and harmonic minor scales. This book has it all for the advancing violinists!


Hrimaly Scale Studies

Level: Intermediate—Advanced

Hrimaly starts off with various scales in different bowing patterns and slurs. Scales quickly get more challenging with a different scale and arpeggio for each line, allowing students to get used to changing key signatures and finger patterns rapidly. There are scales starting in every position up to 7th position and scales that transverse the positions for a wide variety of shifting practice. By the end of this book, students are definitely ready for the grandfather of all scale books: Flesch.


Carl Flesch Scale System

Level: Advanced—Professional

The Flesch scale system is perhaps the king of all scale books, used by advanced violin students and professional. My copy is well-used and worn. The scales go through the same pattern of exercises for each key signature. One string exercises on the first page followed by the actual three-octave scale. Then comes a long line of arpeggios. There’s also scales in octaves, thirds, and sixths as well chromatic scales and scales in broken thirds. Yep, you’ll have fun with this one for a long time!


Best Fiddle Books for Beginner to Intermediate Violinists

Best Fiddle Books.jpg

Do you want to learn to fiddle? If you are just beginning, do you wonder if it is hard to learn to fiddle? You don’t have to wait until you have been playing for months or years to start learning the fiddle. Whether you are just starting out or have been playing for some time, here are my top fiddle books for beginner and intermediate violinists.

Check out my favorite hymn books, scale books, free fiddle sheet music, and free fiddling warm-ups!

Learn to Play Irish Fiddle by Philip John Berthoud

Level: Very New Beginner—Intermediate Player

This fiddle book is great whether you are just starting or have been playing a while. In fact, you could use it as your first method book to teach you how to get started. The first section starts off with the basics of violin: tuning, where to put your fingers, bowing, and some simple fingering exercises. After some prep work, Section 2 kicks off with your first tune. A simple song using only open strings and first finger on D and A strings. There are several one-finger polkas and jigs which progress to two-finger songs and then finally three-finger songs.

What I love most about this book is that the easy one-finger songs you learn actually sound cool! With most method books, your first few songs sound like a simple children’s tune. But these jigs sound like jigs! You could stay on each song for several days or weeks, getting it faster and faster, learning to relax and get the classic fiddle sound.

As the book progress, it adds more advanced elements like slurs, ornaments, and grace notes with each song. By the middle of the book, the songs start reaching an advanced beginner or intermediate level. Learn to Play Irish Fiddle could be your go-to fiddle book to last a while!

Fiddlers Philharmonic By Andrew H. Dabczynski and Bob Philip

Level: Beginner—Intermediate Player

This is another fiddle book you could start using pretty soon after you learn the basics. It is a collection of songs, not a method book, so you will need another book (or a teacher) to show you the fingerings and notes.

The songs always have a solo version of the tune and then a trio so you could play it with friends. Sometimes the trio version is more difficult for more of a challenge. There’s a wide variety of styles, from American fiddling to Irish Jigs. You can also buy the series for every stringed instrument so your cello and viola friends can play with you.


Ashokan Farewell

Level: Advanced Beginner—Intermediate Player

This has to be my favorite fiddle tune of all times. I play it often, experimenting with various ornaments and double stops. This sheet music arrangement has lots of written-in ornaments like slides and grace notes, which can make this version tricky. However, if you leave out the grace notes and just play the tune, this could be easily accessible for a beginner. Developing a pure, sweet tone over long notes and adding vibrato make this song enjoyable for any level!

Devil Went Down to Georgia

Level: Advanced Beginner—Intermediate Player

What list of fiddle books would be complete without this iconic fiddle song. I guarantee you, if you are in the Southern part of the United States and you tell someone you play the violin, they will ask you, “Can you play Devil Went Down to Georgia?” Now, you can say yes! The beginning fiddle licks are manageable for advanced beginners. Some double stops and slides make this tune exciting for intermediate players.

The French Fiddler by Edward Huws Jones

Level: Advanced Beginner—Intermediate Player

If you want something a little different, this French fiddling book is a great option. Every song has two versions, an easy version of the song and a more challenging version.

While the notes aren’t difficult, it starts off with some rhythms that might be tricky for very early beginners. There are some 16th notes, 8th notes, quarter notes, and 8th rests along with some time signature changes. But once you get the rhythms down, the songs are easy and fun to play.

Mel Bay’s Complete Irish Fiddle Player By Pete Cooper

Level: Advanced Beginner—Advanced Player

If you have already been playing violin for a while, this book would be my suggestion for you. It’s a big book with lots of songs and information on Irish fiddling. The first song is The Irish Washerwoman to give you an idea of the starting level. Cooper slowly introduces the various ornaments in fiddling by adding one more advanced element for almost every song. You’ll learn various bowing patterns, grace notes, mordents, short rolls, and more.

If you want some fun and challenging duets to play with a friends, this is a great book for you. The songs aren’t ordered by difficulty, so you might have to flip through to find the easier ones. The rhythms can be tricky, but if you’re working through Learn to Play Irish Fiddle or the Complete Irish Fiddle Player, it shouldn’t be a problem.


The only thing that is more fun than playing fiddle, is playing fiddle with someone else!

Happy Fiddling!

How to Have the Best Online Violin Lesson

You can ensure that you get the most out of your online violin lesson by preparing just a little bit beforehand. After teaching online lessons for several years, I’ve discovered four areas that slow down lesson progress. Internet problems, software problems, camera set-up, and violin set-up. With today’s busy schedules sometimes just remembering you scheduled a lesson can be a challenge. I understand! I’ve got some tips to make sure you never forget a lesson.Here’s my checklist to make sure you’re violin lessons are good to go!

Remembering the Lesson

Since lessons can’t be canceled or changed within 24 hours of the lesson, it’s important to make sure your schedule hasn’t changed since you booked the lesson.

  • Lessonface will send you a reminder on your email 25 hours before every lesson. Make sure that you are receiving the Lessonface emails and that they aren’t going to your junk mail.

  • Set an alarm as soon as you book your lesson. This is especially helpful if you are booking lessons for a few weeks in the future or if you are rescheduling lessons from your normal time.

Internet Connections

First, check your internet speed. At the very least, you want 1 Mbps up and down. Of course, more is better. If you aren’t happy with your speeds, try these suggestions.

  • Use an ethernet cable. I know this might be a pain to set up but it really gives my speeds a boost!

  • Discourage other family members from streaming or downloading things during your lesson.

  • Turn off wifi on every other device except the one you are using for your lesson (if you are using wifi).

  • If using a hotspot, check out this video.

Software Set-Up

If you are just starting violin lessons, you will need to get your Zoom account set-up ahead of time. There's no additional fee for the software, and you do not need a separate Zoom account. It's all built into the Lessonface system. You can test your set up by registering for a free account, then, in your Lessonface dashboard, going to the right hand menu accessible by clicking your circular profile image and choosing "VIDEO TEST ROOM."

If you are accessing your lessons using a tablet, simply download the Zoom app.

If a box appears asking you to ‘Connect with audio and video’ or anything similar, give your consent.

Try to schedule your first class during Lessonface office hours (are these Monday - Friday 9am-5pm ET??)  If you run into problems and can’t communicate with your teacher, you’ll have these options: (1) Use the blue ‘Help’ at the bottom of any page on the Lessonface site during their live chat hours. (2) Call Lessonface toll-free within the US at 800-211-7058 or directly at 718-577-2100.  (3) Email jess@lessonface.com

Audio Settings

Zoom is not particularly fond of our violins’ E strings. It often likes to mute them as well as other sounds. For the best lesson experience, please follow the instructions on this page for your operating system.

Lessonface Zoom Audio Settings

Video Set-Up

Under the video settings in the Zoom settings menu, follow these steps.

1. Check “Mirror my video”

2. Uncheck “Turn off my video when joining a meeting”

Camera Set-Up

Your camera on your tablet or computer will work fine. Finding the right angle so that you can see me and your music and I can see you while you’re playing is a little trickier. In order for me to be able to give you the most advice, it’s best if I can see your entire violin. Try to position the camera so that your video looks like this. 

Straight bow.jpg


In your Lessonface dashboard, go to the right hand menu accessible by clicking your circular profile image and choose "VIDEO TEST ROOM." This will allow you to check out your image without joining a lesson.

I position my music stand so it’s to the left of my scroll. Sitting is fine, but make sure you have a chair without arms so they won’t interfere with your bow. Ensure the table or desk where your computer is won’t interfere with you bow either. 

Violin Set-up

What’s great about online violin lessons is that you can have your violin tuned and your bow hair tightened before the lesson. If you are new, we’ll go over tuning in the lesson, but you can get a head start by watching an introductory tuning video.

Have all your books ready to go and have your bow tightened and rosined. If you are new, don’t worry about this, we’ll go over everything!

Here’s a few other miscellaneous tips to give you an even better lesson.

1. If you can, warm-up before starting your lesson.

2. Join the lesson early to make sure everything is working properly. Computers generally like to restart/install updates exactly one minute before a lesson starts, so make sure you don’t have any surprises right before your lesson! Sometimes I am able to join the lesson 2 or 3 minutes before it starts so we can have more time in the lesson. Keep in mind, if you join before I do, a dialogue box will appear that says: "The Host Has Another Meeting in Progress.” Don’t worry, everything is working fine. Stay on the call and as soon as I join we will be connected. (This is a good time to make sure your audio settings are set like the ones above!)

3. Review the lesson notes during the week. 

Remember, the more you put into lessons, the more you get out of them. Practice regularly and have a great online violin lesson!

Happy Practicing!

The Importance of Tetrachords on the Violin

Tetrachords.jpg

Tetrachords: a fancy name for a four note scale. These simple little scales can do wonders for your violin technique. They are great warm-ups and if you find yourself strapped for time, I would skip the scales and focus on tetrachords. Tetrachords are particularly useful on the violin because you can use each left hand finger (1-4) to play a tetrachord without changing strings. Tetrachords aren’t terribly difficult, but they offer a great way to incorporate all the basic elements of violin technique. And you change them up for endless possibilities, different finger patterns, different bowings, but we’ll get to all that in a bit.

Why are tetrachords so important for the violin?

Tetrachords can greatly improve your intonation and finger dexterity. I once asked a veteran violin teacher what the best exercise for intonation was and she quickly responded, “TETRACHORDS!”

When playing a tetrachord I start on the open string and then place 1st finger, 2nd finger, 3rd finger, and 4th finger respectively. Then go back down, 4-3-2-1. This is actually framing your basic hand position for the violin. Everything you play on the violin generally happens in the confines of the tetrachord framework from 1st finger to 4th finger. Sure, occasionally you will have a “low 1st finger” or a “high 4th finger.” Both of those involve stretches outside of this basic tetrachord hand shape, but most of the time your hand stays in this standard distance from 1st finger to 4th finger (the interval of a perfect fourth).

Practicing tetrachords solidifies muscle memory and the more you practice them, the quicker your fingers will be able to move, which means better intonation!

How to Practice Tetrachords

Repetition. That’s the key to tetrachord practice. It’s the repletion that reinforces muscle memory and ear training—two of the most important components of playing in tune. While it’s great to play tetrachords and tetrachord exercises over and over again, don’t give in to mindless repetition. Here are the things you want to keep in mind as you are playing these exercises.

If you want the best warm-up exercises for better intonation, my course, Everyday Exercises will show teach you some great exercises based on tetrachords that will transform your left hand and help you get the intonation you’ve always wanted! The course is part of my Online Studio Membership. Learn more here.

What to Think About When Doing Tetrachords

Don’t try to think about all of these things at once when playing tetrachords. The beauty of tetrachord exercises is that they are short, so each time you repeat the tetrachord, you can either think of something different to work on, or you can focus on one aspect of your technique.

  1. Train your ear. Don’t just play through the notes. Listen carefully to each pitch. Try to determine if you placed your finger too high, too low, or just right. When you repeat the exercises, try to fix the problem you had in the pervious go.

  2. Straight wrist. Repetition gives you a chance to ensure your left hand wrist is straight. If your wrist is straight, you will be able to play quickly with great dexterity. If your wrist is flat like a pancake, forget about it and just accept that everything you play will be slow, sloppy, and probably painful.

  3. KFD: (Keep Fingers Down) As much as you can on the violin, you want to keep fingers down until you absolutely have to move them. When you put down 1st finger, keep it down and add 2nd finger, keep 1st finger and 2nd finger down as you add 3rd finger, etc. Then when you get to 4th finger and are about to go back down, all you have to worry about is peeling off each finger—the correct note is already there! Lifting up fingers creates unnecessary movements which will slow you down.

  4. Play on the tips of your fingers—for better clarity and dexterity.

  5. When you do lift fingers, don’t flick them up. Just lift them far enough so they aren’t touching the string. Let them hover over the string. The further they are from the fingerboard, the longer they are going to have to travel to get back to the fingerboard and more movement = slow and sloppy.

  6. Use light finger pressure. You really don’t have to press very hard to get a clean sound. Practice pressing down with only the bare amount of pressure. I can’t tell you how important this concept is. If you are playing with a death grip, your fingers will once again, never be able to move quickly. Tense fingers = slow and sloppy. Practice being relaxed as possible with your left hand and your left thumb, you’ll be happy you did once you start learning vibrato!

  7. Prepare for 4th finger. Before you even put 4th finger down, start stretching for it or adjust your thumb so your thumb is more across from the 4th finger. Make sure you aren’t tucking your 4th finger underneath the neck when you aren’t using it, this will slow you down.

Tetrachord Exercises

Here are my favorite tetrachord exercises. The first one is a basic tetrachord exercise. While everything is on the D string, you can practice these exercises on all strings using the same fingerings. Always use 4th finger for the top note instead of an open string. Repeat each grouping until it sounds clean and crisp.

Basic_Tetrachords-1.png

You can also practice tetrachord “arpeggios.” Now you are practicing skipping notes going from an open string to 2nd finger to 4th finger then back down. If you want an extra challenge, you can also practice this exercise with a “low” 2nd finger.

Tetrachord__Arpeggios_-1.jpg

Adding in bowings and rhythms allows you to perfect your bowing technique with an easy finger pattern. Like all tetrachord exercises, practice these in all parts of the bow: upper half, middle, and lower half.

Download the Basic Tetrachord exercise, Tetrachord “Arpeggios", or Tetrachords with Advanced Bowings and Rhythms.

Tetrachords_with_Advanced_Bowings_and_Rhythms-1.jpg

Now you’e ready for an advanced tetrachord exercise. It starts off with the traditional finger pattern where 2nd and 3rd fingers are half steps apart. Each line is a different string but the finger patterns are the same for every string. Notice the repeat signs? Repeat every two measures several times until you are comfortable and then move on to the next two measures.

Download the advanced tetrachord exercise here.

Tetrachords-1.png


Once you have the advanced tetrachord exercise under control, move on to different finger patterns. Next do “minor” tetrachords with a “low” 2 where the 1st and 2nd fingers are half steps apart. (If all those low 2s and high 2s are confusing you, you aren’t alone. It’s a quick way to describe a crucial music theory concept. If you want to know the real reason why we have “lows” and “highs,” read about the basics of key signatures and scales).

Download the Minor Tetrachord exercises here.

Tetrachords+Minor-1.jpg


As you progress in your technique, you’re going to start playing in different key signatures—that’s going to mean a lot of going back and forth between “low” 2s and “high” 2s. Generally, everyone tries to split the difference and play “narps,” something that is not quite a natural and not quite a sharp. So make sure when your 2s are high, they are right next to 3rd finger and when they are low they are right next to 1st finger. Use this tetrachord exercises to help you switch back and forth between high 2 and low 2 quickly. It’s the same exercise as before, now you are just combining the basic tetrachord exercise with the minor tetrachord exercise.

Download the low 2 vs. high 2 tetrachord exercise here.

Tetrachords Sharp Vs. Natural-1.png

Once you’re ready for more of a challenge, start adding in rhythms, slurs, and bowing variations. There’s really no limit to what you can learn from tetrachords!

Happy Practicing!

Step by Step Guide to Starting Violin Lessons

Step by step.jpg

Starting a new instrument can sometimes be a challenging endeavor. There’s the struggle of finding an affordable, good quality instrument. Then purchasing the accessories you might not have known you needed. Finding a teacher that suits you and then finding a time that works for both of you. And we haven’t even played a note yet! I’m here to help you streamline this process for violin lessons into step by step guide to getting started so you can focus on making beautiful music!

1. Find a Violin Teacher

This might not seem like the logical first step, but finding a good teacher from the start can help the rest of the process go smoothly. I don’t know any violin teacher who wouldn’t be eager to help a student get started. Feel free to reach out an ask questions.

2. Purchase or Rent a Violin

sebastian.jpg

This is the fun part! First you want to know what size violin you will need. I’ve got a handy sizing chart to make measuring easy. Next, decide if you want to purchase or rent. If you decide on purchasing a violin, learn how much to budget for a violin and the pros and cons of used versus new violins. Then check out my top picks for beginner violins. Most beginner violins come as an outfit including a violin, bow, and case, so you will need to purchase just a few other accessories.

3. Accessories

Once you have the violin on the way, the next step will be to purchase the goodies you will need to go with it. There are a lot of gadgets out there that supposedly make learning violin easier. Don’t bother with the majority of them. Only two accessories are necessary. A shoulder rest and rosin. Here are my top picks for shoulder rests. For rosin, I recommend Hidersine.

If you don’t have a music stand, it will make your life so much easier when it comes to posture. And lastly, it’s not necessary, but if you want a little extra help to show you where to place your left hand fingers, purchase a First Frets Decal, just make sure it matches the size of your violin.

You’ll want to purchase the music books your violin teacher recommends. Here are a list of books I use.

4. Tune Your Violin

When your violin arrives, you will find it’s pretty bad out of tune. No worries! Your teacher will be happy to help. I’ve also made a video to make tuning a breeze. Make sure you’re keeping your new violin safe and clean as well!

5. Learn to Play!

Now that your violin is in tune, you are almost ready to make music! Learn how to adjust your shoulder rest to play comfortably. Get your bow hold ready to go, and start playing! I’ve got lots of free sheet music for beginners and make sure to check out my lessons on music theory and technique tips!

Happy Practicing!


What Size Violin Should I Buy?

Short Answer: If you are an adult, purchase a full size or 4/4 size violin. (4/4 and full size are both the terms for a standard size violin).

If you are purchasing a violin for a child or if you have very small hands and arms, keep reading to determining the correct size violin for you.

Purchasing your first violin can be challenging. Determining the right size violin to buy is extremely important to ease of playing. If your violin is too small, it might be impossible to NOT play over the fingerboard, which means you are going to hit other strings no matter how hard you concentrate. Violins that are too large for a player make the left hand stretch beyond what is comfortable.

Violins come in a variety of sizes measured in fractions, ranging from a full size 4/4 violin all the way down to a tiny 1/16 violin. There’s also a 1/32 size, if your child’s arm length is below 14 inches. In my opinion, 1/32 size is a few steps away from a toy. If your child needs that size, my advice would be to save your money, buy your child some piano lessons, and then purchase a 1/16 in a few months. Your child will get much more benefit out of the piano lessons since they will show up to violin lessons already having a basic understanding of music and we can focus on learning the violin.

If you are an adult with average arm length and hand size, you will probably want a full size, 4/4 violin. However, if you are an adult with smaller than average hands and arms, or a younger child, you will definitely want to measure yourself to find the right size violin. There is a size in between 3/4 and 4/4. It’s called 7/8 and it’s somewhat rare. I have pretty small hands and I’ve always wanted to try a 7/8. I recently purchased one from Gliga violins. It’s a great size for teenagers who are still growing or adults with smaller hands and fingers.

Use this chart to determine the correct violin size for you. Measure from the neck all the way out to the middle of the left hand palm.

Screen+Shot+2020-03-25+at+2.45.54+PM.jpg

Irish Washerwoman Free Violin Sheet Music

Irish Washerwoman is a relatively easy fiddle tune that is well known around the world. I play through it almost daily, getting it faster and faster, adding ornaments, slides, and turns for a greater challenge. Enjoy this free sheet music for the classic Irish fiddle tune, Irish Washerwoman.

Download the sheet music for Irish Washerwoman here.

Irish_Washerwoman+-1.jpg

Fiddling Warm-Up

Whether you are playing jigs, reels, hornpipes, Celtic, or American fiddling, folk music has certain bowing patterns, accents, and rhythms that are similar across genres and styles. Use this fiddling warm-up to get used to the various bowing styles and left hand ornaments that you will be playing.

Each exercise is separated from the next by a double bar. Stay with each exercise until you are comfortable with it. Play it on all the strings or with your scales. Learn to relax your shoulders, your wrists, and your fingers.

Download the Fiddling Warm-Up free sheet music here.

Fiddling_Warm-Up-1.jpg


3 Best Shoulder Rests for Beginner Violinists: A Violin Teacher's Guide

“What violin shoulder rest is the best?”

It’s a common question I receive from my violin students. I’ve tried dozens of styles of shoulder rests myself in order to find the absolute perfect fit and I’ve gone through the same process with my students in order to help them find the best shoulder rest for them.

If you are just starting to play the violin, you might be overwhelmed by the many options for shoulder rests. There are hundreds of versions out there, all promising to deliver stability and comfort. But which violin shoulder rest is the best for you? Since every person’s body type is different, finding the perfect violin shoulder rest might involve some trial and error.

The shoulder rest that works for one person may not work for someone else, but I’ve found that there are some violin shoulder rests that work with most body types. After teaching thousands of students, I’ve found these three violin shoulder rests are the best place to start.

These violin shoulder rests are best for beginners because they don’t break the bank. You’ll find there are many very expensive violin shoulder rests out there and if you’re just starting out, you don’t want to drop several hundred on a shoulder rest until you understand your body type and what you need.

So here are the best shoulder rests I recommend to my students!

*Remember, these are a good place to start but continue to experiment to find the perfect set-up for you as you learn the violin.

(Make sure you purchase the size of shoulder rest that matches your violin).

1. Wolf Forte Secundo Shoulder Rest

This is the violin shoulder rest that I use and I love it! For years I thought that since I was short (5’4”) I had a short neck. Nope. It doesn't work that way. I’m short but I have a long neck. When I finally realized I needed a shoulder rest for medium to long necks, so many of my posture problems improved. For those of you with longer necks, this is a good option with feet that twist out farther for a better fit. The screws or height adjusters are also very thick so the shoulder rest won’t wobble if you do adjust the feet for a taller height. It’s extremely customizable. The width is adjusted with a metal bar and a screw, allowing for a very customized fit to your violin. You can even bend the metal backing plate to fit your shoulder.

This shoulder rest also works well for people with shorter necks too.

Pros:

-Great for longer necks

-Sturdy feet don’t fall off

-Sturdy when feet are extended

-Offers the most options for customization

-Tilt-able and bend-able

-Crescent shape is good for narrower shoulders

2. Everest Shoulder Rest

This violin shoulder rest is a great place to start and seems to suit most students well. The curve of the cushion hugs your shoulder very nicely making for a comfortable fit. My only complaint is that the feet do not screw out very much so if you have a long neck, this shoulder rest may not give you the support you need. Since the feet are firmly attached to the shoulder rest, it doesn’t allow you to tilt the rest. It’s not a big deal, but the rigidity makes it a little less customizable. The lack of customizable options can also make this shoulder rest a great option for beginners, because it’s less variables for you to deal with!

Personally, I love this shoulder rest and used it myself for years. It’s the shoulder rest I always recommend for brand new beginners (as long as they don’t have a really long neck).

You can also buy a collapsible version so the feet fold down to better fit in your violin case. As far as shoulder rests go, it’s pretty cheap so it’s worth a try.

Pros:

-Inexpensive

-Doesn’t fall off your violin

-Comfortable cushion

-Comes in lots of fun colors

-Better for medium to small necks

-Not very customizable which can be good for beginners (fewer variables)

Cons:

-Feet don’t screw out very far.

-Not good for long necks

-Does not tilt (limited customizing)


3. BonMusica Shoulder Rest

Many of my students love their BonMusica shoulder rest. It curves around the contour of your shoulder for a stable hold. For people with longer necks, the feet also extend quite a bit for more height. The shoulder rest is very customizable and versatile with many different options for heights and angles.

All of those options can make this shoulder rest overwhelming for beginners who just want to get somewhat comfortable and start playing! But if you don’t mind spending some time experimenting and tweaking, this violin shoulder rest can be a great option.

Pros: 

-Adjustable and customizable

-Hooks around your shoulder for improved stability.

Cons:

-Can look clunky

-Might take some time to find your perfect adjustment.

Finding the best shoulder rest can sometimes be a challenge, but all three of these shoulder rests are great places to start. 

If you’re just starting out, focus on getting a comfortable shoulder rest. But if you’ve been playing for a little while, it’s worth talking about the other part of the setup equation: the chinrest!

The chinrest is just as responsible for comfort and tension free playing as the shoulder rest. I usually recommend not going crazy trying different shoulder rests and different chinrests all at the same time while you’re first learning the basics, because that is WAY to many variables! But if you’ve got some basic fundamentals under you belt and you’re ready for the next level of comfort and customization, then check out my Ultimate Guide to Choosing the Right Chinrest!

Happy Practicing!

First Songs on the Violin (With Sheet Music and Fingerings)

Here are three easy songs that you can learn on the violin right away. These are the first songs I teach on the violin since you can play them on any string and they use only a few notes. I’ve written each song starting on the D string but you can play each song on every string using the exact same fingerings as the first line. Happy Practicing!

Hot Cross Buns Sheet Music for Violin

Hot Cross Buns Sheet Music for violin

Mary Had a Little Lamb Sheet Music for Violin

Mary_Had_A_Little_Lamb-1.jpg


Boil Them Cabbage Down Sheet Music for Violin

I love teaching this easy fiddle tune. Once you learn the basic notes, you can add different rhythms to make it sound even more “fiddle-like.” My favorite is the Run Pony Run Pony rhythm. Try adding double stops (2 strings at once—playing the open string above the string you are playing) for even more of a challenge.

Boil_Them_Cabbage_Down-For-Violin


Beginning Rhythms for the Violin (With Sheet Music)

When you first start learning to play the violin, your teacher may teach you some “rhythms” associated with little sayings to play with your bow. These beginning rhythms may also be known as the “Twinkle Rhythms” because most of them occur on the first page of Twinkle Twinkle Little Star in the Suzuki Book One.

Of course, it’s great for children but I also teach all my beginner adults these rhythm sayings too. They are great for warming up your bow and teaching your bow hand to work in certain rhythms instead of just up and down. And it’s a lot easier to say, “Play the Mississippi Hot Dog rhythm” as opposed to, “Play the four eighth note two quarter note rhythm.”

I have included the rhythms that are pretty common but I’ve also included some of my own rhythms.

The rhythms are:

Mississippi Hot Dog

Run Pony Run Pony

Elevator Operator

Chocolate Elephant Chocolate Elephant

Fluffy Penguin

Popcorn and candy and (This is what one measure of the rhythm looks like. But you would continue to repeat back to popcorn so you are continuously saying “popcorn and candy and popcorn and candy.”

Here are what the Twinkle rhythms look like in musical notation.

Beginning_Rhythms_for_Violin-1.jpg


Happy Rhythm Practicing!

Music Deal: Violin Dampit Humidifier for $5.99

Violin humidifiers like Dampits are a must if you want to keep your violin’s wood in top condition. To prevent cracking, wet the Dampit and insert it into your violin’s F-holes. The Dampit doesn’t make any noise while you play. Simply rewet it when it dries out. I use my Dampit everyday. Save $10 on this Super Sensitive Dampit.


5 Ear Training Exercises for Violin

Ear Training Exercises.jpg

How do you play in tune on the violin? How do you develop good intonation? How can you even tell if you are too sharp, too flat, or perfect? These ear training exercises for the violin will help your ear hear the slight subtleties in music and help you play better in tune!

With fretted or keyed instruments, you can get away with putting your finger down and not really listening to the quality of the note you are producing. As long as the instrument is in tune and you placed your finger on the correct key or fret, the note you are trying to play should be in tune. Not so with the violin! Since there are no keys or frets, your ear has to be in control. Muscle memory alone won’t cut it. Your ear must tell your finger if the note you just played was too high, too low, or just right. And to do that, your ear has to be the boss when you are playing violin. 

This is a hard concept for many students to learn. Students generally focus on their left hand fingers and let their fingers try to control the show. But to truly master the violin, your fingers must be lowly employees to the CEO—the ear!

For most of us, our ears aren’t natural born leaders. You have to teach your ear how to take over. Here are some exercises to help your ear listen better.

1. Pitch matching

Do this first without an instrument at all. When you hear a note from a song, try to match it. Either sing it, hum it, or whistle it. You can do this in the car while listening to music. You can also try playing a random note on a piano or on your violin and try to replicate it with your choice or vocal replication (singing, whistling, of humming). 

Now try the same concept, but with the violin. You don’t have to worry about playing the note with the “correct fingering.” Use any finger you want to achieve the correct pitch. Try to sing a random pitch and then find where it exists on the violin. One way is to simply put your finger on a string and start sliding it around until you find the pitch you are looking for. You will discover that one note can exist on several different strings. 

2. Identify if music ascends or descends

This is just a listening exercises. As you listen to music, try to determine when the music is going up and when it is going down. While this sounds easy, it might be harder than you think. 

Sing one of your favorite songs, move your hand up and down depending on whether the next note in the song goes up, goes down, or stays the same.

3. Identify skips and steps 

Another listening exercise. As you listen to music, determine if the notes are moving by step—one note after another like a scale (A B C D) or by skips (A C E). 

4. Learn what intervals sound like

Intervals are those skips between notes. We can measure the distance between notes using intervals. A to B is the interval of a second (always start counting with the bottom note). A to C is a third. C to the next highest C is an octave—8 steps. 

Each interval has a certain sound and it’s easiest to associate that interval with a song. For instance A to B is a second (a major second to be specific) and it sounds like the first two notes of Happy Birthday. C to C is an octave and sounds like Somewhere Over the Rainbow. Listen for the first two notes in the word “somewhere.” 

Use this chart to help you choose songs to be able to identify each of the intervals. As you learn them, you will be able to hear intervals in the music you listen to and the music you play.

5. Try to play simple songs on the violin without using music

This exercises is not only great for your ear, it’s lots of fun. Once you develop this skill, you won’t have to spend hours searching the internet for sheet music to your favorite song, you’ll be able to pick out the notes yourself.

You’re going to use all those other skills we just talked about. First, you’re going to have to pitch match. Sing the note that your song starts on and try to find that on the violin. Next, decide if you are going to have to go up for the next note or down? Or maybe you’ll stay on that same note? If you do move up or down, are you moving by step or by skip? If you are moving by skip, by what interval? Once you determine what the interval is, you’ll know what note comes next. 

Do these steps for every note in the song. Eventually, with enough practice, your fingers will start to know what note comes next. 

Start off with simple folk songs or hymns. These songs generally don’t skip around a lot so it’s easy to pick them out by ear. 

You are never too good for this exercise! As you progress, pick harder and harder songs to play by ear. Since you aren’t looking at music, doing this exercises leaves your ear no choice but to take over!

Practice these skills everyday, with the instrument or without it. The more you exercise your ear, the better it will be able to hear small details and variations in pitch. You’ll know if you’re playing a note too sharp or too flat. Your ear will tell you! Once you let your ear be the boss, it will turn into a little tyrant—but that’s a good thing! 

Happy Practicing!

How to Take Care of Your Violin

luthiers.jpg

Even beginner violins aren’t cheap by any means. So it’s important to learn how to take care of your violin from day one. Taking care of your violin ensures that you are getting the best possible sound your violin can offer. With a little bit of upkeep and preventative maintenance, you can catch issues before they develop into bigger problems. Follow these guidelines so your violin always sounds its best!

Read the rest of the article at Lessonface.com

Where Do You Put Your Fingers on the Violin?

man-playing-violin-3451162.jpg

Any beginning violinist can tell you what makes violin is so hard—knowing where to put your fingers! While decals like First Frets can help, you can’t put a sticker where every single note exists on the violin. You can memorize where certain notes are on the violin, and your muscle memory might get pretty adept at finding those notes, but if you don’t understand two important concepts, then you will never truly understand where to put your fingers. 

These two concepts are essentially the two reasons learning violin is so hard. However, these two concepts are often left out of violin lessons all together. Why would teachers leave out the two things that could help everything make sense? Well these two concepts take a lot of self-study to master. They also require in-depth study. You can’t understand these concepts with just a few words of advice from your teacher every week. When you only have 30 minutes to talk about songs, tone production, rhythm, note reading, posture, and so on, there’s hardly time to focus on these concepts. 

But if you don’t learn these concepts, it’s the same as just learning certain phrases in another language as opposed to really understanding how the language works. You may be able to play songs and read challenging music, but without understanding these two things, you will never truly understand the language of the violin. These two concepts are not dry by any means, but they can be hard to grasp. But I’m going to help you with that! 

Are you ready to learn the real language of the violin? Are you ready to know what two secrets could help everything make sense? Here they are: ear training and music theory.

Before I explain why these two concepts are so important, let’s take a moment and talk about where to put your fingers in first position. The violin strings are (starting from the lowest string) G, D, A, and E. Your left hand fingers are numbered 1-4. Index finger being 1st finger, middle finger is 2nd finger, ring finger is 3rd, and pinky is 4th finger. (Remember that the musical alphabet goes from A-G. After G, your next note is A but a higher A than the first A you played).

Okay, notice how there are three letters separating each string? 

G (A B C)

D (E F G)

A (B C D)

E

Those notes in parentheses are going to be your 1st, 2nd, and 3rd fingers respectively. What about 4th finger? Well it’s the same note as your open string below it.

Screen+Shot+2020-02-12+at+11.15.07+AM.jpg

When you are first learning, you will learn a finger pattern in which the 2nd and 3rd fingers are touching on every string (half steps apart) and all the other notes will be whole steps apart.

Just knowing what note you are playing won’t necessarily help you know where to put it on the fingerboard. Sometimes your fingers will be right next to each other, sometimes they will be a step apart. You have to understand how each note relates to the note before it in order to know where the finger goes. You have to be able to hear how the next note sounds. Which brings me back to those two big concepts. 

What are these concepts? 

Ear Training

Ear training is a term we use to describe the process of teaching our ears to to discern certain things in music. You might have heard of people with perfect pitch—people who have the ability to say what a note is just by hearing it. (You don’t have to have this ability. I definitely don’t! But you can get close). Or you may have heard of “playing songs by ear”—without looking at music. These are both ear training skills, but ear training is more complicated than just that. Ear training involves the ability to hear and understand the distances between notes, the quality of chords, whether a song moves by step or by skips, and most importantly for the violin, whether or not a note is in tune! 

Since there are no frets or keys on the violin fingerboard, you have to be able to hear a note in your head before you play it in order to know if it’s in tune once you put your finger down. This sounds complicated, but with practice it can become second nature. 

Before we talk about how to start tackling ear training, let’s discuss that second big concept: music theory.


Music Theory

Music theory is the the structure behind songs. It’s like the frame of a house. You don’t always see it or understand it, but without it, music would be a big mess. Theory involves understanding how all the notes work together.

For instance, when students first learn violin, they often learn “high 2” or high second finger. Teachers rarely take time to explain why the 2nd finger is high because it would take too long. “Just make sure you call it F sharp on the D string and not F. Don’t worry about why it’s sharp right now. Oh and yes, the 2nd finger on the A string and E string are also called sharps, but not the second finger on the G string. It’s just B natural, but you don’t have to say natural. Just call it B.”

Confused yet? Just wait until you start learning to lower that 2nd finger and play “low 2.” “Now that 2nd finger on the A string is no longer sharp, it’s C natural, but you’re still going to need to play “high 2” on the D string and G string those are still sharp, well except for the G string. That one’s still just B natural. Don’t worry about why it switches around, we’ll tell you later!”

If you don’t understand the framework behind music, you will just be trying to memorize worthless rules to put your fingers in the right place. But those “rules” will only apply when you are in first position. (The collection of notes that you learn first. Eventually you will learn higher positions and move up the fingerboard.) With a little music theory knowledge, you’ll know why some of those notes are sharp, which ones are sharp, when they’re not sharp, and how to play those notes all the way up the fingerboard and not just right there in first position.

If you look at a piano key board, you can see all the notes and their relationships to each other. Each violin string works the same as a keyboard, except you can only see the notes in your head! And there are 4 strings, each string starting with a different note, so really something like THIS is what you should be seeing in your head (this isn’t an exact representation of the notes on each string. It just gives you an idea of how each string is like a keyboard).

piano+keyboard+on+violin.jpg

If it looks confusing, don’t let that deter you. With just a little bit of theory, you will be able to build this structure in your head when you play. 

So how do you start learning the language of the violin? Check out my easy ear training exercises to get started teaching your ear to be the boss! As you learn about ear training, you’ll see how it’s intertwined with music theory. Check out my music theory lessons to start learning how to see the structure behind music. 

Learning ear training and music theory might seem like big tasks, but gaining even a basic understanding of these concepts will not only make playing the violin easier, it will make it more enjoyable! You will not only be able to understand the language of music when other’s play, you will be able to speak the language and make your own music! How wonderful is that?

Happy (ear training, music theory) Practicing! 

New to the Violin? Here's Some Tips for Parents

TIPS FOR PRACTICING

pexels-photo-165973.jpeg

WHEN TO PRACTICE

Try to practice right after the lesson while everything is still fresh. The longer you wait, the more your child will forget. If you aren’t able to practice right after, have your child talk through the new things they learned.

The amount of time each student needs to practice will vary with age and level. For all students, it is much better to have short daily practice sessions than to have one or two long weekly sessions. For beginners, at least 10-15 minutes a day 5 days a week is a good start. 

HOW TO PRACTICE

Students often fall into the trap of just running through pieces for their practice time. Running through a song might make it sound better after multiple attempts, but there are better, quicker ways to make something sound good. Set daily and weekly goals for yourself. I try to give students one or two big concepts to work on for the week. Think of these things while you play. Stop and ask yourself if you are doing them. Identify any problem spots. You don’t always have to start at the beginning of a song, start at the hard parts and try to understand what makes them difficult. Simplify the music if needed: pizz. the song without the bow or shadow bow it without the left hand. Make up words to songs or listen to others playing them. Finally, reward yourself for playing something well! As musicians, we are always thinking about what we did wrong and forgetting about everything we did right!

PARENT INVOLVEMENT

Parent involvement will differ with age level. For very young children, parents should be present during the lesson. Take notes and ask questions since you will be your child’s teacher during the week. Practice time for young children should be adult supervised as well. I can always tell an incredible difference with young students who have parents assisting them during lessons, versus parents who are not present during the lesson. When parents (or older siblings) help out a child during lessons, we can cover much more material, and the parent knows exactly what to work on during the week. If you can’t be present for your child’s lesson, ask for your teacher’s notes on the lesson. I leave lesson notes for every lesson so parents always know what we worked on. Use these notes as a guide throughout the week.

MOTIVATION 

Staying motivated is hard no matter how well you play. Once the honeymoon phase has worn off, parents should make sure their children still practice regularly. The less they practice, the more discouraged and frustrated they will become and the more they will want to quit. Hearing other musicians play is always encouraging. Take advantage of the internet and YouTube to find some great performances. Encourage students to also improvise on their violins. This is a fun and important part of developing the necessary aural and tactile skills.

Consider Learning the Violin Yourself

When a parent learns violin along side their child, something magical always happens. The child almost always progresses much, much faster than other students. The child will hear the parent playing their songs, reinforcing what the songs sound like. The parent serves as a role model throughout the week. The greatest benefit is the joy of sharing music together, which is priceless!

How Do I Play Music Faster?

Learn to play faster and sound better!

Learn to play faster and sound better!

“How do I play faster?” That’s one of the questions I am asked the most. Even if students don’t ask it, I know they’re thinking it based on the tempo of their performances. When students ask about playing faster, I sometimes say, “Just move everything faster.” That’s not the answer they’re looking for because they don’t want to know how to play faster. What they really mean to ask is, “How can I play faster and actually sound good?”


Ahh. There’s the rub. What is it that makes us sound bad when we play fast? There are lots of potential problems but I boil it down to two: our left hand fingers aren’t hitting the right notes and our bow and left hand fingers aren’t coordinated.

Left Hand
Let’s tackle the first problem. You’re fingers aren’t hitting the right notes, a.k.a. you’re not playing in tune. Even if you have finger tapes, playing in tune involves more than just putting your finger down. There are two must-do’s to playing in tune.


1. You must hear the note before you play it. If you can’t hear the note before you play it, how do you know if it’s in tune? Practice playing a note then singing the next note before you play it. That’s a big eye-opener. I know what you’re thinking. “That means I have to play SLOW!” Yes. I’m getting there. You know it’s coming.


2. You must relax. You have to be able to quickly adjust your finger if it is out of tune. You can’t do this if you are tense. Try tensing up your left hand and wiggling your fingers as fast as you can. Now relax and try it again. This is another reason to practice slowly. It gives you time to think about relaxing and placing your fingers as lightly as possible.

Coordination
Now the next big problem with playing fast. Coordinating your bow with your left hand. As you place a left hand finger, your bow should move almost simultaneously. If your coordination is off, you’ll get that overlapping “blub blub blub” sound. The faster you play, the harder coordination becomes. Add in slurs and string crossings and it gets even harder. There are two parts to staying coordinated.


1. Putting down fingers as soon as possible. As you advance in technique this will become more crucial to playing cleanly. If you are about to play a fingering of 3-2-1, go ahead and have all fingers downs. This allows you to move your fingers quicker than placing and releasing each one. You can’t always put a finger down ahead of time (for instance, if you’re going from 3rd finger to another 3rd finger). Even when you can’t get the finger down before you play, you can get as close as you can to actually putting the finger down. If you are going from a 1st finger to a 4th finger on the same string, let your 4th finger stretch and hover right over where it needs to go. Practicing this way requires planning and forethought and it also requires you to practice…ahem…slowly to make sure the fingers are doing what they need to do.


2. Coordinating the bow with the left hand. First put down your bow and play the excerpt pizzicato until your fingers move quickly and smoothly. Add the bow but play very slowly and stop in between each note. Place the finger and then move the bow. For string crossings, make sure you stop the bow, drop or raise your elbow to the new string level and continue. Play the passage again making the pauses shorter and shorter. You are training your muscles to do exactly what they need to do so you can play quickly without having to work as hard.

Tempo
Students often start out playing something smoothly and cleanly and before long they get excited and finish the song like they’re at the Kentucky Derby. Using a metronome helps you stay consistent and keeps you from rushing. I like to start slow then move the metronome up 10 clicks then back 5 and on and on until I get it to the tempo I want.

Keeping everything in proportion
Generally, the faster you go, the less bow you will use. Otherwise you will start a small fire on your violin. Using the right amount of bow helps everything stay coordinated.

What’s the real key to playing faster?
Playing slower. There’s really no other way around it. I’m not talking a brisk walk, I’m talking turtle slow! And just because you play it slow once doesn’t mean you can go back to tempo and expect major improvement. You have to start slow and increase your speed gradually. Remember, any listener would rather hear a song played slowly and cleanly than to hear something quick but messy and unrecognizable. When you choose a a tempo to play a piece (whether for a teacher or an audience) choose the fastest tempo you can play cleanly. This might be slower than what you achieved at home but you’ll know you’re playing at a tempo you can actually manage with all those extra nerves and sweaty hands.

In order to play faster, you’ve also got to make sure your form is correct. If your left wrist is like a pancake or you can’t bow straight, you’ll want to tackle those things first. Learning how to practice can also help you improve your speed.

Remember, it’s never a waste of time to practice something slowly. On the flip side, playing something fast before you are ready can be detrimental and even hamper your progress. You are also less likely to get frustrated when you play something at a relaxed tempo. So take a deep breath, before you start playing fast, play slow. I promise you’ll be pleased with the results!

Happy (Slow) Practicing!


Stop Wasting Your Practice Time! How to Set Up a Great Practice Routine

Making your practice time "golden."

Making your practice time "golden."

A good practice routine is the key to staying motivated to play the violin. But if you don’t have a good practice routine, chances are you will just dabble with the violin and never make any lasting progress. Does the following story sound familiar?

You get out your violin to practice. You know you’re supposed to start out with scales so you whiz through them so you can get to the good stuff. You play through the piece you’re working on. If it’s a good day, you make it all the way through. If not, you stop when it gets hard and go back to play the parts you sound good on. Let’s say it’s a good day. You make it all the way through. What do you do next? Start at the beginning and play it all the way through again. It might sound a little better, chances are, not much has changed. You decide to buckle down on the two or three hard lines. You play through the measures once. Ugh. It sounds awful. You try again. Even worse this time! Stupid fingers. Maybe if you try it faster…nope. Slower? That’s agony, too. You’re frustrated but you’re determined to get it right. You play it again but nothing is sounding right today and your practice time is up. You put the violin up for another day.

Sound familiar? What progress did you make? Not much of any. In fact, you probably reinforced some bad habits. You may not be doing all of these practicing no-nos but everyone is guilty of some of them from time to time (including me)!

What’s the key to being a better player? What’s the key to staying motivated? Practicing smarter. Not practicing more or practicing harder but having quality practice that yields tangible results. Practicing smarter is a skill you must learn. It might be slower going at first but as you get better at practicing, you’ll advance quicker.

Here are some tips to get more out of your practice time and keep your motivation up.

1. Get a warm-up routine—Doing the same warm-ups every day makes it easier to measure progress. Don’t rush it. You’re not only warming up your muscles, you’re getting your mind primed to focus. Start off with some stretches focusing on your upper body. Next I do “windshield wipers” with my bow. Then I move on to open strings. This is yoga for the violin. It’s a time to focus on relaxing, breathing, and making a good tone (one of the hardest things to do!). Draw your bow as fast or as slow as you need to make a good sound. Experiment with different parts of the bow. Try adding more weight or less weight. Think about the angle of the bow.
Next I play scales and arpeggios. You might think scales are easy and therefore don’t require much attention. Teachers prescribe scales because they are easier than your piece and are a great way to perfect difficult skills. Start by focusing on intonation then move on to varying the speeds and using different bowings. There are a million things you can focus on while doing scales. If you can’t think up any, I’m sure your teacher has tons of ideas. For now, only focus on one problem for each scale.
Depending on your level, you’ll want to transition to etudes or other method books and then you’re ready for the main song you’re learning. What’s the number one rule?

2. Keep your expectations low—Then you won’t be disappointed! That’s my life motto. Dream big for long-term goals, but for day to day practice, keep your goals short and manageable. Don’t try to conquer an entire song in one 30 minute practice session. Focus on one ore two measures. Even then, don’t repeat them aimlessly. Focus on one thing at a time to work on like getting your F sharps in tune of smoothing out your string crossings.

3. Keep a practice log—Before you start practicing, write down what your overall goal for the day is. Keep it manageable and tangible. Nothing like “I want to make my song sound better.” Pick something specific and simple like keeping your bow straight and relaxing your grip. If other things fall by the wayside, don’t beat yourself up. If you’ve progressed a little on that overall goal, you’re doing better than if you had no goal at all. As you practice certain measures, again write down what you want to achieve. This keeps you safe from aimless repetition. But, to determine what you need to work on, you need to stop and do some thinking first. Which brings me to my next point.

4. Be a detective—When something doesn’t sound right, don’t play it over and over again the same way hoping that one day it will sound better. Stop. Think. Is it a left hand or a right hand problem? Is it a difficult fingering or a difficult bowing? Are you correctly reading the notes or the rhythm? Once you’ve determined the problem, you or your teacher can come up with a way to fix it. You must do this for every measure and every note that doesn’t sound right! This is what your teacher is doing during your lesson. Learning to practice this way means learning to be your own teacher! That means you can use your lesson time to talk about other exciting things.

5. Stay focused—These tips won’t get you very far unless you can devote your utmost focus to the task at hand. For me, 5-10 minutes is the max I can focus on any one measure or problem, and that’s assuming I’m rested and removed from distractions. When you are past the peak of your focusing ability, simply move on to something else or take a break altogether. It’s better to practice shorter amounts and be focused. Otherwise you could be developing bad habits or reinforcing incorrect bowings, rhythms, etc. Like wise, if you start to get frustrated, put the violin down immediately and come back when you are refreshed.

6. Stop practicing on a high note— When you are nearing the end of your practice time and you play something well, STOP! Put the violin down and walk away while you are still happy! Sure, you could plow through a few more measures and risk getting frustrated but it’s much better to end feeling good about something. It will make you want to practice the next day.

Happy Practicing!

8 Ways To Make Practicing Fun!

Making Practice Fun

Before I share a few ways to make practicing fun for your child, let me start with a caveat. Practicing isn’t always fun. That doesn’t mean that it’s tortuous, but it’s not always smiles and giggles. Sometimes your child just has to buckle down and do it. At the same time, you don’t want music to be yet another homework assignment. Having fun during practice time can be a great way to cultivate creativity and encourage focus if you choose the right “games.”
Some of these games are ways to get students to practice for longer. Keep in mind that as students progress, we want them to stop focusing on quantity practice with mindless repetition and start aiming for quality, goal-oriented practice.


As much as we wish our 7 year-olds would wake up and say, “Today I’m going to focus on getting my F sharps in tune,” that’s probably not going to happen. So until they do start thinking like that, here are 8 ideas to make practicing fun.

*Some of these games can get crazy. Use your discretion to ensure violins and bows aren’t harmed. Otherwise, you might be making an educational visit to the violin shop for repairs!

1. Hopscotch—Perfect for when your child is having problems with a specific section or measure. It requires them to focus to “win.” Using a a tiled floor or a carpet with squares, place a piece of candy on a square. Then position your child 7 squares behind the prize. If they play the measure correctly, they can move forward. If they make a mistake, backwards. When they get to the candy, they’ve played their problem spot correctly for at least 7 times.


2. Crazy Cup—Ideal for when students have already learned a measure or song but still need more repetitions before they’ve mastered it. On several slips of paper, write down actions your child can do while playing their piece (they can help you think up ideas). Keep in mind, they’ll be holding a violin so nothing too crazy like somersaults. In the crazy cup I use for my students, I have actions like “play with one eye closed” or “walk around in circles,” “sway like a tree.” Having them move around while playing can also help them relax and keep them from developing tension problems.


3. Recess—Take advantage of your portable instrument and go outside for practice time! When your backyard gets boring, go to a park or playground. Better yet, surprise a neighbor or friend with a song at their doorstep.


4. Every room in the house—Challenge your child to play a song in every room in your house. They’ll have fun playing in the dark in the closet. Ask them what room they sounded the best in. This will get them actually listening to themselves (which doesn’t always happen). A tiled bathroom will be a lot different than a carpeted bedroom!


5. Teacher time—Have your child be the teacher and let them give you or another family member a lesson. Make sure you ask them if your bow hand and posture are correct. You can deliberately mess something up so the child has to fix it. Act confused and ask them to demonstrate how to do it right. This helps remind them about all those curved pinkies and thumbs!


6. Free time—You might call this noise, but I call it improvisation. Being able to experiment and come up with their own songs is vital to a child’s creative development and aural skills. I never did this as a child and as a result, I was terrified of “jamming” with a band or playing anything without music in front of me. It was a fear that took me a long time to get over. It’s important to start this exercise early. The older the child gets, the more terrified the student becomes of playing something “wrong.” Imposing a few rules gives this time some structure. You must insist they continue to hold the instrument and the bow correctly. To reduce the chaos, give them a certain string to improvise on or a rule of “only open string and 2nd fingers” or “only use the Mississippi Hot Dog rhythm.” You can even make another cup with slips of paper with “rules” for guided improvisation.


7. Play along—Listening to better violinists is the best thing to keep students motivated. Students in orchestra programs have the benefit of always being surrounded by better players to mimic but students that only take private lessons don’t always have that. Youtube a professional violinist and let your child “play along” with them. They won’t be able to play all the notes, but simply pretending to play all the notes can do wonders for motivation. They’re listening to what they could achieve. Of course, use caution. If they’re pretending to be Lindsay Sterling, things could get out of control pretty quickly so be ready to take the violin away and transition to “air violin” before anybody, or anything gets hurt.

8. My Candy—This is my all time favorite trick for getting students to focus while they practice. Identify a problem measure, section, or song. Put five pieces of candy on the music stand. When the child plays the selected measures correctly, they get a piece of candy. But if they play it incorrectly, I take one of their pieces of candy, quickly pop it in my mouth, and comment on how delicious it is. Just seeing me eat their candy is enough to motivate them to focus on the task at hand. Before you start, give some parameters on what is considered “correct.” No stopping and starting, no wrong notes, no flat left hand wrists, good posture, etc.

What else do you do to make practicing fun? Share your ideas!

Happy Practicing!


Recital Time! How to Master Your Recital

It’s that time of year again! Flowers are bursting into life, birds are singing, music students across the country are furiously practicing (hopefully) to get their recital music in shape. First timers are often surprised to learn that they don’t sound as well as they did in the comfort of their own home. That’s because performing is a skill that gets better with time. Just like you practice playing in tune, you have to practice performing! Here are 5 tips to help you dropkick your recital.

1. Perform, Perform, PERFORM!

There are people who are naturally wonderful at everything. And then there are the rest of us who actually have to work for it. But people who perform well have practiced performing. I guarantee you, when a 10 year-old prodigy performs at Carnegie Hall, it’s not the first time they’ve ever played in front of an audience! You must practice performing to be good at it! Start with your most adoring fans: your goldfish, your stuffed animals, your music-loving houseplant. Then move on to more demanding listeners: your dog, your mom, your little brother. Then go for the really tough critics: your grandparents.
Go through the whole rigmarole when you practice performing. Dress up, walk to the stand, play, bow, smile. It’s also a good time to school your family on recital clapping etiquette!


2. Think about the little things.

It’s those pesky things we never though of that trip us up. Like the fact that the pretty necklace we bought just for the recital buzzes when it touches the violin. To avoid wardrobe malfunctions, have a dress rehearsal. Get used to playing in those 6 inch heels. Make sure your dangling earrings aren’t too dangling. Does your collar or tie interfere with your violin? Figure it out before you go deer-in-headlights in front of 50 people.

Think about the other little things. Imagine yourself in the space you’ll be playing. Memorize how high you like your stand. If you are playing from memory, where will you look? Figure out page turns, erase confusing markings in you music. People develop weird quirks when they get nervous. I’m a nose-runner so I keep a hanky handy. Know thyself and be prepared!

3. Don’t Rush!

When adrenaline is pumping through your veins, the natural instinct is to play everything super fast. You’ll get done quicker that way, right? Well, yes, but you’ll hit a bunch of pot holes along the way. At home, practice at a faster tempo than you plan to play at the recital. Just in case your nerves take control, you’ll be prepared. But always plan to play at a tempo slower than your max speed. It’s better to go a little slower and get all the notes than go faster and get every other one.


4.Whatever happens, don’t do this!

Everyone makes mistakes. What separates the professionals and the amateurs is what they do after the mistake. If you grimace like you just swallowed spoiled milk, everyone will know you goofed. If you go on and pretend like nothing happened, there’s a good chance no one in the audience will ever know! But if you stop, grunt, roll your eyes, and publicly flagellate yourself for messing up, it’s like taking a highlighter to your boo boo. Keep a straight face and keep on chugging along.
Performing is like being an actor. You have to pretend you know what you are doing even if you want to crawl in a hole and die. Recital audiences can be oblivious, only slightly better listeners than your houseplant. Even if you make a mistake, and an audience member thinks he heard it, if you keep on going without a scowl, that audience member will shrug and think you meant to do it that way.

5. Eat a Banana!

Seriously. This is a hint handed down from my teacher. Anytime I perform I eat a banana about 30 minutes before I go on stage, even if I have to force it down. It’s hard to eat when you are nervous, but you don’t want to perform on an empty stomach. Bananas reduce anxiety. It’s scientifically proven—probably. Surely someone’s proved it scientifically. Oh, who cares. It works, scientific or not. So grab a bunch before you start getting the jitters!

When you get discouraged, remember, if it were easy, everyone would be doing it! I’d rather mess up on the field than watch from the sidelines.

Happy Practicing!