5 Ear Training Exercises for Violin

Ear Training Exercises.jpg

How do you play in tune on the violin? How do you develop good intonation? How can you even tell if you are too sharp, too flat, or perfect? These ear training exercises for the violin will help your ear hear the slight subtleties in music and help you play better in tune!

With fretted or keyed instruments, you can get away with putting your finger down and not really listening to the quality of the note you are producing. As long as the instrument is in tune and you placed your finger on the correct key or fret, the note you are trying to play should be in tune. Not so with the violin! Since there are no keys or frets, your ear has to be in control. Muscle memory alone won’t cut it. Your ear must tell your finger if the note you just played was too high, too low, or just right. And to do that, your ear has to be the boss when you are playing violin. 

This is a hard concept for many students to learn. Students generally focus on their left hand fingers and let their fingers try to control the show. But to truly master the violin, your fingers must be lowly employees to the CEO—the ear!

For most of us, our ears aren’t natural born leaders. You have to teach your ear how to take over. Here are some exercises to help your ear listen better.

1. Pitch matching

Do this first without an instrument at all. When you hear a note from a song, try to match it. Either sing it, hum it, or whistle it. You can do this in the car while listening to music. You can also try playing a random note on a piano or on your violin and try to replicate it with your choice or vocal replication (singing, whistling, of humming). 

Now try the same concept, but with the violin. You don’t have to worry about playing the note with the “correct fingering.” Use any finger you want to achieve the correct pitch. Try to sing a random pitch and then find where it exists on the violin. One way is to simply put your finger on a string and start sliding it around until you find the pitch you are looking for. You will discover that one note can exist on several different strings. 

2. Identify if music ascends or descends

This is just a listening exercises. As you listen to music, try to determine when the music is going up and when it is going down. While this sounds easy, it might be harder than you think. 

Sing one of your favorite songs, move your hand up and down depending on whether the next note in the song goes up, goes down, or stays the same.

3. Identify skips and steps 

Another listening exercise. As you listen to music, determine if the notes are moving by step—one note after another like a scale (A B C D) or by skips (A C E). 

4. Learn what intervals sound like

Intervals are those skips between notes. We can measure the distance between notes using intervals. A to B is the interval of a second (always start counting with the bottom note). A to C is a third. C to the next highest C is an octave—8 steps. 

Each interval has a certain sound and it’s easiest to associate that interval with a song. For instance A to B is a second (a major second to be specific) and it sounds like the first two notes of Happy Birthday. C to C is an octave and sounds like Somewhere Over the Rainbow. Listen for the first two notes in the word “somewhere.” 

Use this chart to help you choose songs to be able to identify each of the intervals. As you learn them, you will be able to hear intervals in the music you listen to and the music you play.

5. Try to play simple songs on the violin without using music

This exercises is not only great for your ear, it’s lots of fun. Once you develop this skill, you won’t have to spend hours searching the internet for sheet music to your favorite song, you’ll be able to pick out the notes yourself.

You’re going to use all those other skills we just talked about. First, you’re going to have to pitch match. Sing the note that your song starts on and try to find that on the violin. Next, decide if you are going to have to go up for the next note or down? Or maybe you’ll stay on that same note? If you do move up or down, are you moving by step or by skip? If you are moving by skip, by what interval? Once you determine what the interval is, you’ll know what note comes next. 

Do these steps for every note in the song. Eventually, with enough practice, your fingers will start to know what note comes next. 

Start off with simple folk songs or hymns. These songs generally don’t skip around a lot so it’s easy to pick them out by ear. 

You are never too good for this exercise! As you progress, pick harder and harder songs to play by ear. Since you aren’t looking at music, doing this exercises leaves your ear no choice but to take over!

Practice these skills everyday, with the instrument or without it. The more you exercise your ear, the better it will be able to hear small details and variations in pitch. You’ll know if you’re playing a note too sharp or too flat. Your ear will tell you! Once you let your ear be the boss, it will turn into a little tyrant—but that’s a good thing! 

Happy Practicing!

Where Do You Put Your Fingers on the Violin?

man-playing-violin-3451162.jpg

Any beginning violinist can tell you what makes violin is so hard—knowing where to put your fingers! While decals like First Frets can help, you can’t put a sticker where every single note exists on the violin. You can memorize where certain notes are on the violin, and your muscle memory might get pretty adept at finding those notes, but if you don’t understand two important concepts, then you will never truly understand where to put your fingers. 

These two concepts are essentially the two reasons learning violin is so hard. However, these two concepts are often left out of violin lessons all together. Why would teachers leave out the two things that could help everything make sense? Well these two concepts take a lot of self-study to master. They also require in-depth study. You can’t understand these concepts with just a few words of advice from your teacher every week. When you only have 30 minutes to talk about songs, tone production, rhythm, note reading, posture, and so on, there’s hardly time to focus on these concepts. 

But if you don’t learn these concepts, it’s the same as just learning certain phrases in another language as opposed to really understanding how the language works. You may be able to play songs and read challenging music, but without understanding these two things, you will never truly understand the language of the violin. These two concepts are not dry by any means, but they can be hard to grasp. But I’m going to help you with that! 

Are you ready to learn the real language of the violin? Are you ready to know what two secrets could help everything make sense? Here they are: ear training and music theory.

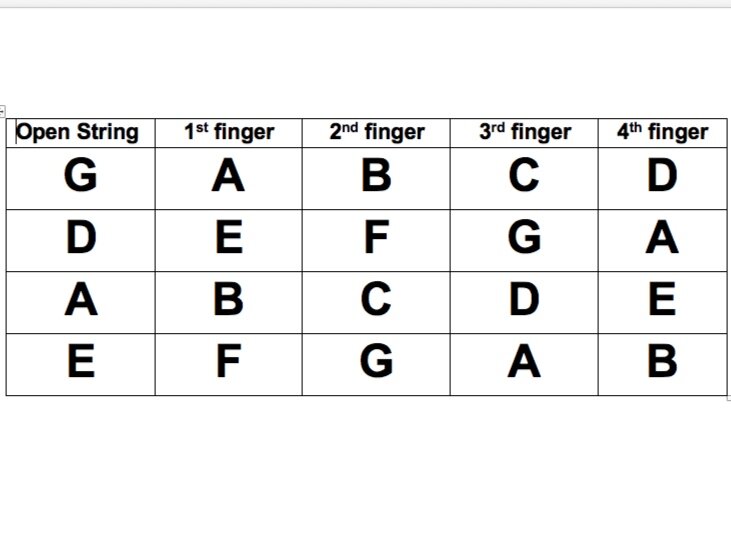
Before I explain why these two concepts are so important, let’s take a moment and talk about where to put your fingers in first position. The violin strings are (starting from the lowest string) G, D, A, and E. Your left hand fingers are numbered 1-4. Index finger being 1st finger, middle finger is 2nd finger, ring finger is 3rd, and pinky is 4th finger. (Remember that the musical alphabet goes from A-G. After G, your next note is A but a higher A than the first A you played).

Okay, notice how there are three letters separating each string? 

G (A B C)

D (E F G)

A (B C D)

E

Those notes in parentheses are going to be your 1st, 2nd, and 3rd fingers respectively. What about 4th finger? Well it’s the same note as your open string below it.

Screen+Shot+2020-02-12+at+11.15.07+AM.jpg

When you are first learning, you will learn a finger pattern in which the 2nd and 3rd fingers are touching on every string (half steps apart) and all the other notes will be whole steps apart.

Just knowing what note you are playing won’t necessarily help you know where to put it on the fingerboard. Sometimes your fingers will be right next to each other, sometimes they will be a step apart. You have to understand how each note relates to the note before it in order to know where the finger goes. You have to be able to hear how the next note sounds. Which brings me back to those two big concepts. 

What are these concepts? 

Ear Training

Ear training is a term we use to describe the process of teaching our ears to to discern certain things in music. You might have heard of people with perfect pitch—people who have the ability to say what a note is just by hearing it. (You don’t have to have this ability. I definitely don’t! But you can get close). Or you may have heard of “playing songs by ear”—without looking at music. These are both ear training skills, but ear training is more complicated than just that. Ear training involves the ability to hear and understand the distances between notes, the quality of chords, whether a song moves by step or by skips, and most importantly for the violin, whether or not a note is in tune! 

Since there are no frets or keys on the violin fingerboard, you have to be able to hear a note in your head before you play it in order to know if it’s in tune once you put your finger down. This sounds complicated, but with practice it can become second nature. 

Before we talk about how to start tackling ear training, let’s discuss that second big concept: music theory.


Music Theory

Music theory is the the structure behind songs. It’s like the frame of a house. You don’t always see it or understand it, but without it, music would be a big mess. Theory involves understanding how all the notes work together.

For instance, when students first learn violin, they often learn “high 2” or high second finger. Teachers rarely take time to explain why the 2nd finger is high because it would take too long. “Just make sure you call it F sharp on the D string and not F. Don’t worry about why it’s sharp right now. Oh and yes, the 2nd finger on the A string and E string are also called sharps, but not the second finger on the G string. It’s just B natural, but you don’t have to say natural. Just call it B.”

Confused yet? Just wait until you start learning to lower that 2nd finger and play “low 2.” “Now that 2nd finger on the A string is no longer sharp, it’s C natural, but you’re still going to need to play “high 2” on the D string and G string those are still sharp, well except for the G string. That one’s still just B natural. Don’t worry about why it switches around, we’ll tell you later!”

If you don’t understand the framework behind music, you will just be trying to memorize worthless rules to put your fingers in the right place. But those “rules” will only apply when you are in first position. (The collection of notes that you learn first. Eventually you will learn higher positions and move up the fingerboard.) With a little music theory knowledge, you’ll know why some of those notes are sharp, which ones are sharp, when they’re not sharp, and how to play those notes all the way up the fingerboard and not just right there in first position.

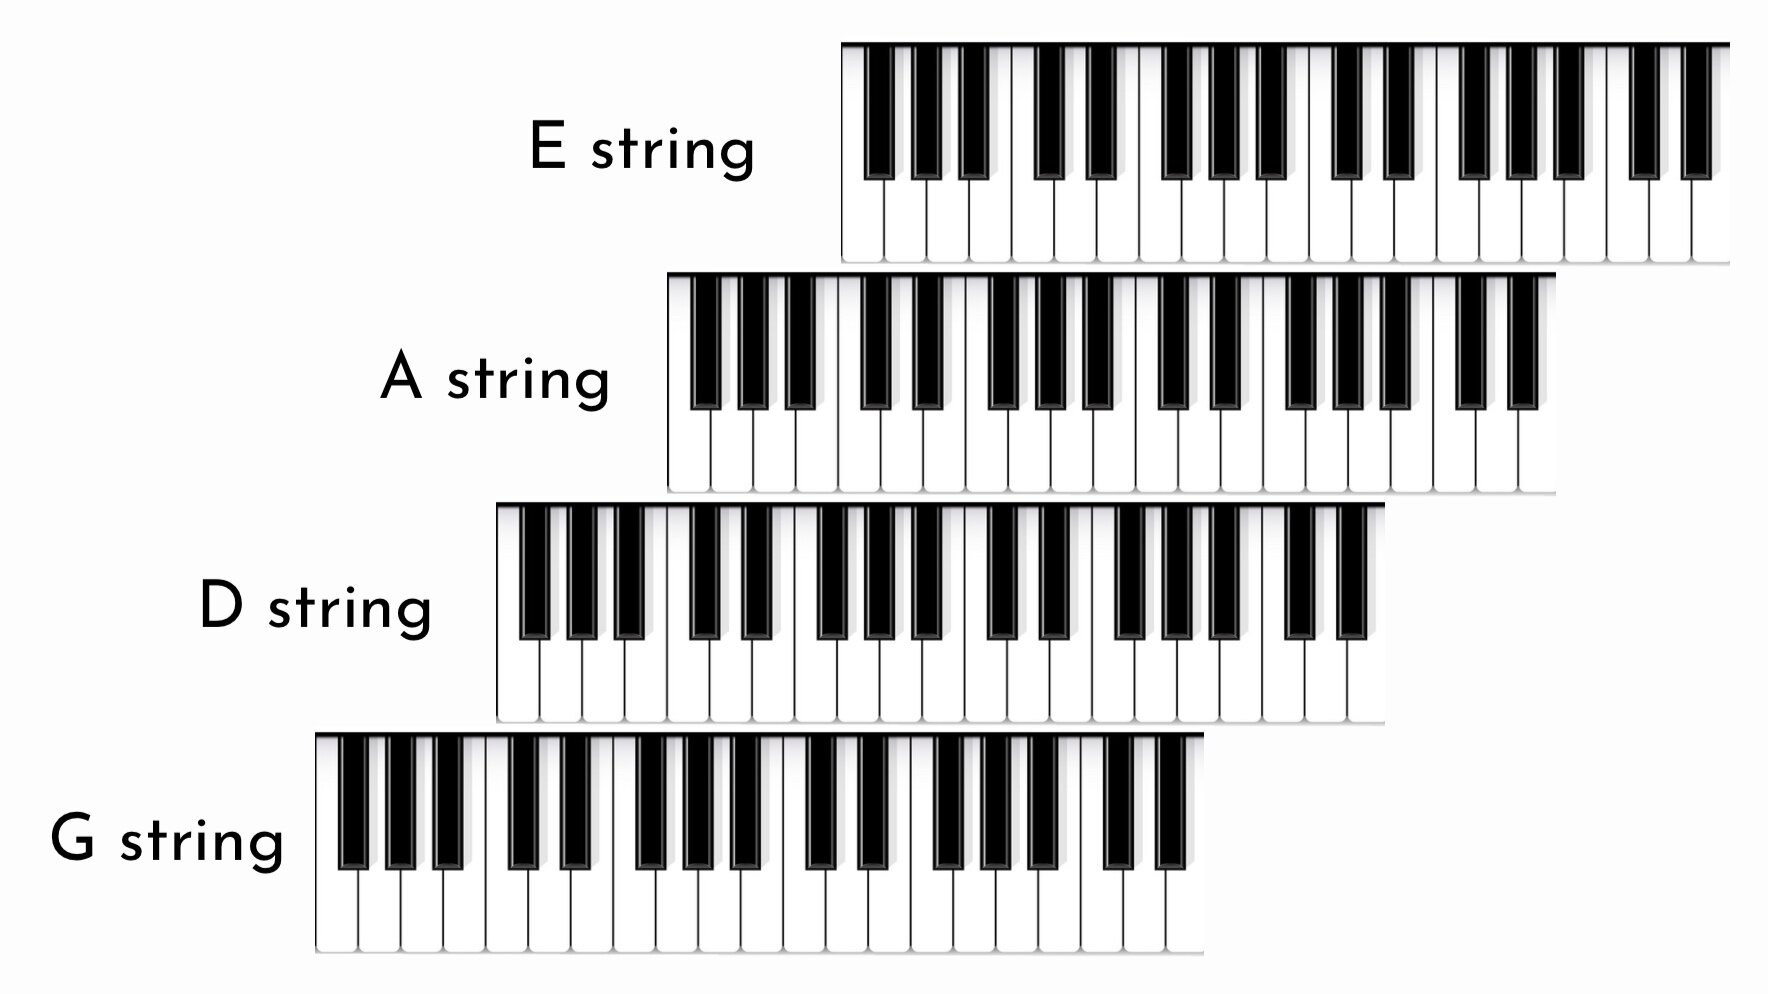
If you look at a piano key board, you can see all the notes and their relationships to each other. Each violin string works the same as a keyboard, except you can only see the notes in your head! And there are 4 strings, each string starting with a different note, so really something like THIS is what you should be seeing in your head (this isn’t an exact representation of the notes on each string. It just gives you an idea of how each string is like a keyboard).

piano+keyboard+on+violin.jpg

If it looks confusing, don’t let that deter you. With just a little bit of theory, you will be able to build this structure in your head when you play. 

So how do you start learning the language of the violin? Check out my easy ear training exercises to get started teaching your ear to be the boss! As you learn about ear training, you’ll see how it’s intertwined with music theory. Check out my music theory lessons to start learning how to see the structure behind music. 

Learning ear training and music theory might seem like big tasks, but gaining even a basic understanding of these concepts will not only make playing the violin easier, it will make it more enjoyable! You will not only be able to understand the language of music when other’s play, you will be able to speak the language and make your own music! How wonderful is that?

Happy (ear training, music theory) Practicing! 

How Do I Play Music Faster?

Learn to play faster and sound better!

Learn to play faster and sound better!

“How do I play faster?” That’s one of the questions I am asked the most. Even if students don’t ask it, I know they’re thinking it based on the tempo of their performances. When students ask about playing faster, I sometimes say, “Just move everything faster.” That’s not the answer they’re looking for because they don’t want to know how to play faster. What they really mean to ask is, “How can I play faster and actually sound good?”


Ahh. There’s the rub. What is it that makes us sound bad when we play fast? There are lots of potential problems but I boil it down to two: our left hand fingers aren’t hitting the right notes and our bow and left hand fingers aren’t coordinated.

Left Hand
Let’s tackle the first problem. You’re fingers aren’t hitting the right notes, a.k.a. you’re not playing in tune. Even if you have finger tapes, playing in tune involves more than just putting your finger down. There are two must-do’s to playing in tune.


1. You must hear the note before you play it. If you can’t hear the note before you play it, how do you know if it’s in tune? Practice playing a note then singing the next note before you play it. That’s a big eye-opener. I know what you’re thinking. “That means I have to play SLOW!” Yes. I’m getting there. You know it’s coming.


2. You must relax. You have to be able to quickly adjust your finger if it is out of tune. You can’t do this if you are tense. Try tensing up your left hand and wiggling your fingers as fast as you can. Now relax and try it again. This is another reason to practice slowly. It gives you time to think about relaxing and placing your fingers as lightly as possible.

Coordination
Now the next big problem with playing fast. Coordinating your bow with your left hand. As you place a left hand finger, your bow should move almost simultaneously. If your coordination is off, you’ll get that overlapping “blub blub blub” sound. The faster you play, the harder coordination becomes. Add in slurs and string crossings and it gets even harder. There are two parts to staying coordinated.


1. Putting down fingers as soon as possible. As you advance in technique this will become more crucial to playing cleanly. If you are about to play a fingering of 3-2-1, go ahead and have all fingers downs. This allows you to move your fingers quicker than placing and releasing each one. You can’t always put a finger down ahead of time (for instance, if you’re going from 3rd finger to another 3rd finger). Even when you can’t get the finger down before you play, you can get as close as you can to actually putting the finger down. If you are going from a 1st finger to a 4th finger on the same string, let your 4th finger stretch and hover right over where it needs to go. Practicing this way requires planning and forethought and it also requires you to practice…ahem…slowly to make sure the fingers are doing what they need to do.


2. Coordinating the bow with the left hand. First put down your bow and play the excerpt pizzicato until your fingers move quickly and smoothly. Add the bow but play very slowly and stop in between each note. Place the finger and then move the bow. For string crossings, make sure you stop the bow, drop or raise your elbow to the new string level and continue. Play the passage again making the pauses shorter and shorter. You are training your muscles to do exactly what they need to do so you can play quickly without having to work as hard.

Tempo
Students often start out playing something smoothly and cleanly and before long they get excited and finish the song like they’re at the Kentucky Derby. Using a metronome helps you stay consistent and keeps you from rushing. I like to start slow then move the metronome up 10 clicks then back 5 and on and on until I get it to the tempo I want.

Keeping everything in proportion
Generally, the faster you go, the less bow you will use. Otherwise you will start a small fire on your violin. Using the right amount of bow helps everything stay coordinated.

What’s the real key to playing faster?
Playing slower. There’s really no other way around it. I’m not talking a brisk walk, I’m talking turtle slow! And just because you play it slow once doesn’t mean you can go back to tempo and expect major improvement. You have to start slow and increase your speed gradually. Remember, any listener would rather hear a song played slowly and cleanly than to hear something quick but messy and unrecognizable. When you choose a a tempo to play a piece (whether for a teacher or an audience) choose the fastest tempo you can play cleanly. This might be slower than what you achieved at home but you’ll know you’re playing at a tempo you can actually manage with all those extra nerves and sweaty hands.

In order to play faster, you’ve also got to make sure your form is correct. If your left wrist is like a pancake or you can’t bow straight, you’ll want to tackle those things first. Learning how to practice can also help you improve your speed.

Remember, it’s never a waste of time to practice something slowly. On the flip side, playing something fast before you are ready can be detrimental and even hamper your progress. You are also less likely to get frustrated when you play something at a relaxed tempo. So take a deep breath, before you start playing fast, play slow. I promise you’ll be pleased with the results!

Happy (Slow) Practicing!


Stop Wasting Your Practice Time! How to Set Up a Great Practice Routine

Making your practice time "golden."

Making your practice time "golden."

A good practice routine is the key to staying motivated to play the violin. But if you don’t have a good practice routine, chances are you will just dabble with the violin and never make any lasting progress. Does the following story sound familiar?

You get out your violin to practice. You know you’re supposed to start out with scales so you whiz through them so you can get to the good stuff. You play through the piece you’re working on. If it’s a good day, you make it all the way through. If not, you stop when it gets hard and go back to play the parts you sound good on. Let’s say it’s a good day. You make it all the way through. What do you do next? Start at the beginning and play it all the way through again. It might sound a little better, chances are, not much has changed. You decide to buckle down on the two or three hard lines. You play through the measures once. Ugh. It sounds awful. You try again. Even worse this time! Stupid fingers. Maybe if you try it faster…nope. Slower? That’s agony, too. You’re frustrated but you’re determined to get it right. You play it again but nothing is sounding right today and your practice time is up. You put the violin up for another day.

Sound familiar? What progress did you make? Not much of any. In fact, you probably reinforced some bad habits. You may not be doing all of these practicing no-nos but everyone is guilty of some of them from time to time (including me)!

What’s the key to being a better player? What’s the key to staying motivated? Practicing smarter. Not practicing more or practicing harder but having quality practice that yields tangible results. Practicing smarter is a skill you must learn. It might be slower going at first but as you get better at practicing, you’ll advance quicker.

Here are some tips to get more out of your practice time and keep your motivation up.

1. Get a warm-up routine—Doing the same warm-ups every day makes it easier to measure progress. Don’t rush it. You’re not only warming up your muscles, you’re getting your mind primed to focus. Start off with some stretches focusing on your upper body. Next I do “windshield wipers” with my bow. Then I move on to open strings. This is yoga for the violin. It’s a time to focus on relaxing, breathing, and making a good tone (one of the hardest things to do!). Draw your bow as fast or as slow as you need to make a good sound. Experiment with different parts of the bow. Try adding more weight or less weight. Think about the angle of the bow.
Next I play scales and arpeggios. You might think scales are easy and therefore don’t require much attention. Teachers prescribe scales because they are easier than your piece and are a great way to perfect difficult skills. Start by focusing on intonation then move on to varying the speeds and using different bowings. There are a million things you can focus on while doing scales. If you can’t think up any, I’m sure your teacher has tons of ideas. For now, only focus on one problem for each scale.
Depending on your level, you’ll want to transition to etudes or other method books and then you’re ready for the main song you’re learning. What’s the number one rule?

2. Keep your expectations low—Then you won’t be disappointed! That’s my life motto. Dream big for long-term goals, but for day to day practice, keep your goals short and manageable. Don’t try to conquer an entire song in one 30 minute practice session. Focus on one ore two measures. Even then, don’t repeat them aimlessly. Focus on one thing at a time to work on like getting your F sharps in tune of smoothing out your string crossings.

3. Keep a practice log—Before you start practicing, write down what your overall goal for the day is. Keep it manageable and tangible. Nothing like “I want to make my song sound better.” Pick something specific and simple like keeping your bow straight and relaxing your grip. If other things fall by the wayside, don’t beat yourself up. If you’ve progressed a little on that overall goal, you’re doing better than if you had no goal at all. As you practice certain measures, again write down what you want to achieve. This keeps you safe from aimless repetition. But, to determine what you need to work on, you need to stop and do some thinking first. Which brings me to my next point.

4. Be a detective—When something doesn’t sound right, don’t play it over and over again the same way hoping that one day it will sound better. Stop. Think. Is it a left hand or a right hand problem? Is it a difficult fingering or a difficult bowing? Are you correctly reading the notes or the rhythm? Once you’ve determined the problem, you or your teacher can come up with a way to fix it. You must do this for every measure and every note that doesn’t sound right! This is what your teacher is doing during your lesson. Learning to practice this way means learning to be your own teacher! That means you can use your lesson time to talk about other exciting things.

5. Stay focused—These tips won’t get you very far unless you can devote your utmost focus to the task at hand. For me, 5-10 minutes is the max I can focus on any one measure or problem, and that’s assuming I’m rested and removed from distractions. When you are past the peak of your focusing ability, simply move on to something else or take a break altogether. It’s better to practice shorter amounts and be focused. Otherwise you could be developing bad habits or reinforcing incorrect bowings, rhythms, etc. Like wise, if you start to get frustrated, put the violin down immediately and come back when you are refreshed.

6. Stop practicing on a high note— When you are nearing the end of your practice time and you play something well, STOP! Put the violin down and walk away while you are still happy! Sure, you could plow through a few more measures and risk getting frustrated but it’s much better to end feeling good about something. It will make you want to practice the next day.

Happy Practicing!