How to Tune a Violin (Without Breaking the Strings!) A Beginner's Ultimate Guide to Tuning
/It’s vitally important to tune your violin every time before you start playing. But learning how to tune your violin as a beginner may seem intimidating. Once you understand a few things about tuning, you’ll see that tuning your violin is not as hard as it may seem.
Let’s talk about how to tune your violin and common tuning problems you may encounter (like the dreaded broken string!) Spoiler Alert: don’t worry, broken strings happen to everyone, but keeping a few things in mind will help you avoid breaking any strings!
Okay let’s get started by talking about a few music theory basics before we jump into learning how to tune the violin.
Important Musical Concepts for Better Violin Tuning
The musical alphabet consists of the notes A through G. If you started with an A and went up to a G and then kept going after that, the next note would be an A. It’s the same pitch as the first A you started on, just 8 steps higher. We call that an octave.
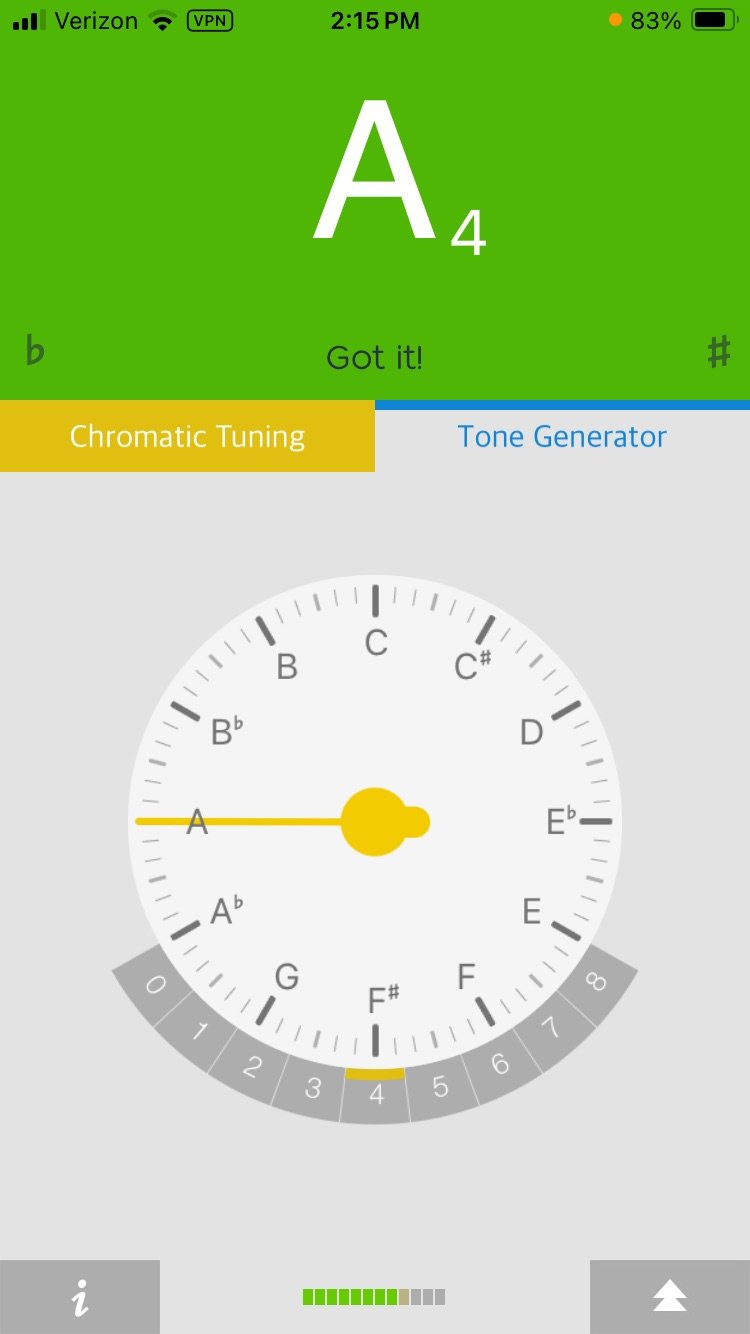
You can have lots of different As, they’re all the same note, just occurring at different frequencies or octaves. On your tuner, the octave in which that pitch occurs is notated by a little number next to the pitch.
So you see, if I play my open A, that tells me I’m playing an A4, if I play the A that’s an octave lower, that’s known as A3.
The names of your strings and the octaves that correspond with those pitches are:
How Tuners and Tuning Apps Work
Now let’s talk about how a tuner or a free tuning app works. I like to use the INS tuning app but most tuning apps work in a similar fashion. When you play a note, the name of the note and its octave number register on your screen. You’ll get a pitch and a number next to it. If the note is in tune, you’ll get a green light. You’ll notice there’s a bar that moves across the screen. In some tuners, this bar is depicted as a dial or a light on the left and the right of the pitch. If the note is too high or too sharp, the bar will be to the right on the sharp side. If the note is too low or too flat, the bar will be on the left side. The bar moves closer to the center as you get closer to being in tune.
How to Tune Your Violin Using the Fine Tuners
The fine tuners are the little screws on your violin tailpiece. They make small adjustments to the string.
You can hold your violin different ways when you’re first learning to tune, but I recommend starting off with the violin against your stomach. Pluck a string and then adjust the fine tuner. The fine tuner works just like a screw. Righty tighty, lefty loosey. So if you want the string to be more taught or higher in pitch, turn the fine tuner to the right or clockwise. If you’re too high or too sharp and you need to go lower, loosen the fine tuner by turning it left or counter clockwise.
Now tuners can be finicky because the microphone is picking up on other noises, so as long as it’s flashing green pretty regularly, that’s good. Now move on to the next string and repeat the process until you’re finished tuning.
You can also progress to tuning with the violin on your shoulder if you like. Pluck the strings with the left hand and tune with the right hand like this…
Now if your strings are close to being in tune, maybe a half step away or less. Use the fine tuners. If it’s really out of tune, for instance if your A string is registering as a G, then you’re going to have to use the pegs.
How to Tune the Violin Using Pegs
There’s a few tricks when it comes to learning how to tune the violin using the pegs. Let’s say my A string is registering as a G. The string is too low for the fine tuners to do anything so I’m going to have to tune the violin using the pegs. Trace the string up to its peg. The A string’s peg is the top peg on the right. Hold the violin neck firmly with the left hand and pinch the peg in between your fingers with the right hand. I always like to release the tension on the peg first by slightly turning it back or towards me. Keep a firm hold on the peg because you don’t want it to loosen completely. As the tension releases, you’ll feel a little click. Now if you let your hand go of the peg, that peg could possibly loosen completely so keep the pressure on it. Now turn the peg away from you as you apply a little bit of pressure towards the peg box to help that peg get wedged into the hole.
Once you’re relatively close, use the fine tuners to get the string perfectly in tune.
Now that’s the basics of how to tune the violin for beginners using pegs or fine tuners, but it’s not always that simple so lets talk about some issues you might run into when it comes to tuning the violin.
Possible Tuning Problems When Learning to Tune the Violin
We talked about the musical alphabet consisting of the notes A through G. Well, in between each of those notes (well in between almost all of the notes) there’s a half way point. So in between each note there’s a sharp or a flat note. In between A and B there’s an A#, It’s a half step higher than an A. Now sharps and flats are really 2 sides of the same coin. So a B flat is the same note as an A#. It’s a half step lower than a B which is the same as an A sharp. You’re just thinking about it in different ways.
So in between G and A, there’s a G sharp or an A flat.
Occasionally, your string may be so flat, the tuner will actually show an A with a a little flat sign next to it. Or if the A were too high, it might even register as a B flat which is the same thing as an A sharp.
It’s important to pay attention to see if there is a flat or sharp symbol next to the note name because you could accidentally tune your A to an A flat. I’ve had some students occasionally show up to lessons with their violin perfectly tuned to an A flat. So as you’re tuning, make sure you’re not tuning to a sharp note or a flat note.
How to Tune the Violin Without Breaking A String
Every beginner’s nightmare is the possibility of breaking a string while tuning. We all accidentally breaks a string at some point, but I’m going to try to help you avoid that!
The easiest string to break on the violin is the E string since it is very thin. Because of its thin diameter, it’s easy to over tighten the string. At some point, the string will snap if you continue to tighten it too much. Anytime you are tuning the E string, especially if you are tuning using the peg, make very small adjustments and stop to check the pitch with the tuner very often.
We’ve all broken E strings so it’s a good idea to have some extras on hand. Here are my recommendations for the best violin strings!
To prevent breaking strings while tuning the violin on any of the other strings, always make small adjustments and avoid over tightening the string.
Why won’t my violin strings stay tight?
Sometimes you tune your violin and the strings continue to loosen. There are a couple of reasons why violin strings don’t stay tight.
New Strings: new strings take time to stretch out. It may take a few days of frequent tuning before the strings settle out and stay tight.
The pegs aren’t wedged in the peg hole. Remember when I said to apply a little pressure towards the peg box while tuning the violin using the pegs? This is to help wedge the peg into the whole to prevent the peg from slipping. Slipping pegs equal loose violin strings.
Low Humidity. Dry air will make the wooden pegs shrink and slip. Try to maintain the ideal humidity level in between 40-60% humidity to prevent your violins strings from loosening.
Low Quality Violins. If you are using a violin on the cheaper side, poor quality workmanship will contribute to pegs that continue to slip and strings that never stay tight.
(Get my top 10 Recommendations for Good Quality Beginner and Intermediate Violins)
How often does a violin need to be tuned?
Tune your violin every time before you start playing. Be very precise with tuning and don't settle for “almost” in tune.
Getting a violin perfectly in tune is very important since we don’t have frets, keys, or stickers. Muscle memory is how you learn to always place your fingers in the right place. If the violin strings are always slightly different in pitch every time you play, you will never develop the correct muscle memory to be able to play in tune.
Another reason to tune your violin every time before you start playing has to do with sympathetic vibrations of the strings. When you play one string, the other strings are sympathetically vibrating. So make sure those vibrations are in tune!
Why do some violins only have one fine tuner?
More expensive, higher quality violins often only have one fine tuner on the E string. Fine tuners can affect the sound or be the source of buzzes and unwanted noises. If you are comfortable tuning using the pegs, there’s no need for that potential effect on the sound.
The advent of steel strings also plays a part in the use of fine tuners. Before steel strings, when all strings were gut, fine tuners weren’t necessary. Gut is stretchier than steel. However, it’s very hard to make small adjustments with steel strings, especially on the E string. When steel strings were introduced in 1919, fine tuners became a necessity and continued to be used for E strings up until today.
Learn more about why some violin have only one fine tuner here.
Do Professional Violinists Use Fine Tuners?
If more expensive violins usually come with only one fine tuner, you may be wondering if professionals use fine tuners? Many professional violinists don’t use fine tuners (except on the E string). This has to do with aesthetics and sound as more fine tuners may negatively affect the tone production.
However, I’ve seen several famous violinists and fiddlers with more than one fine tuner on their violin. So there is no judgment or shame when it comes to using fine tuners!
Why is tuning a violin so hard?
Tuning a violin is definitely harder than tuning a guitar or a mandolin. Why is tuning a violin so hard? Guitars have geared pegs whereas most violins use traditional pegs. A traditional peg is just a wooden peg inside of a hole. That means humidity and weather can make tuning a violin harder as the wooden peg swells or shrinks. Wood that hasn’t been properly dried will also contribute to difficulties tuning the violin. Poor workmanship and cheap violins is yet another contributor that makes it hard to tune the violin.
The nature of wooden pegs also makes it hard to tune the violin because it’s difficult to make small adjustments. This is especially frustrating for violins with only one fine tuner.
You can skip a lot of the tuning frustrations by installing geared pegs onto your violin. Geared pegs look just like traditional pegs, but they are geared much like guitar pegs making tuning much easier. Geared pegs have many names and brands like Perfection Pegs or Planetary Pegs. You can get geared pegs installed at your local luthier or violin shop. I have geared pegs and I will never go back to traditional pegs!
Learning to Tune Your Violin is an Art Form!
Tuning is definitely a skill and an art form in an of itself so if. And there’s more to it than just using a little machine and a flashing green light. You should be working on making progress in your tuning abilities the same way you work on getting better intonation or a better tone. Using a tuner is a great way to learn to tune the violin for beginners, but there are better ways to tune and learning more advanced tuning techniques will actually strengthen your ear, help your understanding of tone and sound production, and improve your playing overall.
If you’re ready to learn how to tune the violin by ear or how to tune the violin using double stops, check out my Art of Tuning Course which is included when you sign up for the Meadowlark Violin Online Studio. Happy Tuning!